Welcome to the first yarn a long Sunday in June. This is actually the fifth yarn a Iong, the first four of which I hosted back in March. If you want to catch up on those you can find the relevant links just here.
So feel free to grab a coffee or something else to drink and I’ll kickof this weeks topic which is all about sharing your
CRAFT HACKS…
crochet hacks, knitting hacks, yarn hacks, or any other crafty hacks. If you are not to sure what a hack is then here is my definition:
A craft hack refers to any skill, short cut, or innovative trick that increases ease of creating, productivity and efficiency.
Now, I use a few, but I think the one I use most frequently is using hair pins as stitch markers.
I know stitch markers are beautiful and my heart flutters a little bit if the stitch marker actually coordinates to a projects theme…but here’s my rub with them…I can never find one when I need one.
Hair pins on the other hand are plentiful in my dresser. They may not look as glamorous as the beautiful stitch markers but they are much easier to attach and remove from projects too!
What is your best craft hack? Share your best ones in the comments thread below.
Yes, just for the month of June, Yarn – a – long Sunday is returning as requested.
The series back in March was fun for me and I know I had a fair bit of lovely feedback about how some of you enjoyed joining in to. So I will be kicking things of on Sunday 03rd June and I’m hoping you will make a cuppa and join in and have some fun. I am also going to run the series over on Instagram too so you can join in there if you prefer. You can find me @yarnyrobin.
If you have absolutely no idea what I am talking about then you can check out March’s yarn – a – long posts just here,here,here and here!
After my last update about my knitty adventure, I continued for all of 2 more stitches before I noticed another dropped stitch and had to rip it all back again! I don’t have any photo evidence of this as I could not face taking the photo.
Now, I felt like stuffing the yarn into the bottom of a bag and just forgetting about the whole sorry thing, but deep down I knew I could do this if I just kept trying and waited for it to click. There is a point where things just click into place and whatever it is you are doing feels more natural.
Well, I recast and re knit the first three rows and then half way through the fourth row I realised that I was knitting quite quickly, my knitting action felt more fluid and I realised that the muscles in my face were actually relaxed and not contorted…and I was enjoying this knitting experience…finally!
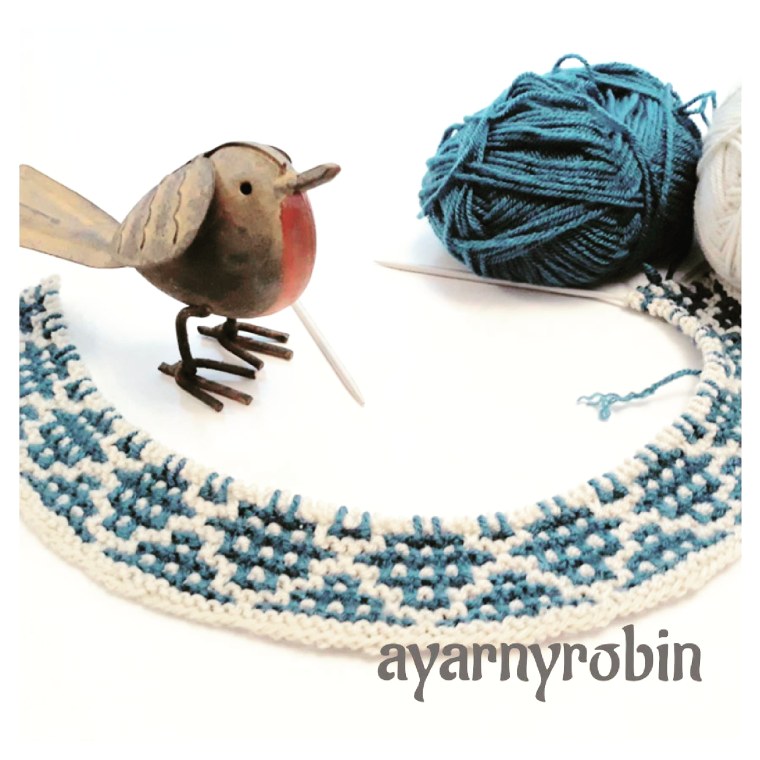
And so I continued until I got to row 19 and realised I had knit a stitch instead of slipped it!
The four cream knit stitches in the middle of this photo should have been x3 knit stitches and a slipped stitch (or x3 cream stitches and x1 teal)
Now, I only know how to rip back and start again, but I just couldn’t bring myself to do that, but I also couldn’t work out how to unknit the stitch either. So I headed over to Mom’s who rescued the day and who also taught me how to unknit the stitch and fix the problem.
I am now on row 20 and am dancing the happy knitty dance!
The pattern is this rather magnificent blanket... by Purl Soho inspired by Barbara Walker.
This knitting adventure is finally becoming enjoyable!
You may well have thought ‘Well that didn’t last long!’ and for a wee while there I thought I may never knit again to. I have not knit since the last time we spoke of knitting just here. There are many reasons why but they could just be summed up in one word…’life!’ Yes, life has been busy and if I’m honest very, very sad at the nest, due to a very sudden and very untimely bereavement and so as such I have been unable to comprehend summoning up the fair amount of concentration knitting demands from me.
I have taken solace in my hook and hooked rows of simple half double crochet on my long forgotten Charming Harbour Blanket instead.
So, after a good while without knitting I spent an evening browsing patterns and decided I still may never knit again because they seemed so flipping difficult to read and to interpret. That was until I saw this rather magnificent blanket... by Purl Soho inspired by Barbara Walker. Advanced beginner it said…and I said ‘well then I can do this!’
I borrowed my Mom’s circular needles and tried to cast on. There lay my first problem, I had forgotten how to cast on and I thought yet again I may never learn to knit! That would have been an awful shame because my lovely brother had in the passing weeks gifted me these beautiful needles.
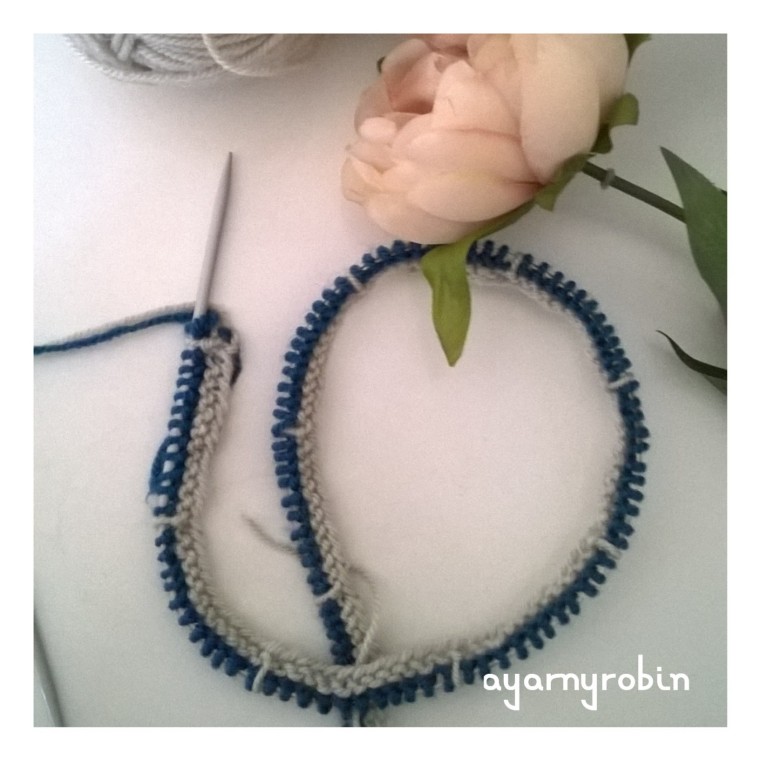
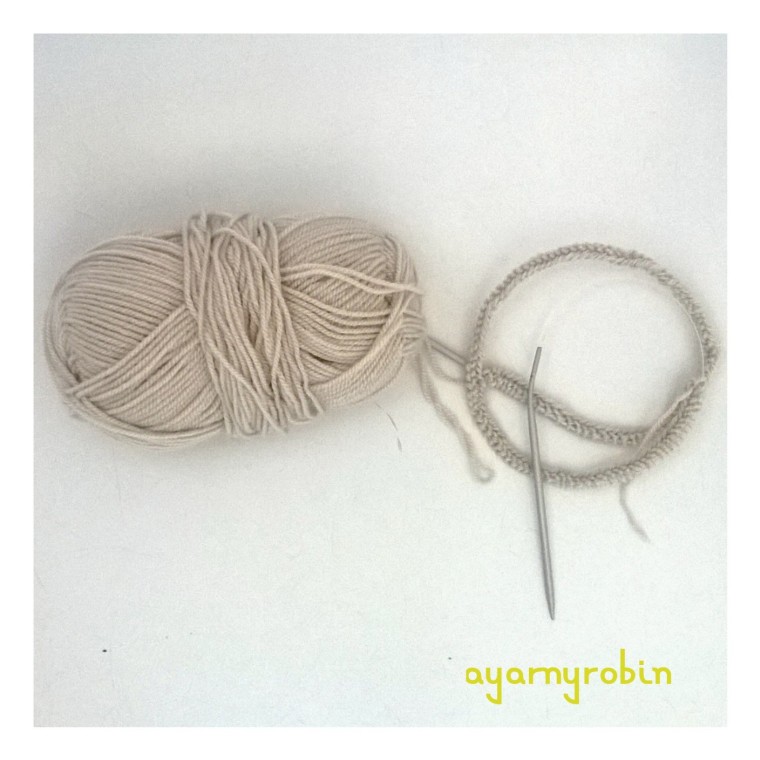
With a little perseverance and some minor cursing I remembered how to cast on and look…
I had managed 123 little stitches followed by one row of knit stitches. What this picture doesn’t tell you is that this took two attempts as I lost a stitch somehow on my first try.
So, you see my knitting adventure continues precariously but it does continue!
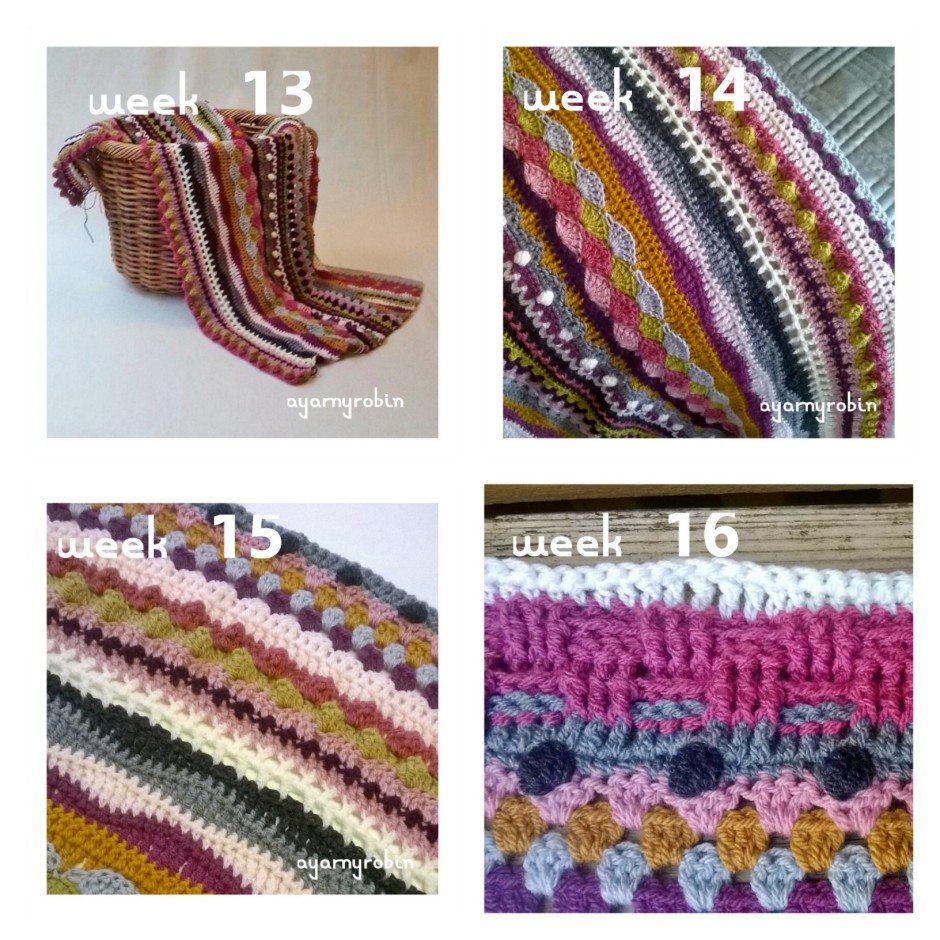
I can’t believe that this blanket has been on my hook and in my life for four months. It is getting large enough now for me to throw it over my lap in the evenings and I thought you might like another photo update on my progress.
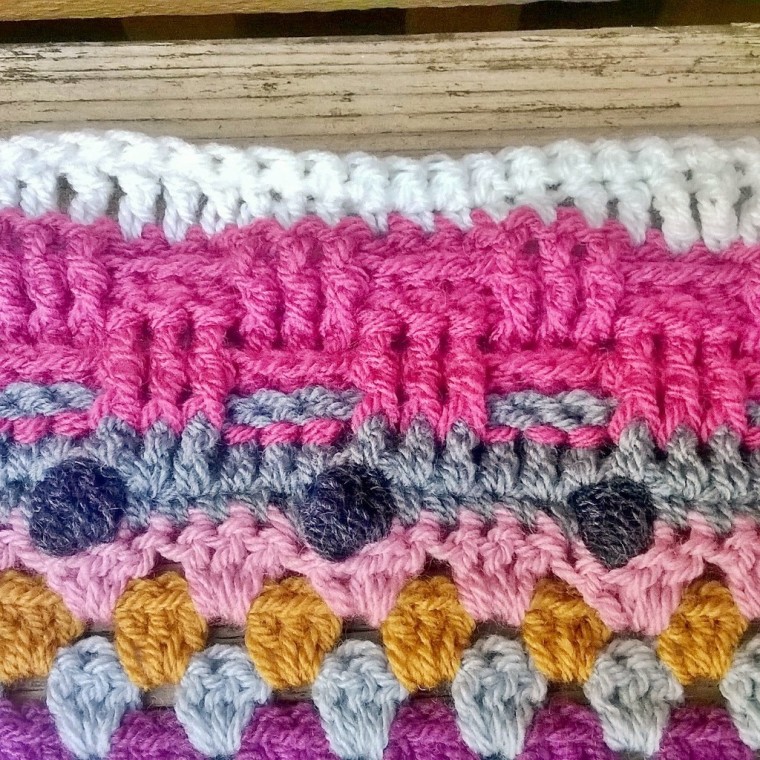
well it was basket weave and if you are a long time reader you may remember my last foray with basket weave…It looks great but I do not like hooking this stitch you can read why just here.
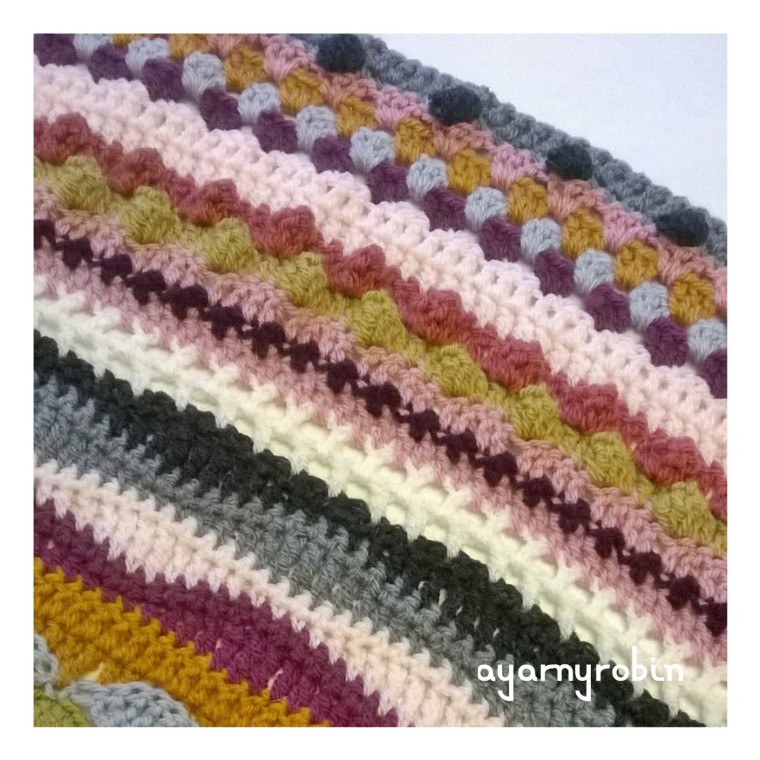
So it came as a very welcome relief to find out that the next stitches were the relaxing long wave stitches after the stressful basket weave!
If you want to find out more about this delightful slow CAL (crochet a long) which is being hosted by the lovely Eleanora hop over to her beautiful blog… Coastal Crochet. You can also find lots of other amazing blankets and makers participating in this CAL across social media by searching #seasidestashbustingblanket.
I‘m off to do another couple of rows now. I will be back soon to show you what else has been on my hook of late and I will also write an update about my yarny knitting adventure.
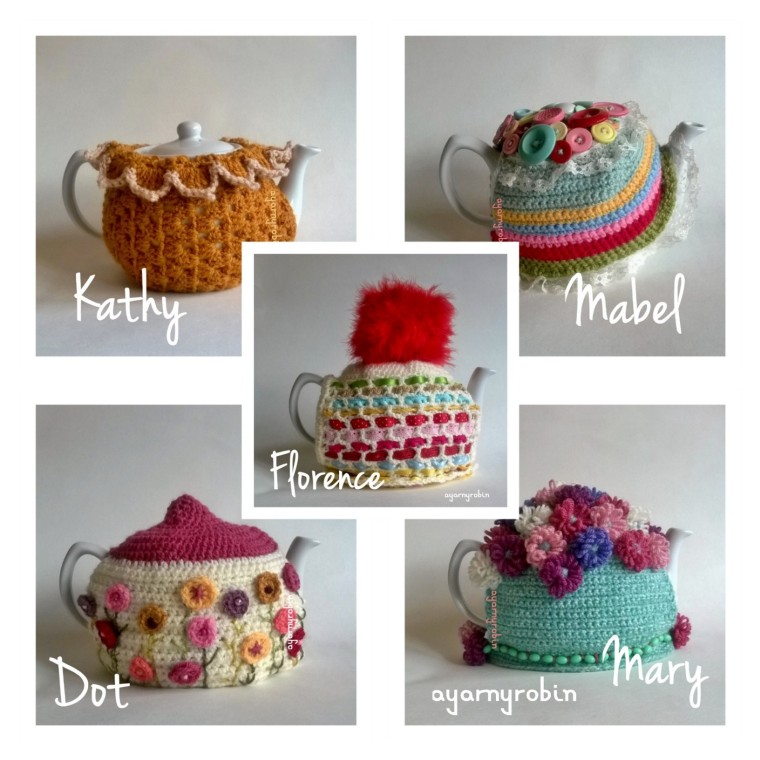
The ‘Florence cosy’ will add a large dose of fun to your teapot with a fluffy oversized pompom and woven ribbons.
and the ‘Kathy cosy’ offers understated off the shoulder glamour in traditional granny stitch style.
Each patterns is free and comes with a photo tutorial. They are easy to hook and make great weekend projects; which makes them the perfect gift for tea lovers.
Which one is your favourite?
I hope you will have fun hooking these great tea cosies.
Well the rain and the snow finally stopped for a little while and the sunshine made a cameo appearance last week.
It seems more rain and freezing temperatures are on there way again! But, the sunshine certainly influenced my hooking last week and I took my hook alfresco whenever I could. I have also enjoyed getting back outdoors and walking the dogs now my foot has finally healed.
Of course there were pit stops along the way!
I have also been keeping up to date with the seaside stashbusting CAL…this photo was taken at the trampoline park.
Not much has occurred on the knitting front, in fact it would be fairer to say nothing has happened. I am enjoying my hooking far too much to be slowed down by needles and I have a couple of commissions that I really must finish. One of which I can now show you…
Aren’t they just the sweetest?
I loved making these little baby shorts.
The pattern is by Mon Petit Violon Designs and I will definitely be hooking some more. I used Rico baby cotton soft yarn in a dk weight and a denim blue and finished them off with some little wooden buttons. Rico was a lovely yarn to hook with and has given a beautiful stitch definition to the garment. Of course it is soft enough for babies skin also and machine washable.
Finally, I just wanted to say a BIG thank you to everyone who has given me such encouraging feedback across my social media about the Sunshine Jelly Baby Blanket…
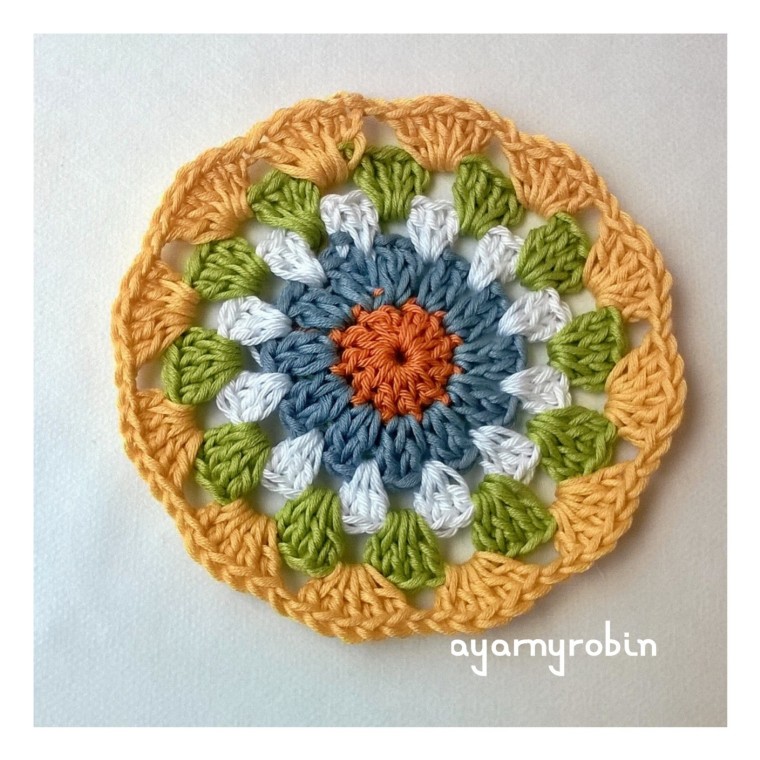
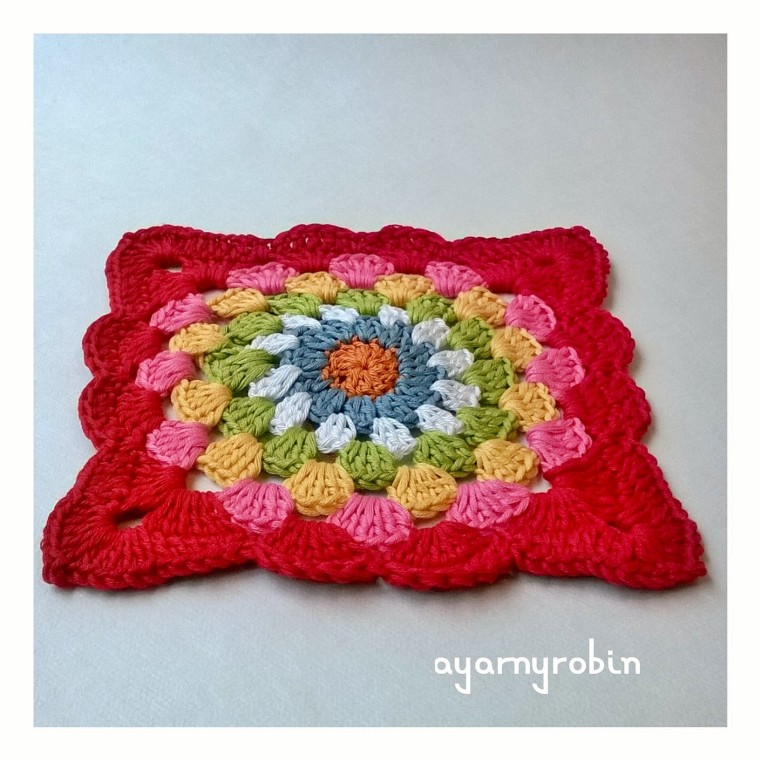
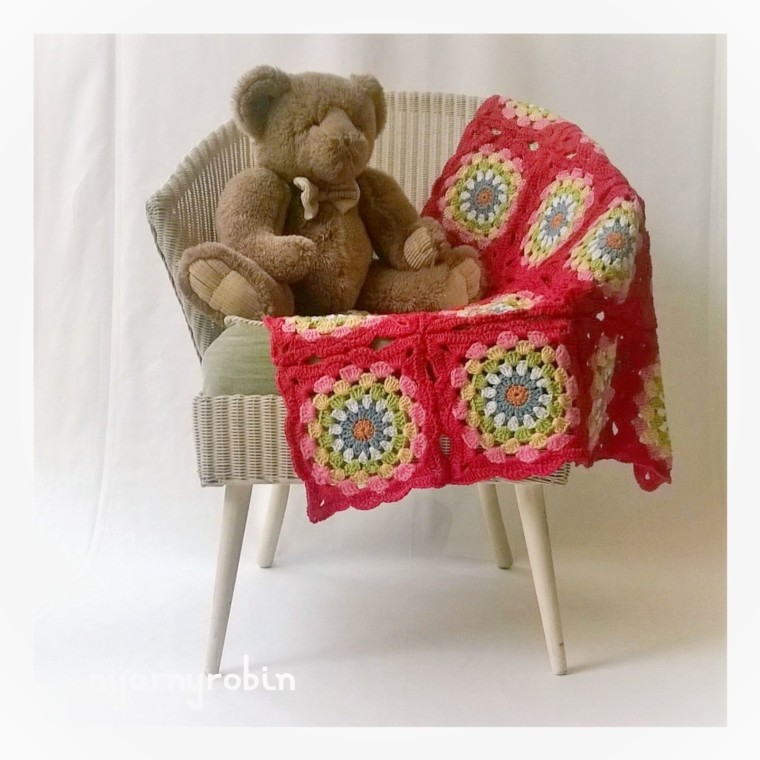
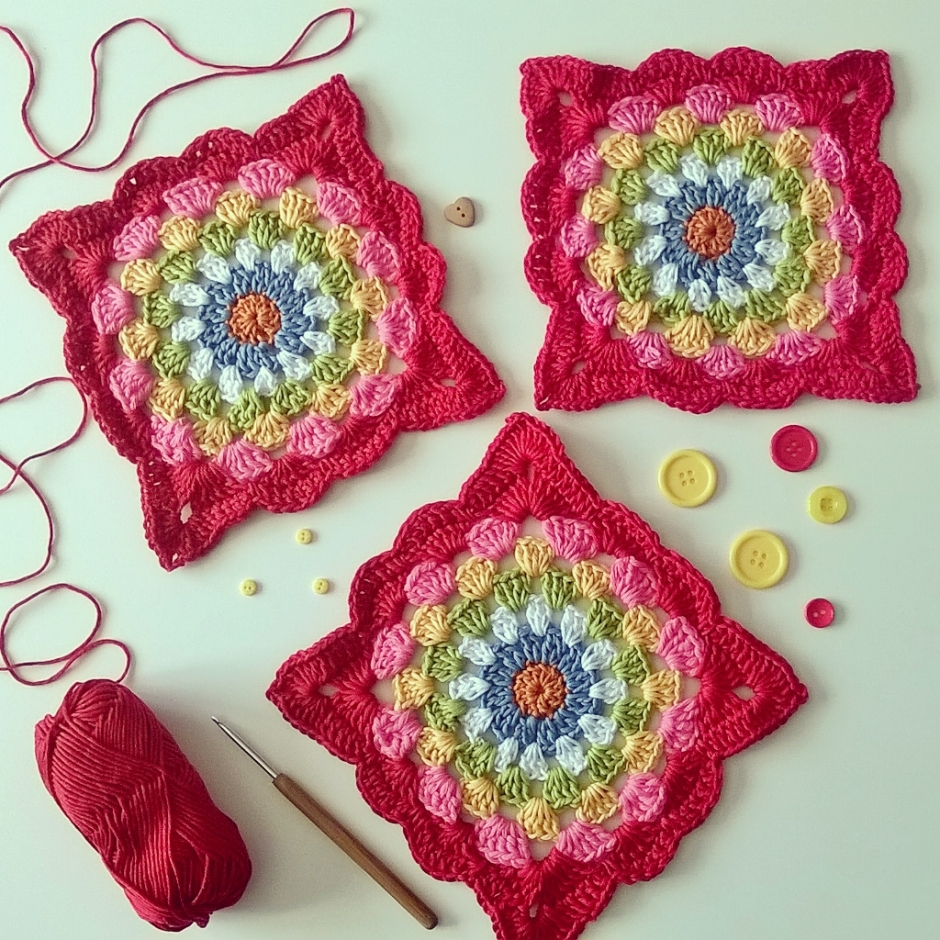
I am so thrilled to be able to introduce the Sunshine Jelly Baby blanket to you.
This delightful crochet blanket is vibrant and fun to hook and the pattern is available, complete with a photo tutorial just below. Made from Drops Muskat cotton, it measures 74cms x 74cms or 29″ x 29″…the perfect pram blanket size, of course you can make the blanket bigger by adding more squares if you wish. You can also check out my latest free baby blanket pattern…The Angelece Baby Blanket by clicking this link. This delicious blanket is made using the Robins Nest square which I designed a few years ago and if you are a regular here you will know that I have recently updated this pattern. When I firstdesigned this square I always intended to make a baby blanket…I guess somethings just take a while to come to pass.
As always I’m using English crochet terminology. Ch – chain Slst – slip stitch dc – double crochet tr – treble crochet
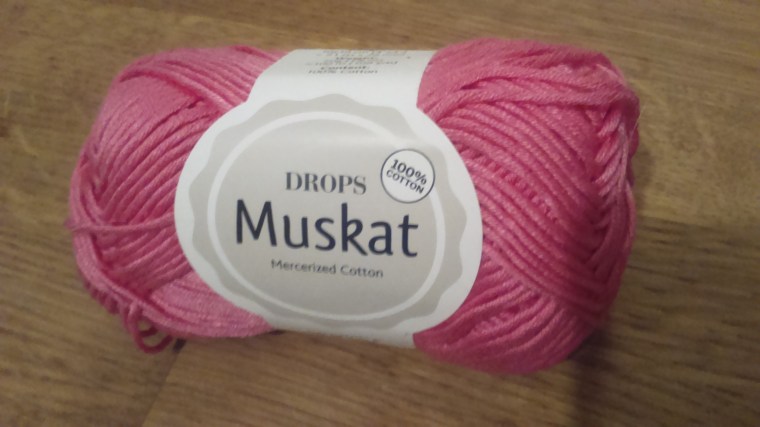
ch3 – counts as a treble unless otherwise stated. I’m using drops muskat cotton.
and I’m using the colours and quantities listed below red – 100g old pink – 80g white – 50g vanilla yellow – 65g dark orange -20g
sky blue – 35g
apple green – 50g
and a 4mm crochet hook and a 3.5mm crochet hook
Each lovely yarny square measures 7″ x 7″ or 18cm x 18cm once blocked.
You will need to make 16 squares to make this blanket arranged
4 x 4…
of course you can make more squares if you wish to make a larger version.
So here goes…
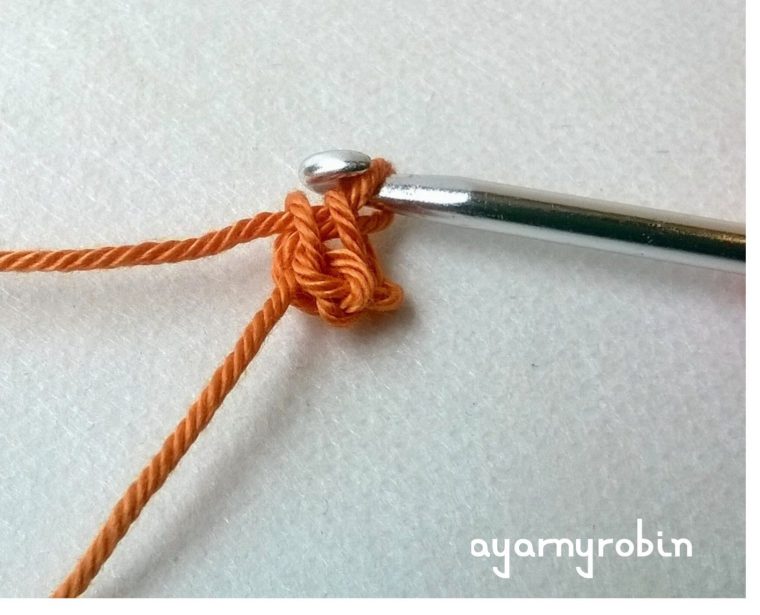
with a 4mmhook ch2, join with ss to form a tiny ring (you could make a magic circle instead if you prefer)
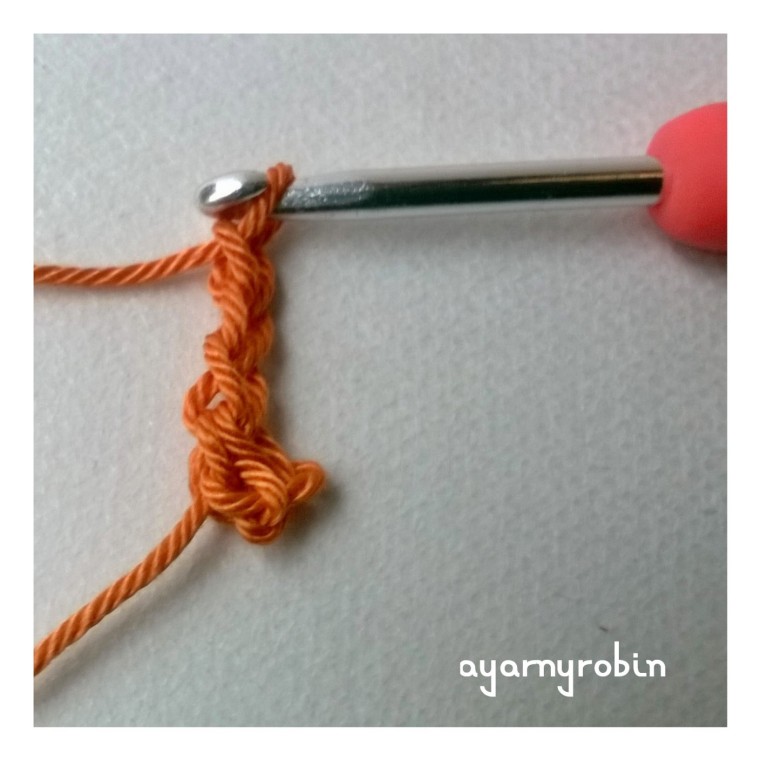
Row 1: ch3,
11tr into ring,
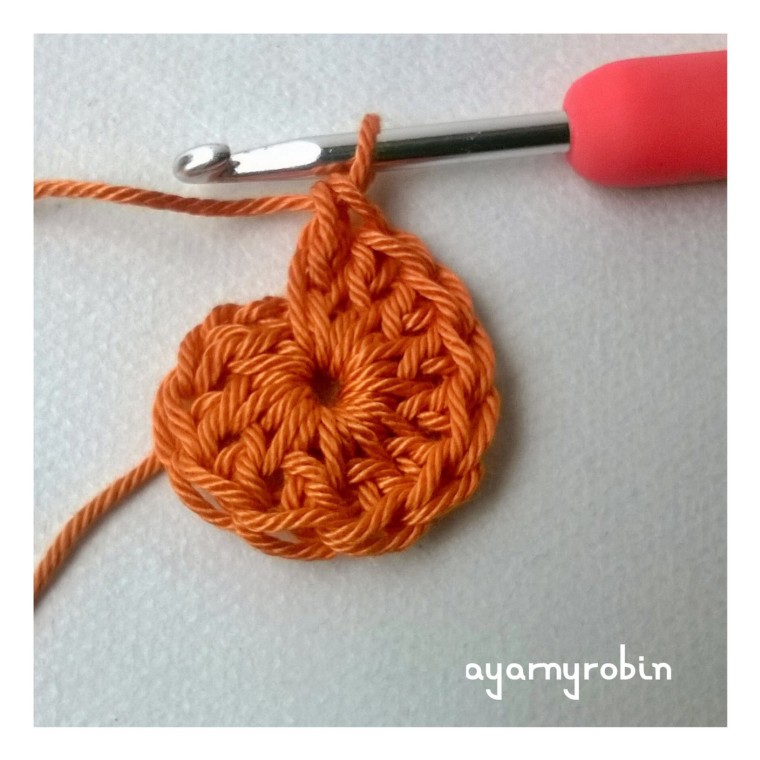
join blue yarn and slst into 3rd ch
(12tr in total).
Row 2: ch3,
1tr in same space, ch1
2tr in next st, ch1
*2tr in next st, ch1*, repeat * * x10 times,
join white yarn and slst into 3rd ch
(12 clusters of 2tr and 12 ch spaces).
Row 3: ch3,
*3tr in next ch space*,
repeat * * x10 times, 2 tr in next ch space,
join with slst in top of ch3 and fasten off.
(12 clusters of 3tr).
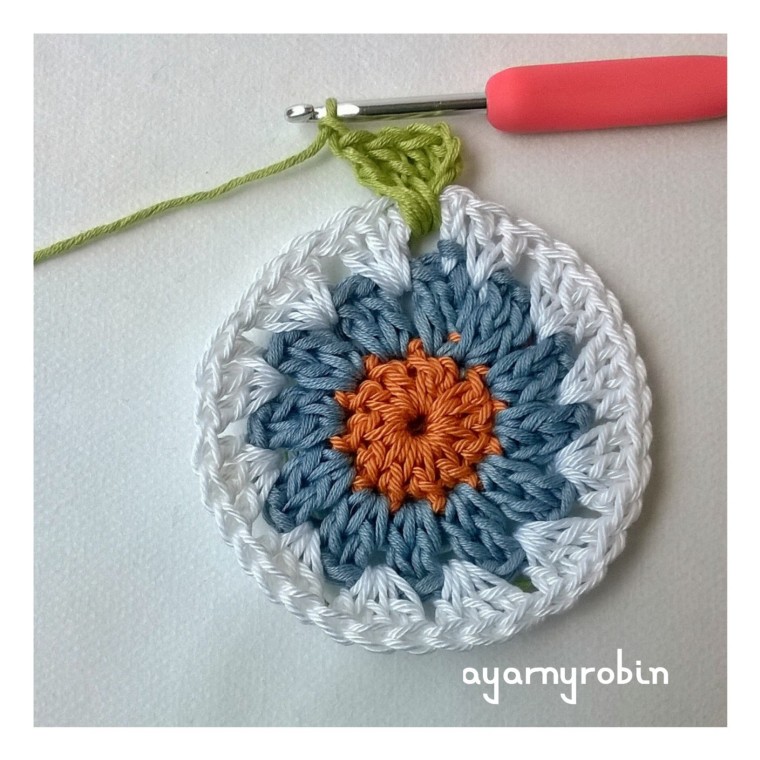
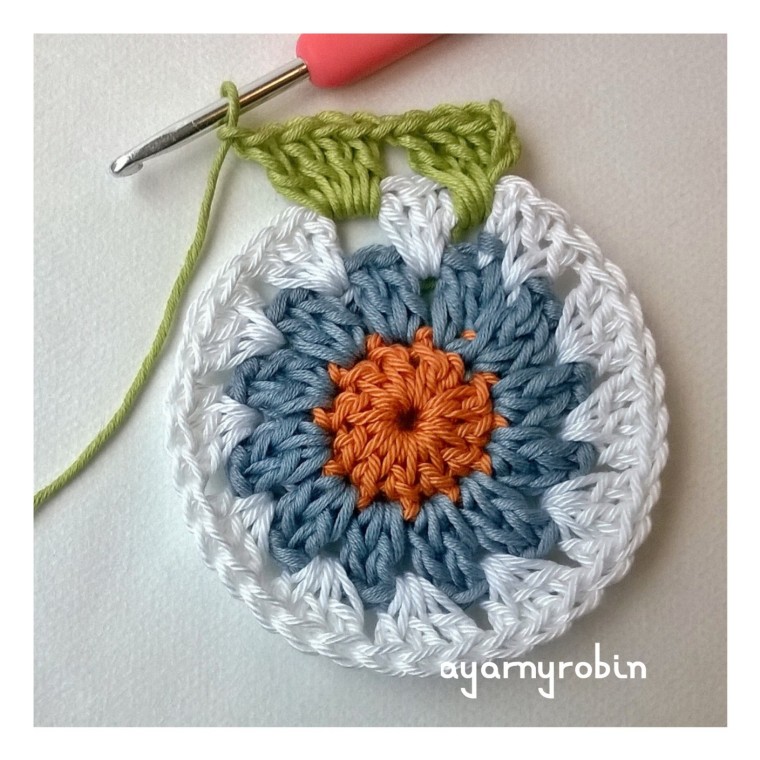
Row 4: join green yarn in between any cluster of 3tr of previous round and ch3,
3tr in same sp, ch1
*4tr in between next cluster of 3tr, ch1*,
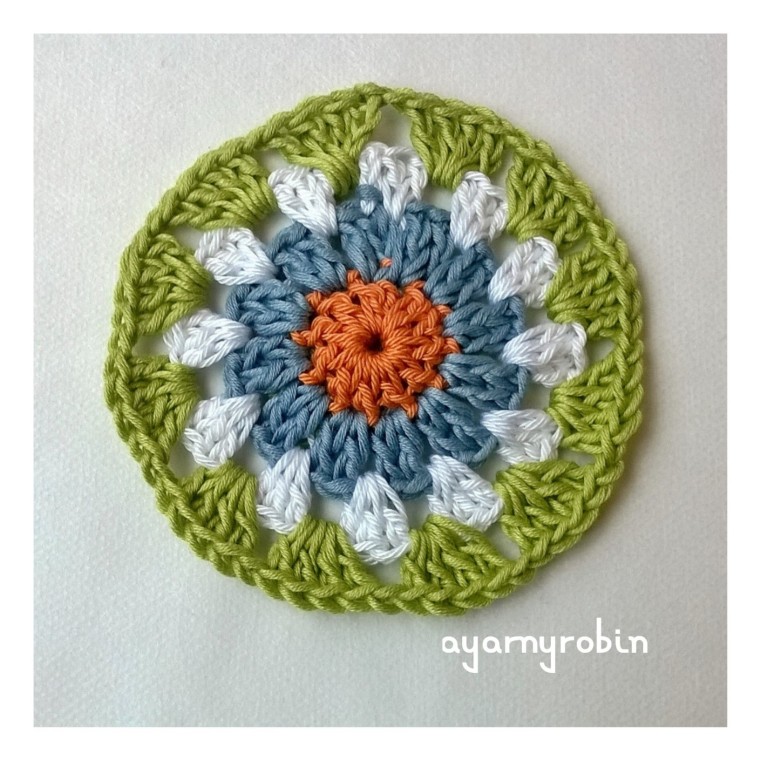
repeat * * x10 times, join with slst in ch3 and fasten off. (12 clusters of 4tr and 12 ch spaces)
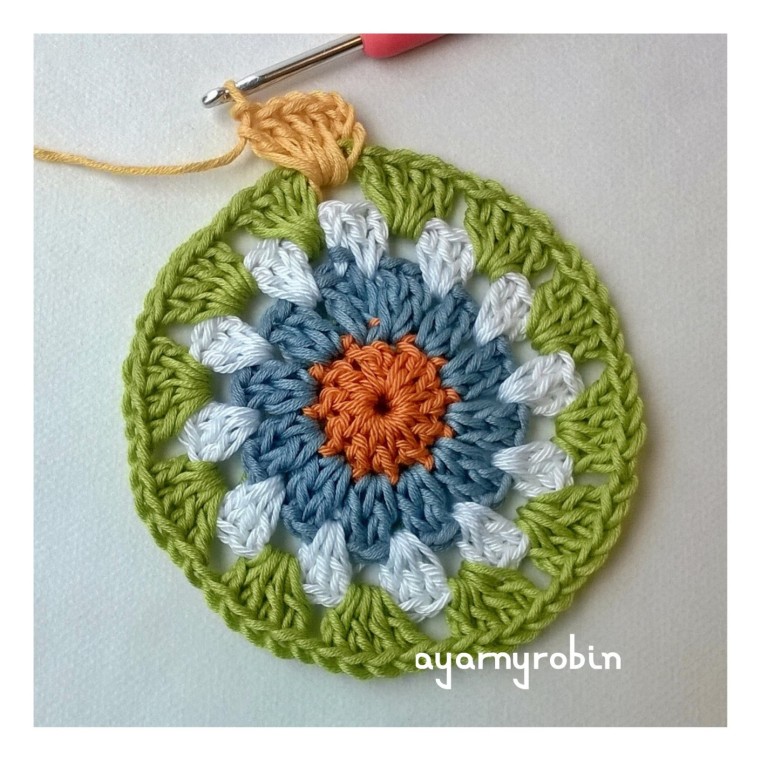
Row 5: join yellow yarn in any ch space and ch3, 4tr in same sp, ch1
*5tr in next ch space, ch1*, repeat * * x10 times, join with slst in ch3 and fasten off. (12 clusters of 5tr and 12 ch spaces)
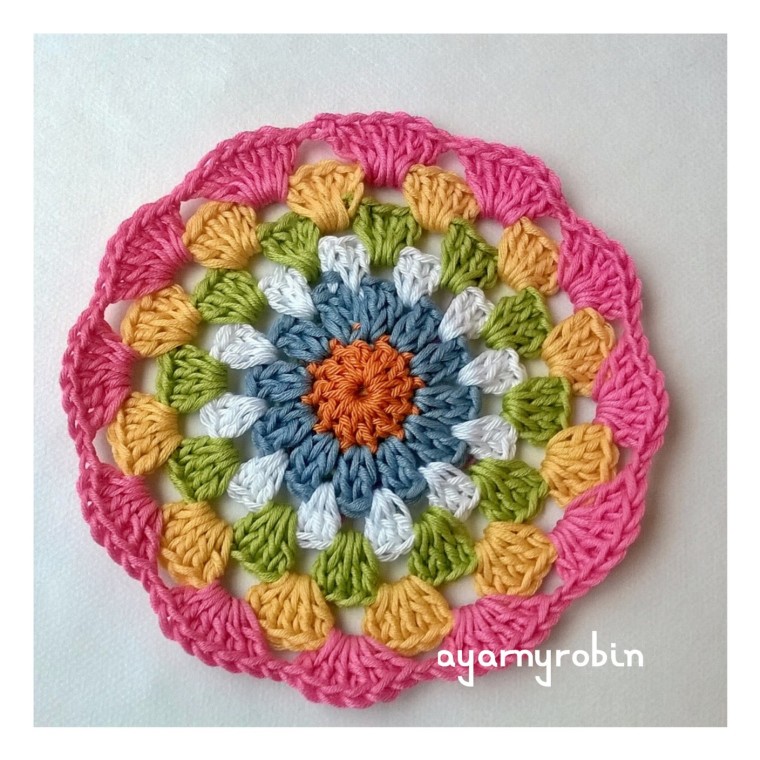
Row 6: join pink yarn to any ch space and ch3, 5tr in same sp, ch1, *6tr in next ch space, ch1*, repeat * * x10 times, join with ss in ch3 and fasten off. (12 clusters of 6tr and 12 ch spaces)
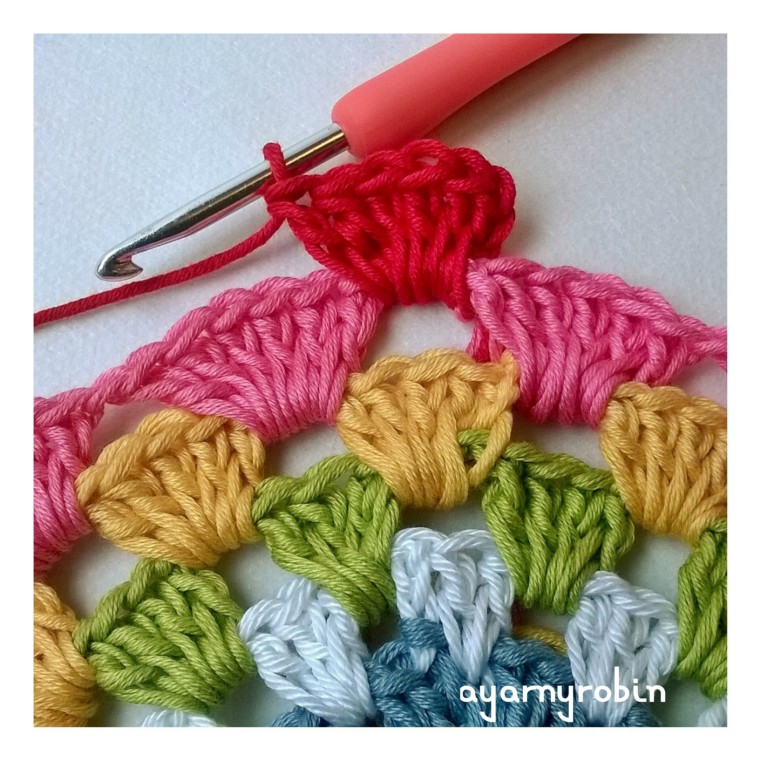
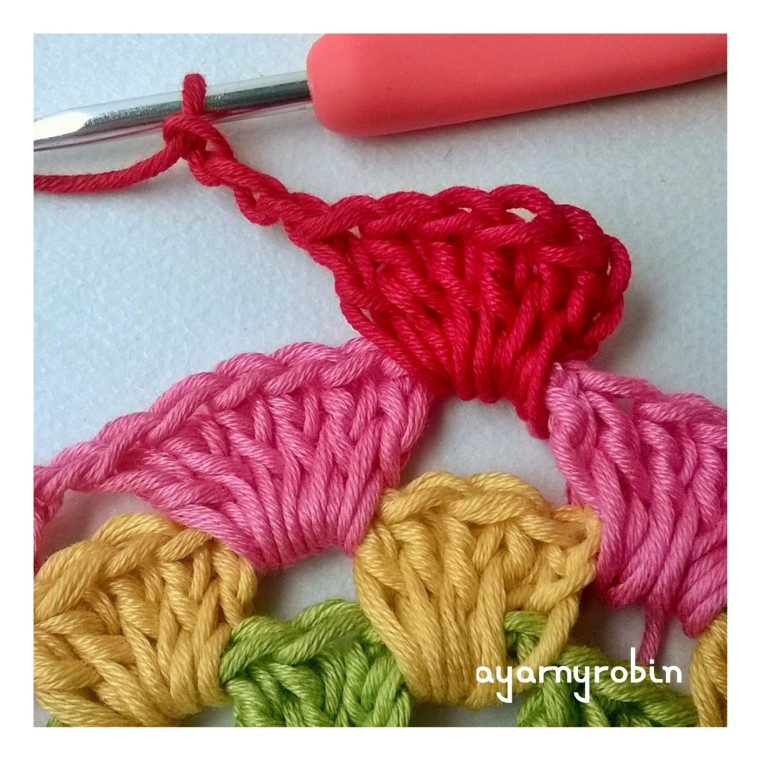
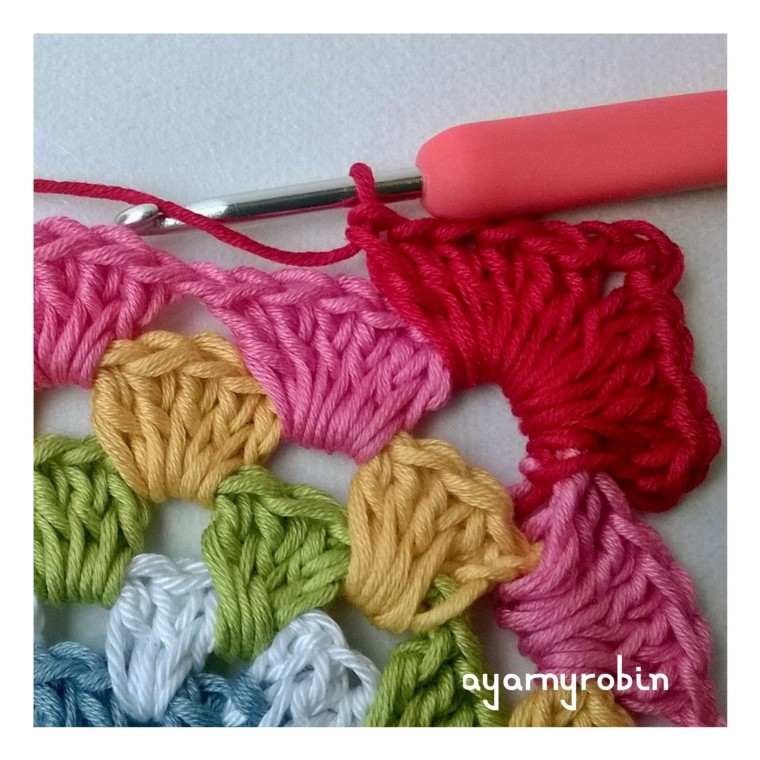
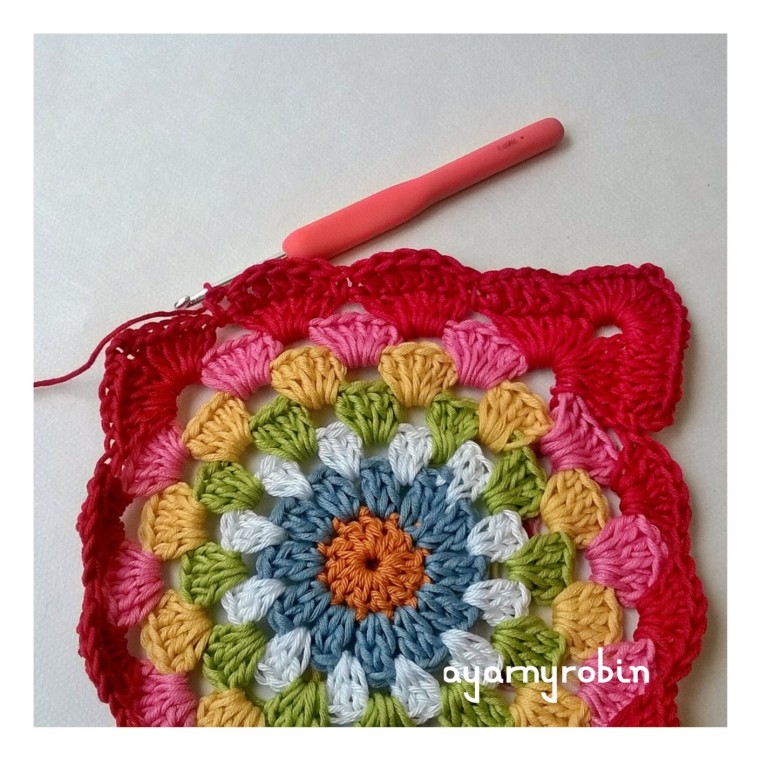
Row 7: join red yarn in any ch space, ch3, 5tr in same space,
ch3,
6tr in same space (corner made),
*6tr in next ch space, 6tr in next ch space,
6tr in next space, ch3, 6tr in same space* (2nd corner made) repeat * * x2 times
6tr in next space, 6tr in next space, join with slst in beginning ch3. Do not fasten off.
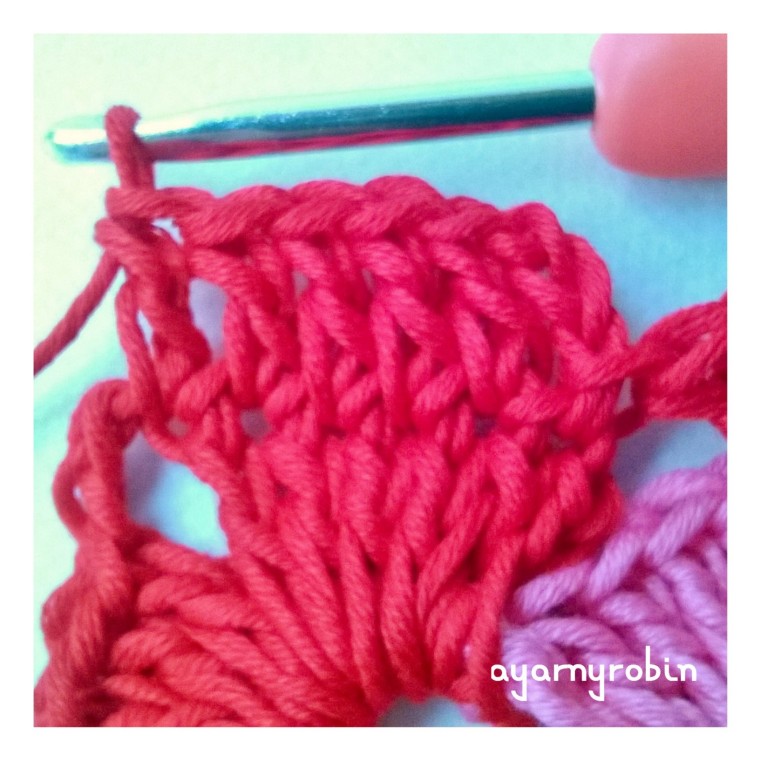
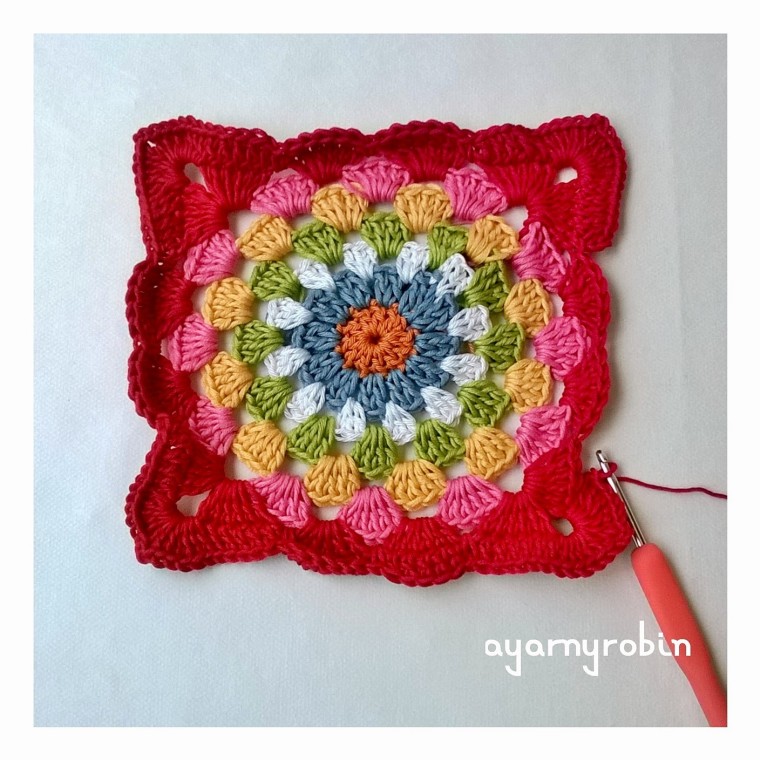
Row 8: ch3,
1tr in next 5sts,
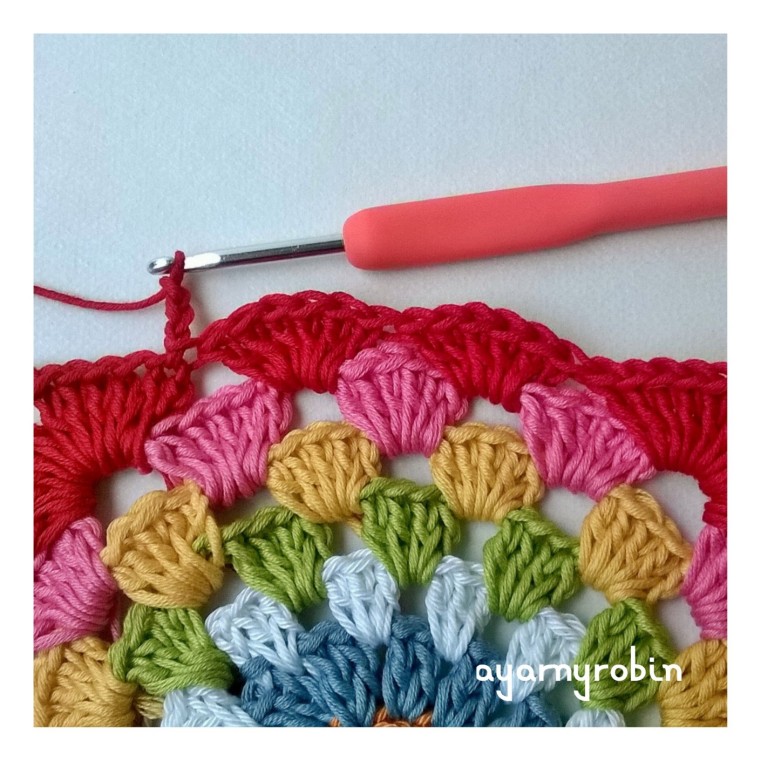
*6tr in ch3 sp, ch2, 6tr in same space (corner made),
*1tr in next 5sts,
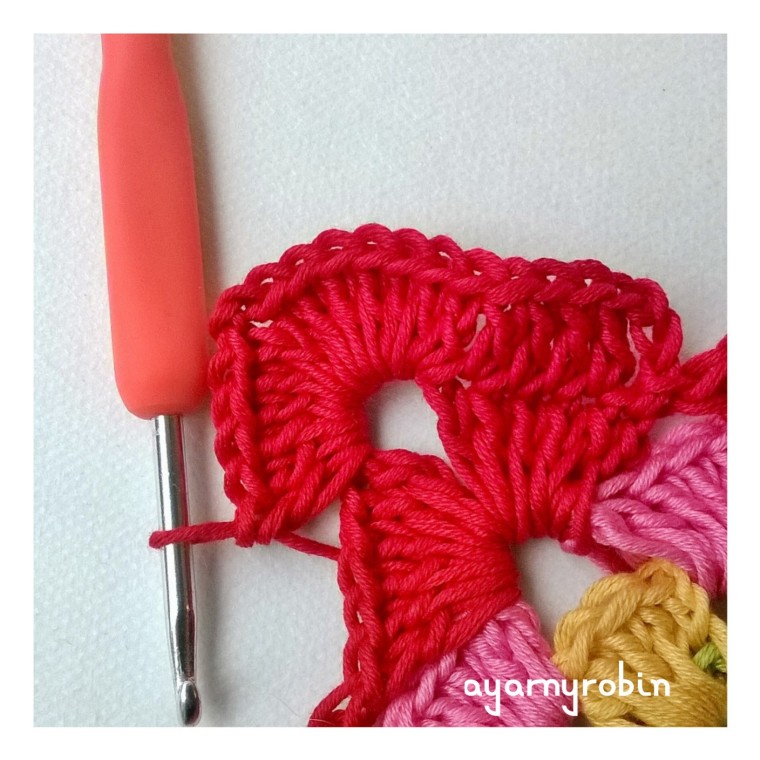
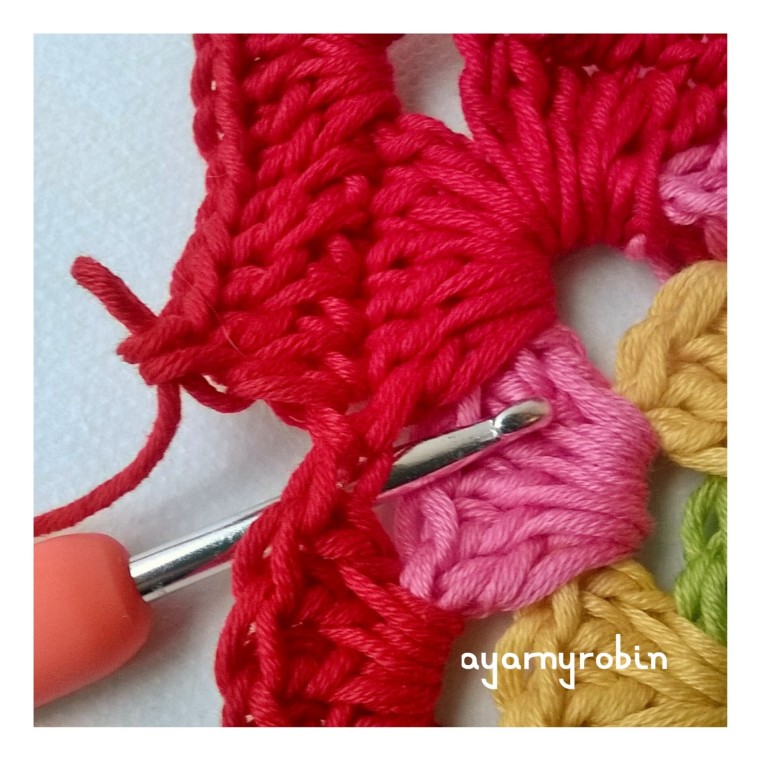
dc UNDER next stitch (indicated by the hook)
1tr in next 5sts, dc under next stitch, 1tr in next 5sts, dc under next stitch
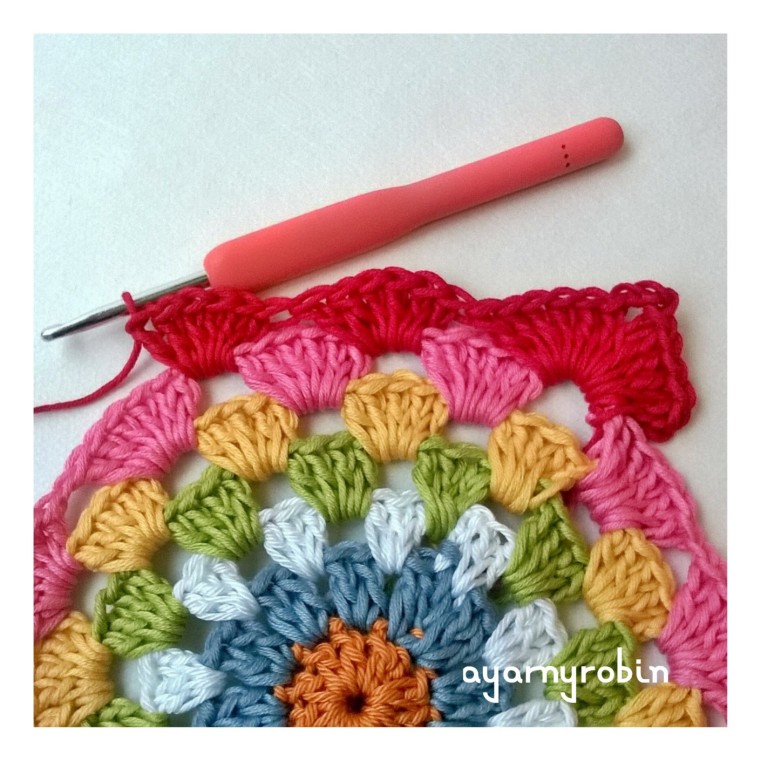
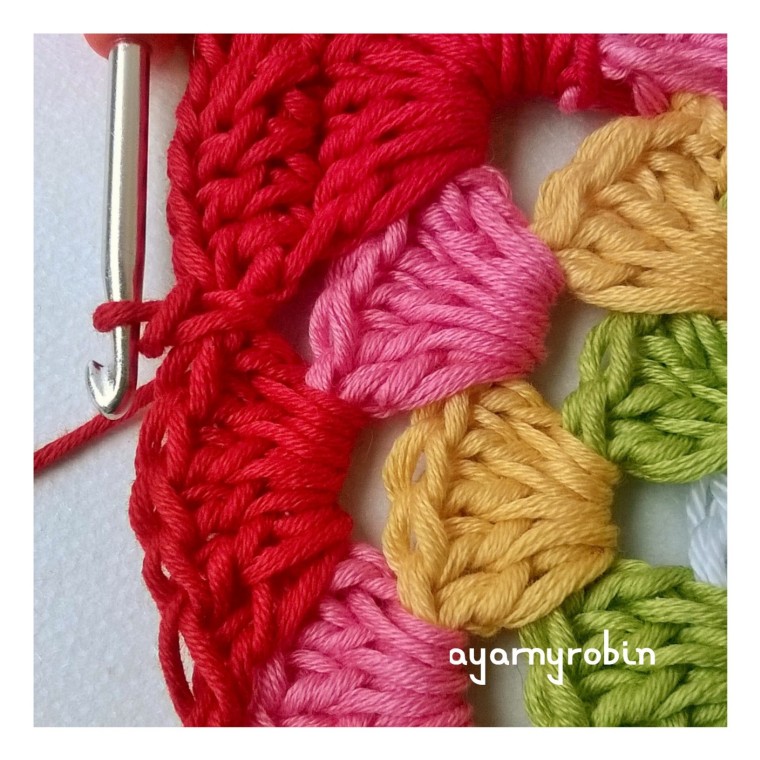
1tr in next 6sts, 6tr in ch sp, ch 2, 6tr in same space*
repeat * * x2times
1tr in next 5sts, dc under next stitch, 1tr in next 5 sts, dc under next stitch, 1tr in next 5 sts, dc under next stitch, slst to beginning 3rd ch to finish. Weave in ends.
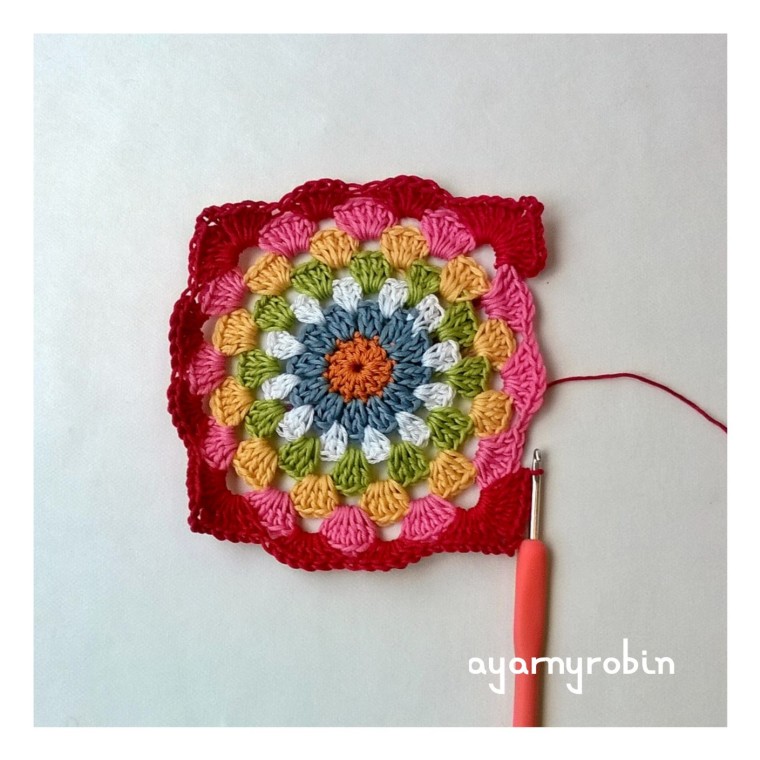
Blocking:
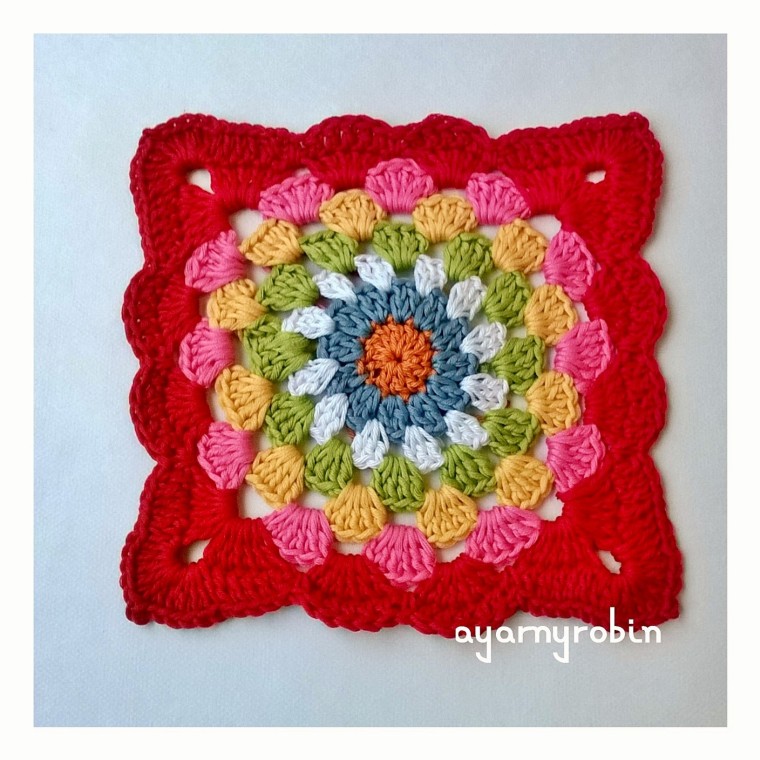
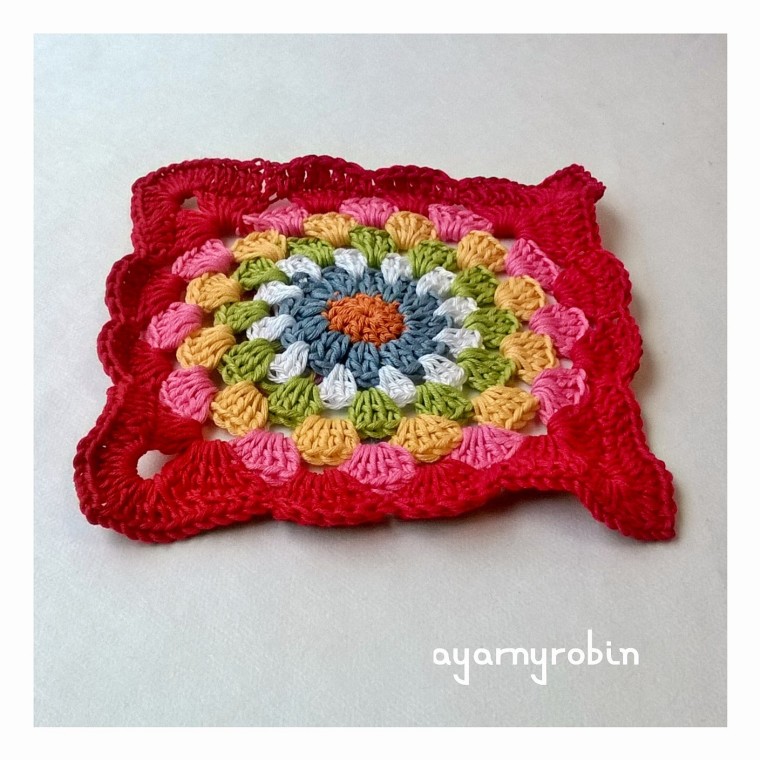
A word on blocking: Before blocking…
Your square will be wibbly. After blocking…
Your square will lie flat and will look much better. Blocking is really worth the extra effort and isn’t difficult or expensive to do. I just pinned this square to my ironing board so that it measured 7″ by 7″ and hovered my iron just above the square and blasted it with steam. Allow to cool before unpinning and store carefully. Alternatively, you could pin the square to the required measurements to a towel or a pin board, spritz with water and allow to dry.
Joining:
I have used a simple and easy slip stitch to join these squares. I have chosen this join for two reasons. The first reason is that it is secure and does not add anything to the squares, allowing them to showcase themselves.
The second reason is it uses the least amount of yarn and also creates less ends to weave in.
So to join the squares start by placing 2 squares with the right side to the right side…ie/ the wrong side of each square will be facing outwards.
Note that this join requires you to place slip stitches in the top of the stitches along the edge of the square and you should go under both loops of each stitch.
Some stitches will require you to slip stitch in both stitches of each square, these stitches should be the corresponding stitches for each square. Some stitches will require you to slip stitch in the top square only. This is because the squares are only joined to each other at each corner and in the middle of each scallop.
Join yarn in 2nd ch of any corner space and with a 3.5mm hook slst,
in both squares slst in the next 6sts,
in top square only slst in next 6 sts (tr), slst in next st (dc), slst in next st (1st tr of scallop),
*in both squares slst in next 3 sts (2nd, 3rd &4th st of scallop),
in top square only slst in next 3sts (tr,dc,tr)*
repeat * – *
in top square only slst in next 5sts,
in both squares slst in next 6 sts, miss chst, slst into 2nd ch of corner space.
Repeat this process for each side of the square which requires joining. You will not need to cut your yarn at the end of each side joined as you can continue round by adding another square. I started joining in the middle of the blanket. You will have to join in a new corner space for some of the joins, but the process remains the same.
I would love to see your makes and you can share on social media by using the following hashtags
#ayarnyrobin #yarnyrobin @yarnyrobin
This pattern to include the photos are the property of Nicola Florence @ayarnyrobin. You can’t modify, resell or share this pattern. You can sell finished items made from it, but please mention that the item is made using AYARNYROBIN pattern.
I have not knitted every day this week; I have done a wee bit though. Most of my yarn time has been given over to a beautiful crochet baby blanket and to getting the pattern and tutorial ready to go out in a couple of days, which actually has been quite time consuming…
It’s a good job I love to do nothing better!
But back to knitting…this is what I have completed.
I have completed 35 rows of stocking stitch.
Told you it wasn’t much…but this is what I have learned. Purl stitch is spelt P.U.R.L… not as I had spelt it in my last post!
I think I can count the rows better if I look at the purl side. I also have been keeping track of which row I am leaving my stitches at by emailing myself…you may laugh but it works for me!
I have also had another little lesson with Mom, no wine involved this time; in which we discussed and she demonstrated increasing and decreasing and I got a little frustrated…!
Mom also gave me an old pattern just to look through and get familiar with the terms and just actually reading a knitting pattern…which got me thinking that making these squares is a bit dull.
Before I knew where I was, it was way past midnight and I had picked out a few easy knit mitts and beanies over on ravelry…this is my favourite just here
Now do you think I should really start something just yet?
I have updated this lovely pattern and have re shot the tutorial photos, so they are clearer. I have also updated this pattern on ravelry too so you can save for later if you want to.
Hope you enjoy!
As always I’m using English crochet terminology. Ch – chain Slst – slip stitch dc – double crochet tr – treble crochet
ch3 – counts as a treble unless otherwise stated. I’m using drops muskat cotton
and I’m using the colours listed below, you will see you only need a very small quantity of yarn. red – 16g old pink – 5g white – 3g vanilla yellow – 4g dark orange -1g
sky blue – 2g apple green – 3g and a 4mm crochet hook.
This lovely yarny square measures 7″ x 7″ or 18cm x 18cm once blocked.
So here goes… ch2, join with ss to form a tiny ring (you could make a magic circle instead if you prefer)
Row 1: ch3,
11tr into ring,
join blue yarn and slst into 3rd ch (12tr in total).
Row 2: ch3,
1tr in same space, ch1
2tr in next st, ch1
*2tr in next st, ch1*, repeat * * x10 times, join white yarn and slst into 3rd ch (12 clusters of 2tr and 12 ch spaces).
Row 3: ch3,
*3tr in next ch space*,
repeat * * x10 times, 2 tr in next ch space,
join with slst in top of ch3 and fasten off. (12 clusters of 3tr). Row 4: join green yarn in between any cluster of 3tr of previous round and ch3, 3tr in same sp, ch1
*4tr in between next cluster of 3tr, ch1*,
repeat * * x10 times, join with slst in ch3 and fasten off. (12 clusters of 4tr and 12 ch spaces)
Row 5: join yellow yarn in any ch space and ch3, 4tr in same sp, ch1
*5tr in next ch space, ch1*, repeat * * x10 times, join with slst in ch3 and fasten off. (12 clusters of 5tr and 12 ch spaces)
Row 6: join pink yarn to any ch space and ch3, 5tr in same sp, ch1, *6tr in next ch space, ch1*, repeat * * x10 times, join with ss in ch3 and fasten off. (12 clusters of 6tr and 12 ch spaces)
Row 7: join red yarn in any ch space, ch3, 5tr in same space,
ch3,
6tr in same space (corner made),
*6tr in next ch space, 6tr in next ch space,
6tr in next space, ch3, 6tr in same space* (2nd corner made) repeat * * x2 times
6tr in next space, 6tr in next space, join with slst in beginning ch3. Do not fasten off.
Row 8: ch3,
1tr in next 5sts,
*6tr in ch3 sp, ch2, 6tr in same space (corner made),
*1tr in next 5sts,
dc UNDER next stitch (indicated by the hook)
1tr in next 5sts, dc under next stitch, 1tr in next 5sts, dc under next stitch
1tr in next 6sts, 6tr in ch sp, ch 2, 6tr in same space*
repeat * * x2times
1tr in next 5sts, dc under next stitch, 1tr in next 5 sts, dc under next stitch, 1tr in next 5 sts, dc under next stitch, slst to beginning 3rd ch to finish. Weave in ends.
A word on blocking: Before blocking…
Your square will be wibbly. After blocking…
Your square will lie flat and will look much better. Blocking is really worth the extra effort and isn’t difficult or expensive to do. I just pinned this square to my ironing board so that it measured 7″ by 7″ and hovered my iron just above the square and blasted it with steam. Allow to cool before unpinning and store carefully. Alternatively, you could pin square to the required measurements, to a towel or a pin board, spritz with water and allow to dry. A very versatile yarny square.


 Welcome to the first yarn a long Sunday in June. This is actually the fifth yarn a Iong, the first four of which I hosted back in March. If you want to catch up on those you can find the relevant links just here.


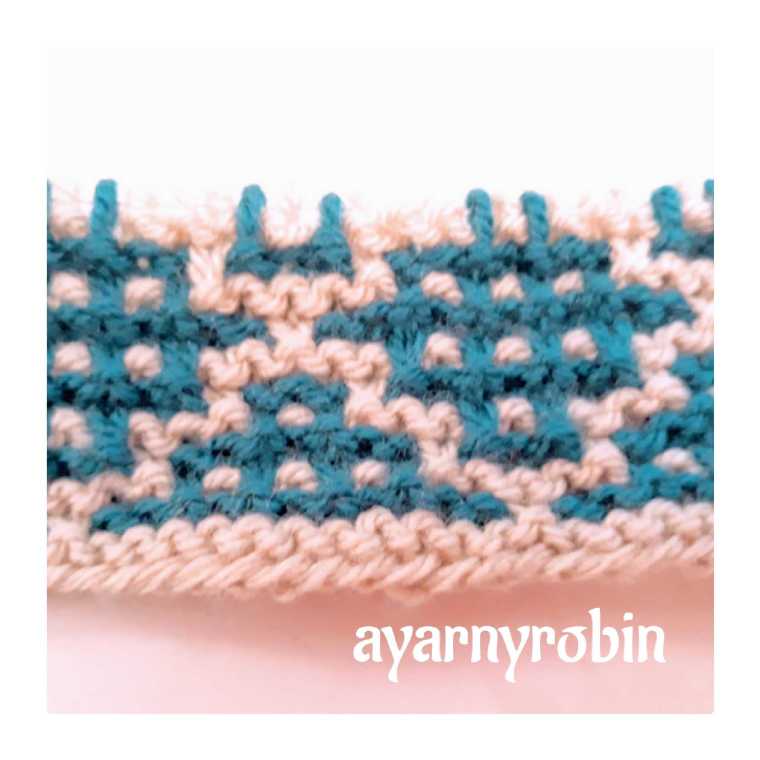 And so I continued until I got to row 19 and realised I had knit a stitch instead of slipped it!


 join blue yarn and slst into 3rd ch
 Row 2: ch3,
 1tr in same space, ch1
 2tr in next st, ch1
 *2tr in next st, ch1*, repeat * * x10 times,
 Row 3: ch3,
 *3tr in next ch space*,
 repeat * * x10 times, 2 tr in next ch space,
 join with slst in top of ch3 and fasten off.


 join blue yarn and slst into 3rd ch
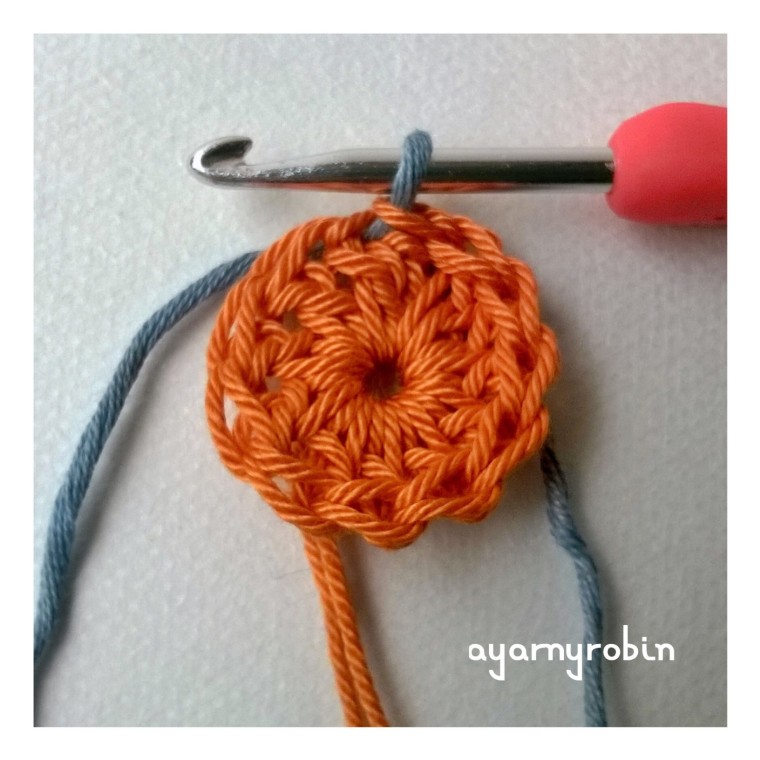 Row 2: ch3,
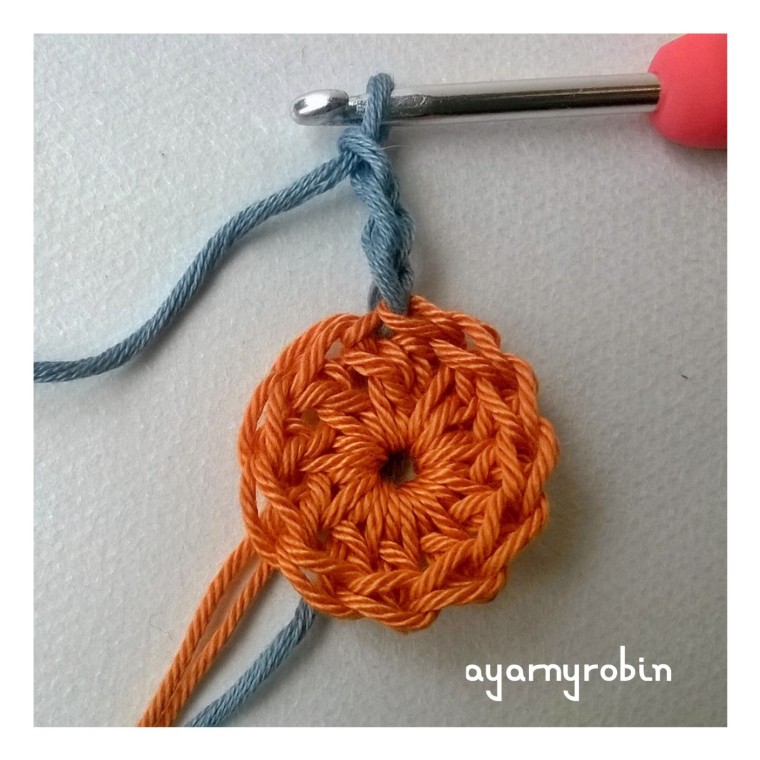 1tr in same space, ch1
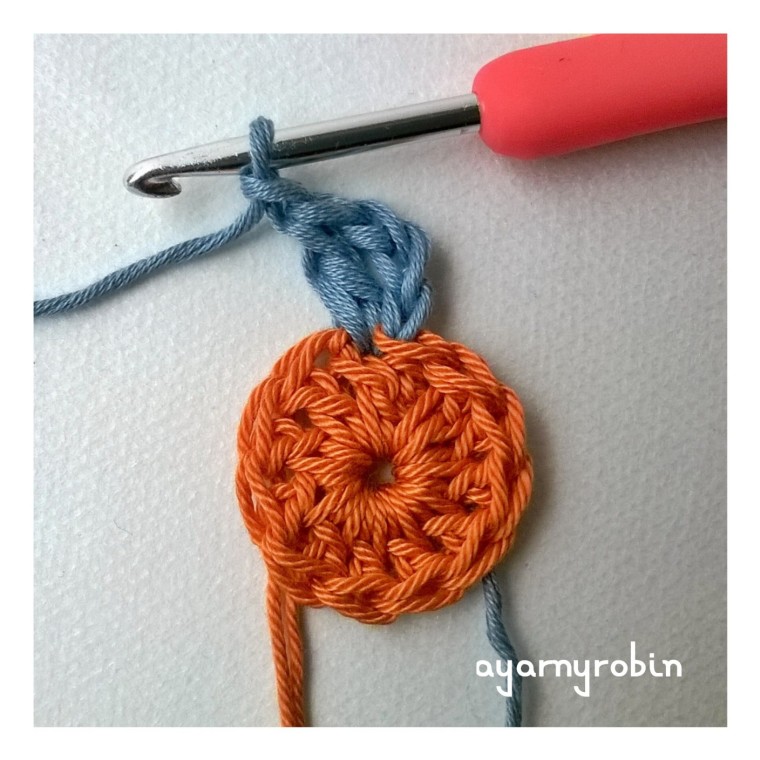 2tr in next st, ch1
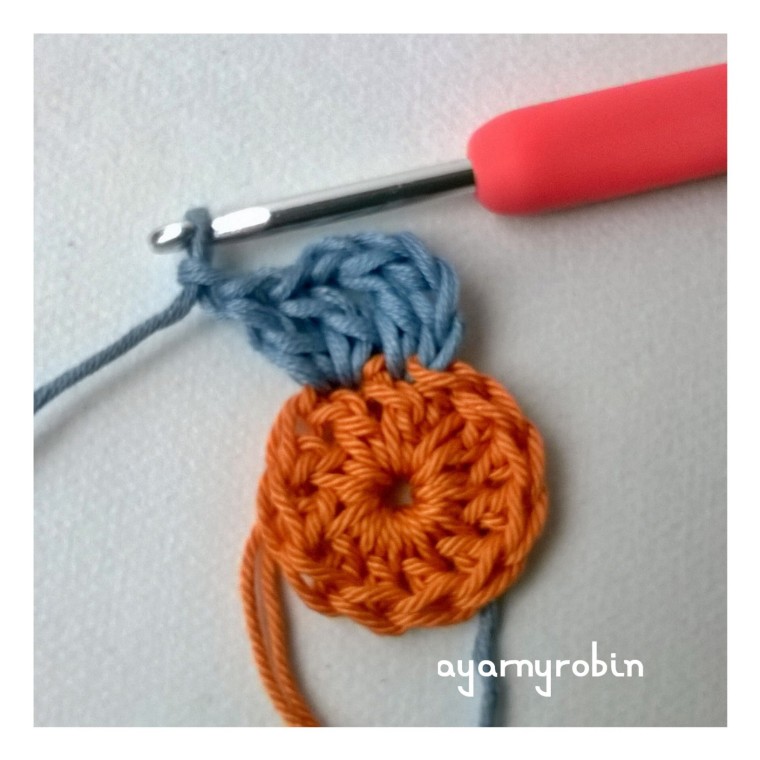 *2tr in next st, ch1*, repeat * * x10 times,
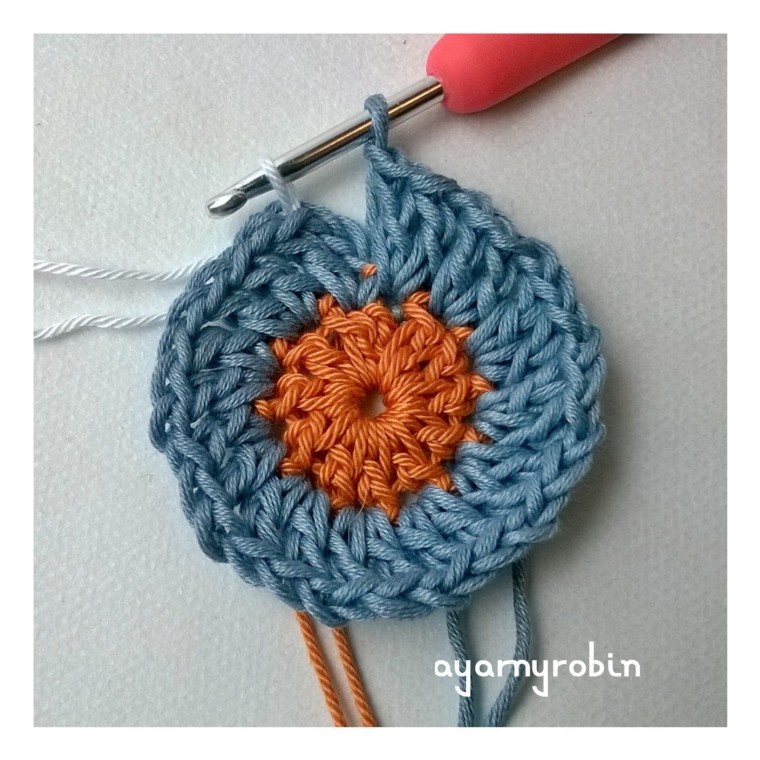 Row 3: ch3,
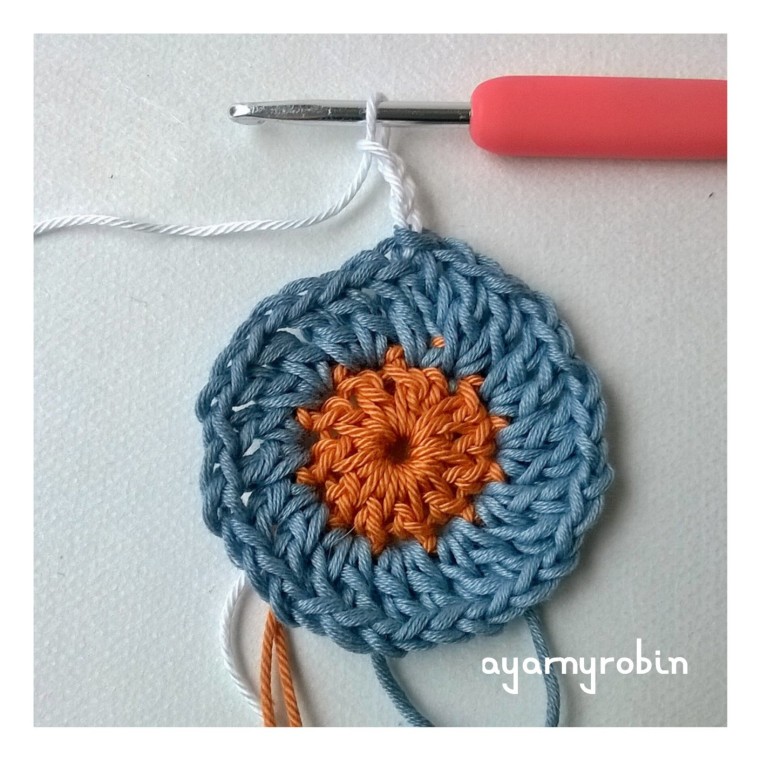 *3tr in next ch space*,
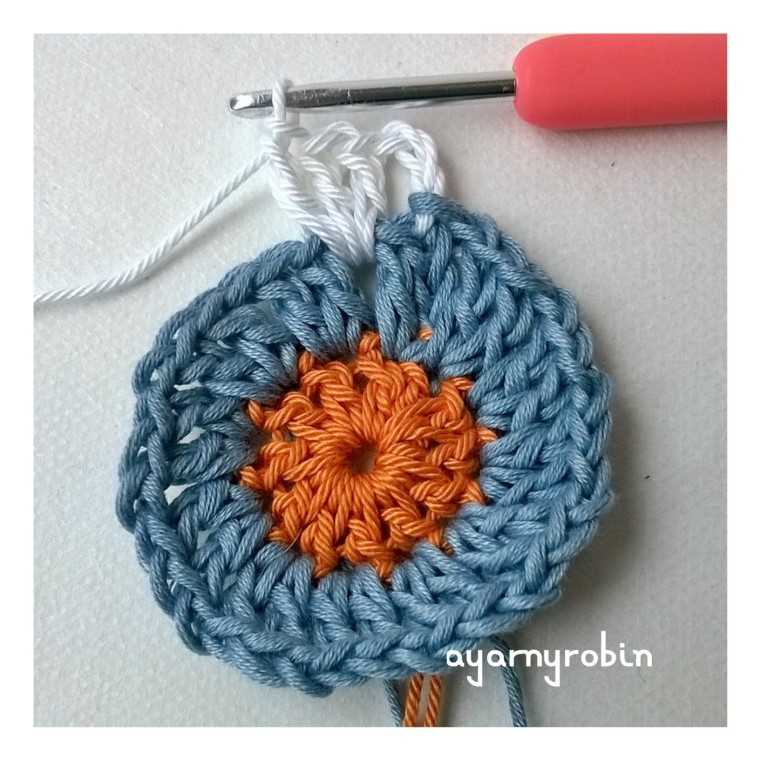 repeat * * x10 times, 2 tr in next ch space,
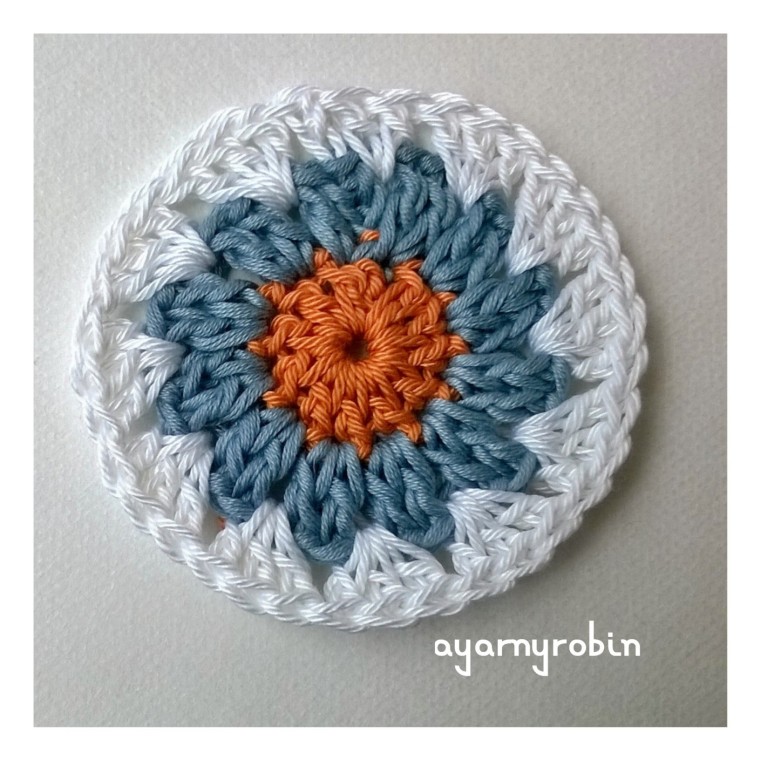 join with slst in top of ch3 and fasten off.