Category: afghan / blanket
Seasidestashbusting blanket weeks 25 – 28

I am still behind on my
#seasidestashbustingblanket …
I have just completed week 29 and I think the CAL is now up to week 31, so I really want to push on and catch up with this as the CAL is almost done. I think there may be a couple more weeks of rows before it is time to border and finish. So I am going to make this one of this week’s hooky priorities; especially since it has cooled down a lot around here. These weeks pictured contained some more filet crochet, bobbles and some more basket weave!
I am loving these colours there are 11 in total which I had in stash and they are stylecraft special dk. I did have to go a buy a ball of yarn yesterday as I was short and didn’t want to introduce a new colour so late into the blanket and I really felt that it should feature in some of the last rows. Other than that I am just picking from these yarn balls randomly, and I like the surprise of that.
I have been hooking some other little makes and have found some wonderful patterns and I will share those with you soon.
xxxxx
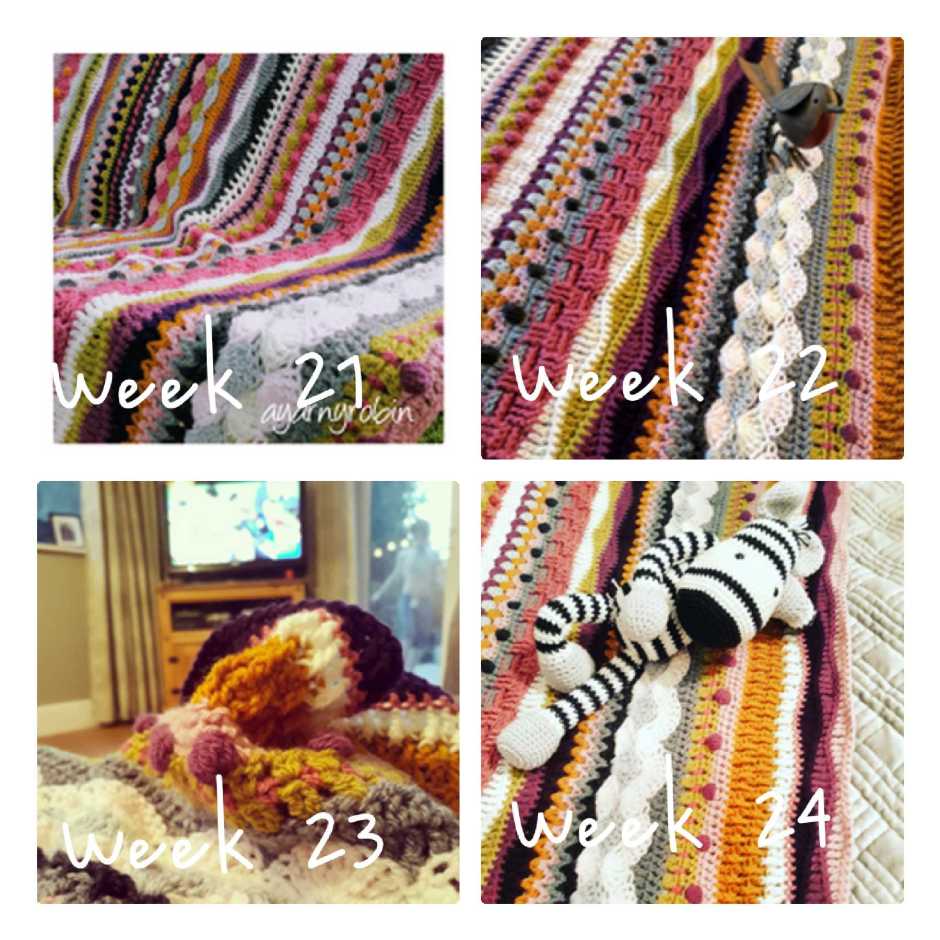
Seasidestashbustingblanket weeks 20 – 24
Here’s just a little update on the lovely
#seasidestashbustingblanket …
I confess I have fallen a week behind with this CAL. I am laying the total blame for this at the feet of Gareth Southgate and the England world cup team for smashing history and those penalties…apologies if you are reading this in Columbia.
I am also totally going to blame the UK heatwave…the hottest and driest summer since 1976…which was also before I was born! It is glorious but it makes hooking blankets hot work. If you look closely at week 24’s photo you will see just what I have been hooking instead… but I will write a separate post all about that next time.
xxxxx
Yarn a long Sunday #8
Well this is the last yarn a long Sunday in this June series. Apologies for this last session being a bit late…It has everything to do with a manic weekend, a 16 mile charity walk and a wedding in a field! It is still Sunday in the UK…so only a bit late eh!
I now have a little collection of cute summer projects and if you follow me on Instagram you will know what has captured my heart…but I will post about that separately in the week.
This week’s topic is
‘Ask me a question…yes you can ask me anything!’
Go on don’t be shy!
xxxxx
Gorgeous Glamping…
Just a couple of weekends ago, I abandoned work early, gathered my brood and made a little journey to a truly magical place. We only travelled 30 minutes away but we found ourselves in a different world.
We went glamping…that is camping in style!
And let me tell you it was absolutely luxurious. Running hot water, flushing toilet, the most comfortable bed in the world (honestly I felt like I was sleeping in a cloud) and a roll top bath with a gorgeous and very private view.
The boys happily shunned their screens and devices and spent hours splashing in the hot tub
and lighting fires
We cooked contently on the dutch oven (although there was a large wood burning stove inside our abode)
And we cycled the short distance into Arley where the great Severn Valley Railway passes through.
In the evenings we lit another fire and made use of the blankets provided for us;
and we chatted and laughed and breathed in and out deeply inhaling as much of the tranquillity as we could whilst toasting marsh mallows and drinking bubbles.
Of course I took my own blankets and they looked so pretty out on the decking…which has fairy lights at night.
(Yes, that is a candelabra you can see on the dining table! )
There was also plenty of time to crochet
and knit
This place is a true gem…and look what I found in the dresser…
a happy piece of yarn!!!!
So thank you Mark and Sonja for all of the fairy dust you sprinkled for our stay with you….we loved it!
woodhouse farm luxury camping
xxxxx
seaside stash busting blanket weeks 17- 20
I thought you might like another little update on the slow CAL (crochet a long) I’m participating in which is being hosted by the lovely Eleanora over at coastal crochet. You can also find lots of other amazing blankets and makers participating in this CAL across social media by searching #seasidestashbustingblanket.
You can read about my weeks 1 – 4 just here
and weeks 5 – 8 just here
weeks 9 – 12 here
and weeks 13 – 16 here
Here is how it has been growing…
Now, I’m off to catch up with the rows for week 21!
xxxxx
seaside stash busting blanket weeks 13- 16
I can’t believe that this blanket has been on my hook and in my life for four months. It is getting large enough now for me to throw it over my lap in the evenings and I thought you might like another photo update on my progress.
You can read about my weeks 1 – 4 just here
and my weeks 5 – 8 just here
and weeks 9 -12 just here
But let me show you weeks 13 – 16.
Now Weeks 13 -15 were just fine…
but week 16…
well it was basket weave and if you are a long time reader you may remember my last foray with basket weave…It looks great but I do not like hooking this stitch you can read why just here.
So it came as a very welcome relief to find out that the next stitches were the relaxing long wave stitches after the stressful basket weave!
If you want to find out more about this delightful slow CAL (crochet a long) which is being hosted by the lovely Eleanora hop over to her beautiful blog… Coastal Crochet. You can also find lots of other amazing blankets and makers participating in this CAL across social media by searching #seasidestashbustingblanket.
I‘m off to do another couple of rows now. I will be back soon to show you what else has been on my hook of late and I will also write an update about my yarny knitting adventure.
xxxxx
April crochet…
Well the rain and the snow finally stopped for a little while and the sunshine made a cameo appearance last week.
It seems more rain and freezing temperatures are on there way again! But, the sunshine certainly influenced my hooking last week and I took my hook alfresco whenever I could.
I have also enjoyed getting back outdoors and walking the dogs now my foot has finally healed.
Of course there were pit stops along the way!
I have also been keeping up to date with the seaside stashbusting CAL…this photo was taken at the trampoline park.
Not much has occurred on the knitting front, in fact it would be fairer to say nothing has happened. I am enjoying my hooking far too much to be slowed down by needles and I have a couple of commissions that I really must finish. One of which I can now show you…
Aren’t they just the sweetest?
I loved making these little baby shorts.
The pattern is by Mon Petit Violon Designs and I will definitely be hooking some more. I used Rico baby cotton soft yarn in a dk weight and a denim blue and finished them off with some little wooden buttons. Rico was a lovely yarn to hook with and has given a beautiful stitch definition to the garment. Of course it is soft enough for babies skin also and machine washable.
Finally, I just wanted to say a BIG thank you to everyone who has given me such encouraging feedback across my social media about the Sunshine Jelly Baby Blanket…
It has really made me smile.
Have a good week what ever you get up to
xxxxx
Sunshine Jelly Baby Blanket Free Pattern…
I am so thrilled to be able to introduce the Sunshine Jelly Baby blanket to you.
This delightful crochet blanket is vibrant and fun to hook and the pattern is available, complete with a photo tutorial just below. Made from Drops Muskat cotton, it measures 74cms x 74cms or 29″ x 29″…the perfect pram blanket size, of course you can make the blanket bigger by adding more squares if you wish.
This delicious blanket is made using the Robins Nest square which I designed a few years ago and if you are a regular here you will know that I have recently updated this pattern. When I first designed this square I always intended to make a baby blanket…I guess somethings just take a while to come to pass.
As always I’m using English crochet terminology.
Ch – chain
Slst – slip stitch
dc – double crochet
tr – treble crochet
ch3 – counts as a treble unless otherwise stated.
I’m using drops muskat cotton.
and I’m using the colours and quantities listed below
red – 100g
old pink – 80g
white – 50g
vanilla yellow – 65g
dark orange -20g
sky blue – 35g
apple green – 50g
and a 4mm crochet hook and a 3.5mm crochet hook
Each lovely yarny square measures 7″ x 7″ or 18cm x 18cm once blocked.
You will need to make 16 squares to make this blanket arranged
4 x 4…
of course you can make more squares if you wish to make a larger version.
So here goes…
with a 4mmhook ch2, join with ss to form a tiny ring (you could make a magic circle instead if you prefer)
Row 1: ch3,
11tr into ring,
join blue yarn and slst into 3rd ch
(12tr in total).
Row 2: ch3,
1tr in same space, ch1
2tr in next st, ch1
*2tr in next st, ch1*, repeat * * x10 times,
join white yarn and slst into 3rd ch
(12 clusters of 2tr and 12 ch spaces).
Row 3: ch3,
*3tr in next ch space*,
repeat * * x10 times, 2 tr in next ch space,
join with slst in top of ch3 and fasten off.
(12 clusters of 3tr).
Row 4: join green yarn in between any cluster of 3tr of previous round and ch3,
3tr in same sp, ch1
*4tr in between next cluster of 3tr, ch1*,
repeat * * x10 times, join with slst in ch3 and fasten off.
(12 clusters of 4tr and 12 ch spaces)
Row 5: join yellow yarn in any ch space and ch3,
4tr in same sp, ch1
*5tr in next ch space, ch1*,
repeat * * x10 times, join with slst in ch3 and fasten off.
(12 clusters of 5tr and 12 ch spaces)
Row 6: join pink yarn to any ch space and ch3,
5tr in same sp, ch1,
*6tr in next ch space, ch1*,
repeat * * x10 times, join with ss in ch3 and fasten off.
(12 clusters of 6tr and 12 ch spaces)
Row 7: join red yarn in any ch space, ch3,
5tr in same space,
ch3,
6tr in same space (corner made),
*6tr in next ch space, 6tr in next ch space,
6tr in next space, ch3, 6tr in same space*
(2nd corner made)
repeat * * x2 times
6tr in next space, 6tr in next space, join with slst in beginning ch3. Do not fasten off.
Row 8: ch3,
1tr in next 5sts,
*6tr in ch3 sp, ch2,
6tr in same space (corner made),
*1tr in next 5sts,
dc UNDER next stitch (indicated by the hook)
1tr in next 5sts, dc under next stitch,
1tr in next 5sts, dc under next stitch
1tr in next 6sts,
6tr in ch sp, ch 2, 6tr in same space*
repeat * * x2times
1tr in next 5sts, dc under next stitch,
1tr in next 5 sts, dc under next stitch,
slst to beginning 3rd ch to finish.
Weave in ends.
Blocking:
A word on blocking:
Before blocking…
Your square will be wibbly.
After blocking…
Your square will lie flat and will look much better.
Blocking is really worth the extra effort and isn’t difficult or expensive to do. I just pinned this square to my ironing board so that it measured 7″ by 7″ and hovered my iron just above the square and blasted it with steam. Allow to cool before unpinning and store carefully. Alternatively, you could pin the square to the required measurements to a towel or a pin board, spritz with water and allow to dry.
Joining:
I have used a simple and easy slip stitch to join these squares. I have chosen this join for two reasons. The first reason is that it is secure and does not add anything to the squares, allowing them to showcase themselves.
The second reason is it uses the least amount of yarn and also creates less ends to weave in.
So to join the squares start by placing 2 squares with the right side to the right side…ie/ the wrong side of each square will be facing outwards.
Note that this join requires you to place slip stitches in the top of the stitches along the edge of the square and you should go under both loops of each stitch.
Some stitches will require you to slip stitch in both stitches of each square, these stitches should be the corresponding stitches for each square. Some stitches will require you to slip stitch in the top square only. This is because the squares are only joined to each other at each corner and in the middle of each scallop.
Join yarn in 2nd ch of any corner space and with a 3.5mm hook slst,
in both squares slst in the next 6sts,
in top square only slst in next 6 sts (tr), slst in next st (dc), slst in next st (1st tr of scallop),
*in both squares slst in next 3 sts (2nd, 3rd &4th st of scallop),
in top square only slst in next 3sts (tr,dc,tr)*
repeat * – *
in top square only slst in next 5sts,
in both squares slst in next 6 sts, miss chst, slst into 2nd ch of corner space.
Repeat this process for each side of the square which requires joining. You will not need to cut your yarn at the end of each side joined as you can continue round by adding another square. I started joining in the middle of the blanket. You will have to join in a new corner space for some of the joins, but the process remains the same.
I do hope you enjoy this pattern.
The Sunshine Jelly Baby Blanket ©2018 and the robins nest square ©2016 are designed by Nicola Florence @ayarnyrobin.
I would love to see your makes and you can share on social media by using the following hashtags
#ayarnyrobin #yarnyrobin @yarnyrobin
This pattern to include the photos are the property of Nicola Florence @ayarnyrobin. You can’t modify, resell or share this pattern. You can sell finished items made from it, but please mention that the item is made using AYARNYROBIN pattern.
seaside stash busting blanket weeks 9 – 12
I thought you might like another little update on the slow CAL (crochet a long) I’m participating in which is being hosted by the lovely Eleanora over at coastal crochet. You can also find lots of other amazing blankets and makers participating in this CAL across social media by searching #seasidestashbustingblanket.
You can read about my weeks 1 – 4 just here
and my weeks 5 – 8 just here
But let me show you weeks 9 – 12. I have enjoyed these weeks so much, hooking out and about in town
The blanket is certainly growing larger and no longer resembles a scarf…in fact it is way past scarf stage now and is handy for keeping my lap warm whilst I hook away.
I think this will be the last close up picture where the whole of the blanket will fit into frame.
I’m still ploughing through my stash too, so this makes me doubly thrilled with this blanket. I find I am really looking forward to every Monday and Friday when the next rows are released. I love the surprise of not knowing what the next set of rows will be.