Humph!!…did you hear that…or is it just my tinnitus again? I think it was the sound of me falling onto the sofa from a parallel universe; where the last few weeks have spun by in a blur and may have possibly been the fastest few weeks in history.
A fleeting glimpse of the super moon…
I was hoping to have posted this weekend about the second tea cosy in the Grandma Collection, but that may well be next week end now…so sorry. It would have happened, but I think that in exiting the parallel universe I left my little pencil case of hooks as I can’t seem to find them…most distressing.
There has been quite a bit of Christmas hooking going on, but that will have to remain under wraps for now, enough to say I am in love with the pattern and can’t wait to share it with you all.
So, whilst I acclimatise back into the earthly realm, I will leave you with a little snap shot of the last few weeks…
Autumn is slipping into winterbut glorious colour can still be foundand if you know where to look you can still find cosmos…The boys are still being boys…getting balls stuck up trees…I do love them so…
taboggoning at the snowdome was pretty awesome also…A sneek peek of some of the lovlinesss in store for the second tea cosy in the Grandma Collection….
Oh ok then, just a very quick look at some of the Christmas hooking…
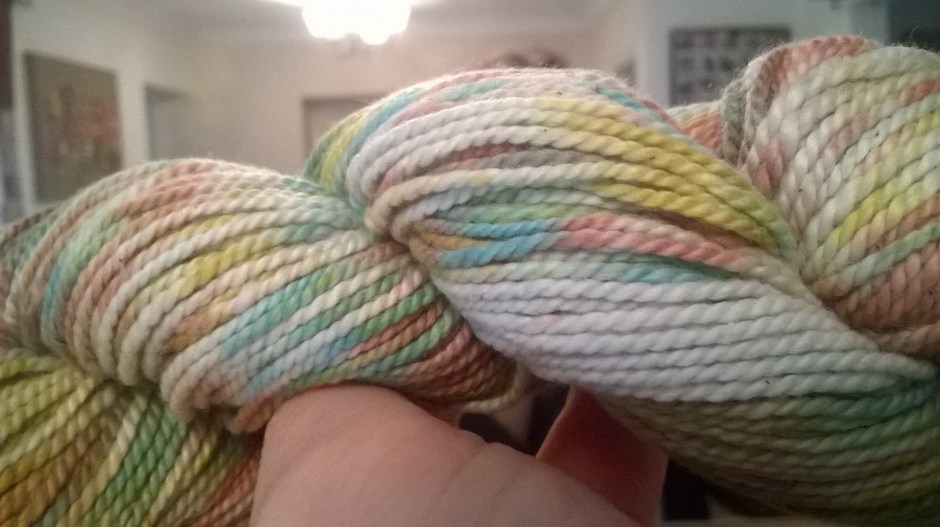
Do you remember a little while back, in the summer I was lucky enough to win this gorgeous hank of yarn courtesy of Joey of littleblackdogsa all the way from South Africa…Well, this yarn is a dream to hook with and let me tell you I have hooked with it!
I have hooked and frogged and hooked and frogged, because I wanted this little hank of yumminess to become something special.
You see this little hank has travelled some miles, all the way from South Africa to the Midlands of England. Then it wasn’t long before it was travelling again, this time back south to Devonshire. Where it was hooked almost everywhere
poolside…
seaside…
and even at the farm. But, I just didn’t feel the pattern I had chosen was special enough for this beautiful yarn.
The yarn as you can see is a 4 ply cotton organic yarn, which slipped over my hook effortlessly. Its twist meant that it did not split once during all of its hooking and frogging and it also maintained its tension throughout. But, the best thing about this yarn from One of a Kind Yarns is the amazing and unique colourway throughout. My heart swelled each time the delicate colour blended into the next gentle tone, non so much as when the lemon hues began to merge with the deep lavender…mmm it is still making me smile now!
Well what is a girl to do, when she is given a surplus of damsons?…
Gin of course!
I have read that many recipes for damson gin, I became confused. What follows is a conglomeration of several.
The ingredients are this simple…
550g of damsons (because that is how much we had!)
250g of granulated sugar
1 litre of gin
1 litre mason jars x2.
First I sterilised the jars with boiling water.
Then skewered the damsons with a sterile darning needle to get their damson juices flowing. I divided the damsons equally between the jars.
Next, I added 125g of sugar into the first jar and 125g of sugar into the second jar.
Finally, adding 500ml of gin into the first jar and 500ml into the second jar.
I gave the jars a little shake and then popped them on the larder shelf where it is dark…this is important storage information apparently!
I’m not sure if it is a good thing that there is an air space in the jars or not. Looking at the unopened gin bottle there was an air space. So I think I am going to have to do a bit more research. I may be topping up with a bit more gin, but I will let you know if I do. The jars will need a little shake each day for the first week and then weekly after that.
All the recipes differ on how long to leave the gin until you crack it open. Some say 3 months others 6 months and then others a year!!! I should imagine it is when desperate! Again I will let you know. I am hoping it will be in time for Christmas, unless I get desperate before that!!
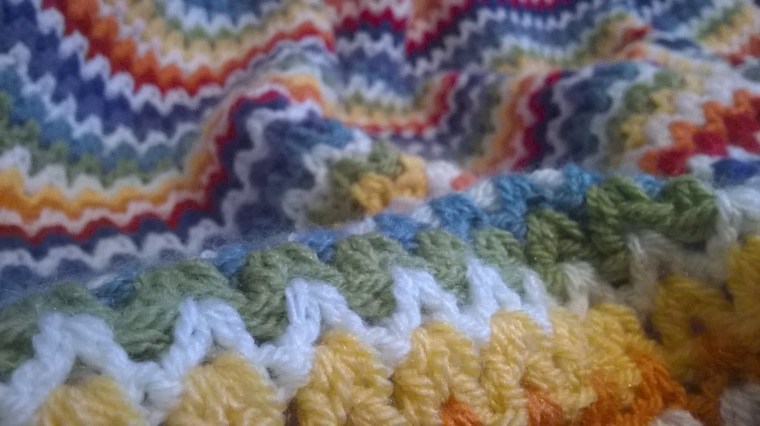
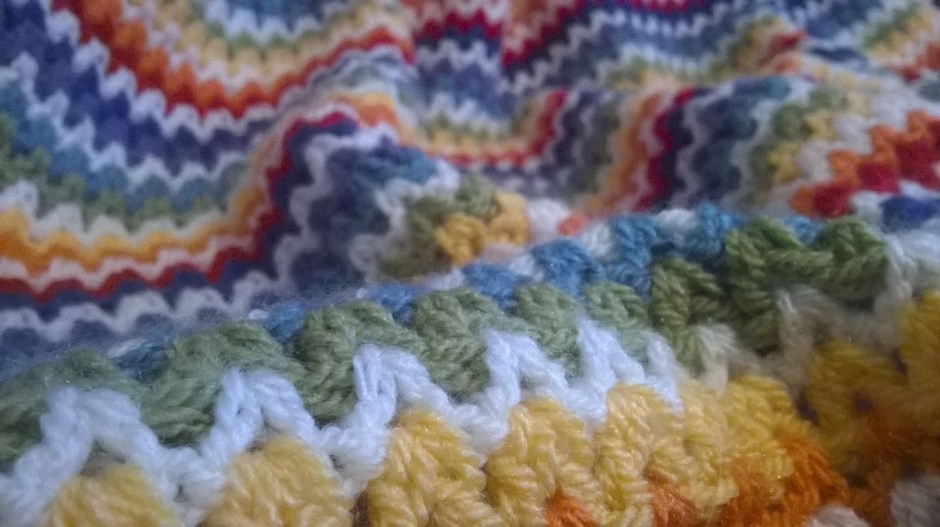
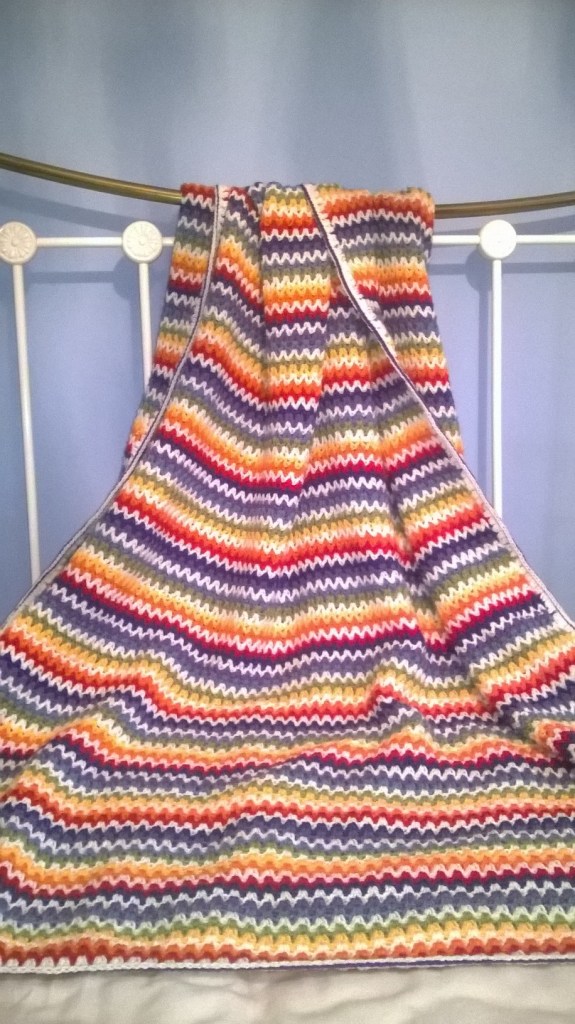
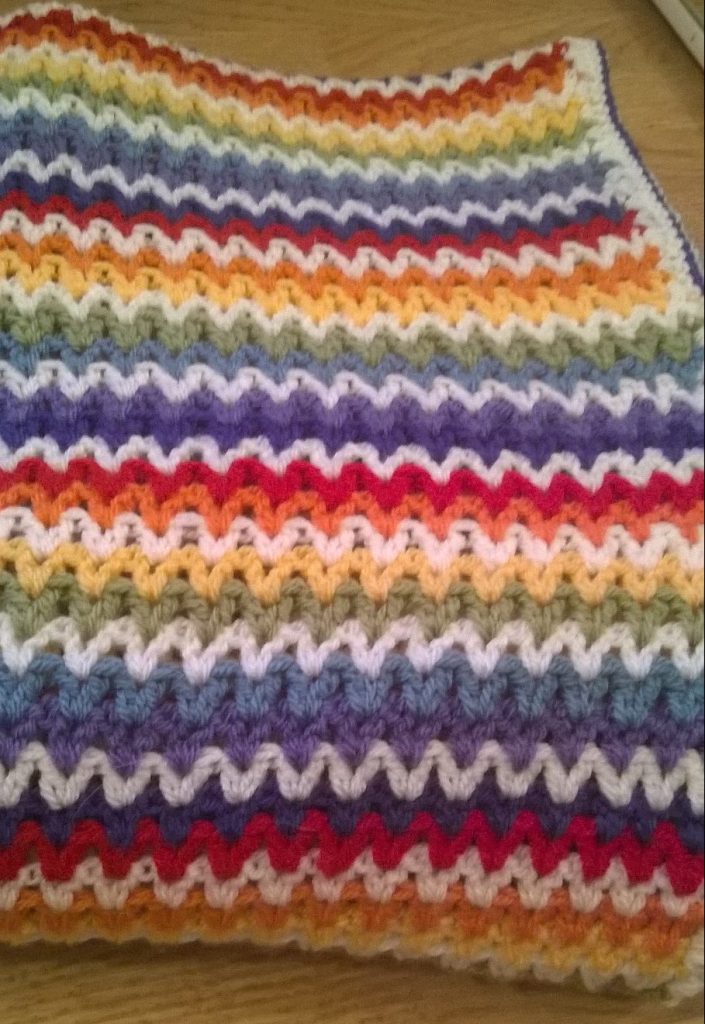
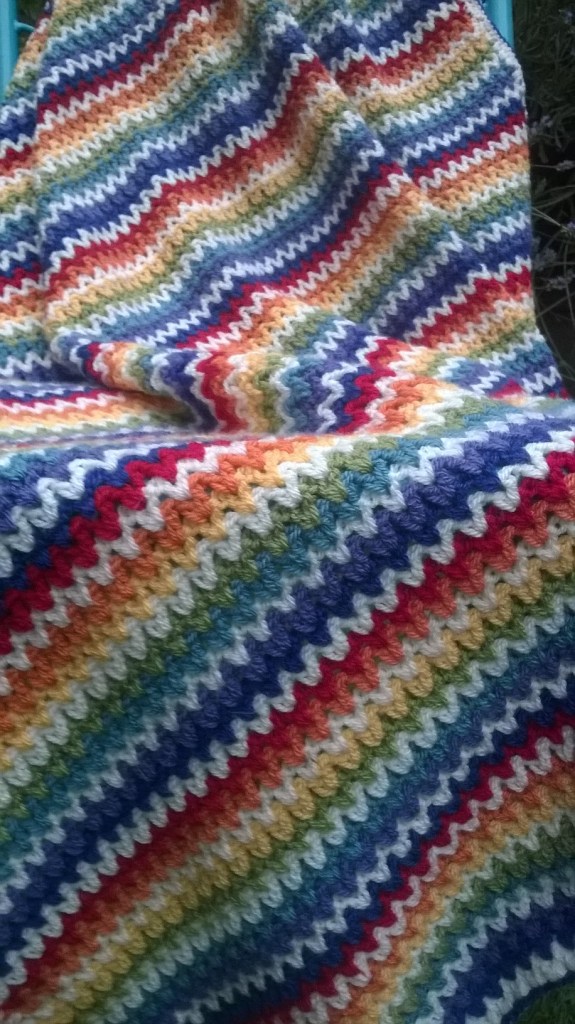
Thank you for your lovely comments about my latest blanket off the hook…the ‘Very V’ blanket.
It really is very simple to hook, so I thought I would put together a little tutorial, as I have not done one for a while and because I have some rare time off on my own. The tutorial can be found below. You can also check out my latest free pattern The Angelece baby blanket by clicking on this link.
So, clearly this is not an original pattern. I say that from the offset because of copyright and all of that. Let’s be honest…the humble ‘v stitch’ has been around for years. But this is my tutorial in case you want to have a crack for yourself and you have never done a ‘v stitch’ and you are a visual kinda gal or guy.
Processing…
Success! You're on the list.
Whoops! There was an error and we couldn't process your subscription. Please reload the page and try again.
Here we go!
Final measurements: 132cms x 120cms / 52″ x47″
I used Stylecraft special dk , for it’s durability, softness and price! The colorway I used:
Lipstick x 1 ball
Meadow x1 ball
Saffron x 1 ball
Violet x 1 ball
Spice x 1 ball
Lobelia x 1 ball
Storm blue x 1 ball
Cream x 3 balls
You will also need a 4mm hook and a darning needle to weave in those ends!
Of course if you are using different yarn then you may need to use the recommended hook size for your chosen yarn; and of course you can alter the finished size by hooking more or less chains to start.
Your hooking tension (we are all different) may also mean you need more or less chains to start with.
Lets start, are you ready?
Abbreviations used are below and are English terminology.
Ch = chain stitch
Chs = chains
Tr = treble stitch (double crochet in US terminology!)
St = stitch
Slst = slip stitch
Sp = space
Pattern order I used:
Row 1: Cream
Row 2: Lobelia
Row 3: Violet
Row 4: Cream
Row 5: Storm blue
Row 6: Meadow
Row 7: Cream
Row 8: Saffron
Row 9: Spice
Row 10: Cream
Row 11: Lipstick
Row 12: Indigo
Row 13: Cream
Row 14: Violet
Row 15: Storm blue
Row 16: Cream
Row 17: Meadow
Row 18: Saffron
Row 19: Cream
Row 20: Spice
Row 21: Lipstick
Row 22: Cream
NB/ the first and last row form the edging for the top and bottom of the blanket so use the colour you wish to edge the blanket in, for row 1.
Chain 175 in cream
(This gave me about a 1m 15cm /42″ length of Ch. But any odd number of Chs will work to suit the size blanket you are wishing to hook!).
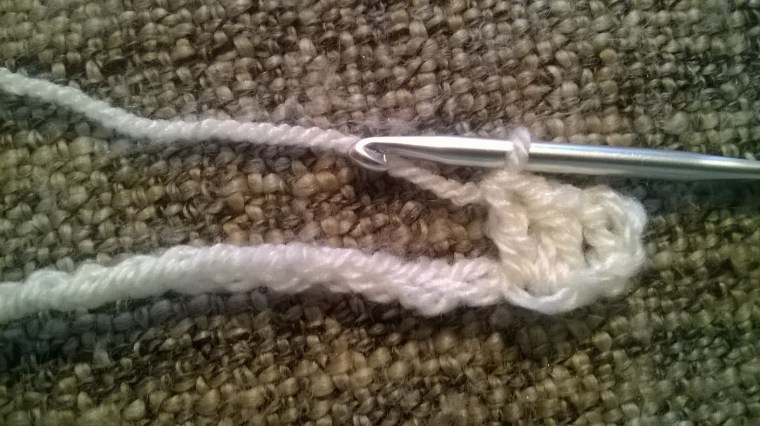
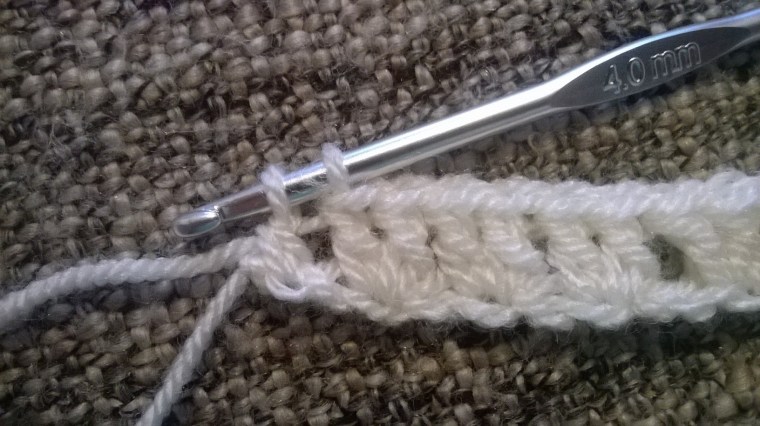
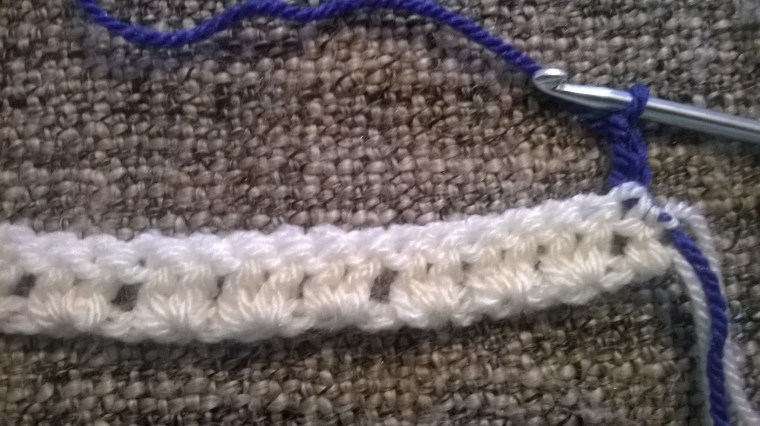
2tr in 5th ch from hook,
miss a ch, 2tr in next ch
miss a ch, 2tr in next ch
*miss a ch, 2tr in next ch*
Repeat * – * across the row.
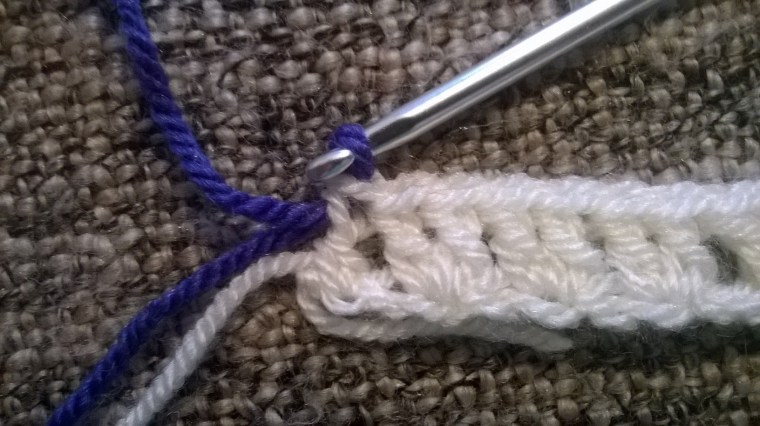
Finishing with 1tr in last ch. Change colour. As shown below, I change colour by completing half of the process for the last tr (ie/ leave two loops on the hook). Complete last part of tr in new colour as shown.
I find this makes colour changes more secure. These ends should be tied to secure further. Top tip! leave the ends long (approx. 10cms) so that weaving in is easier.
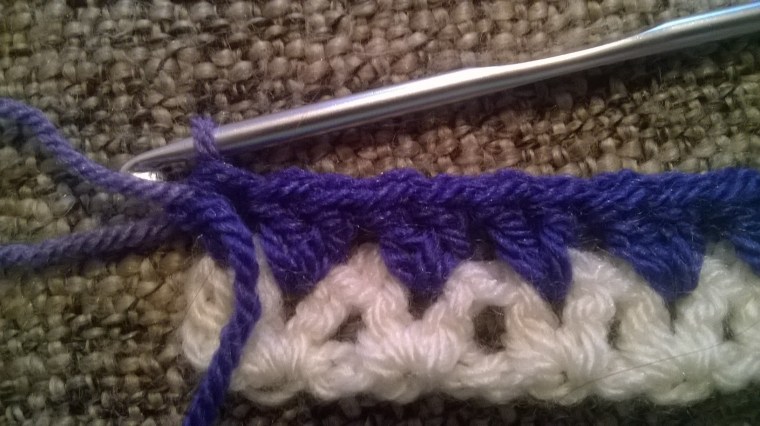
Turn. Ch3 (counts as 1tr)
2tr in the middle of set of tr’s of previous row
Continue along the row.
finishing with 1tr in top of 3rd ch on previous row.
Change colour. Turn.
And that’s it!
Top Tip!! Weave in the ends every few rows.
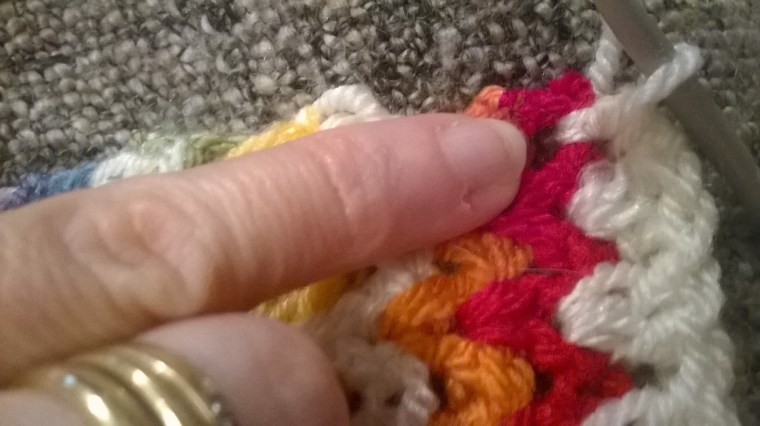
Repeat rows 1-22 x5 times.
Then repeat rows 1 – 13 to finish body of blanket. And if you did not adhere to the top tip above…now is the time to weave in those ends!
I’ve gone all minimalistic for the edging because the blanket itself is simply stunning in this colourway and I did not feel like it needed something fussy to detract from its beauty.
This is what I did.
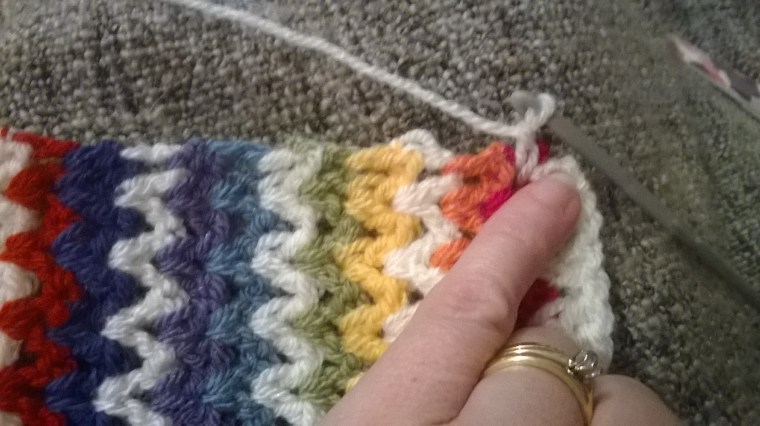
The first and last row (in cream if you have been following this colourway) form the edging for the top and bottom of this blanket. In cream / your chosen edging colour join in the space at the bottom right of your blanket as shown.
Ch 3 and slst into the top st of the first tr/ch3 of 1st row.
Ch1, 2tr in same sp
2tr in next sp (the sp is the gap between the side of the first sts of each row), 2tr in next sp.
Continue along the edge until you come to the top corner. 2tr in last sp, ch 1, 1tr in same sp.
Then slst into the top st of the first tr/ch3 of last row as shown. Fasten off. Repeat for the other side of the blanket.
Finally, in Lobelia (or your chosen colour) join in any st of edge with a slst.
Slst in each st around edge of blanket. Fasten off and weave in loose ends. And that is it, you should now have one of these to snuggle under…or reluctantly gift.
Well done if you got this far.
I really hope you have found this tutorial easy to follow. I welcome feedback, so let me know how you got on and if you want to share your picture of your finished make you can in the comment section below.
This blanket was a thank you gift for someone that has helped me enormously this year and each stitch, like the Happy Ripple before was hooked with love and prayer.
It makes my heart sing when I am able to gift something like this and know that it is appreciated.
I received a card in the post just this week from the owner of the Happy Ripple telling me of the enormous comfort the blanket has brought to both her and her family in the midst of heartbreak recently…
*There is still time to enter the yarny give-a-way here*
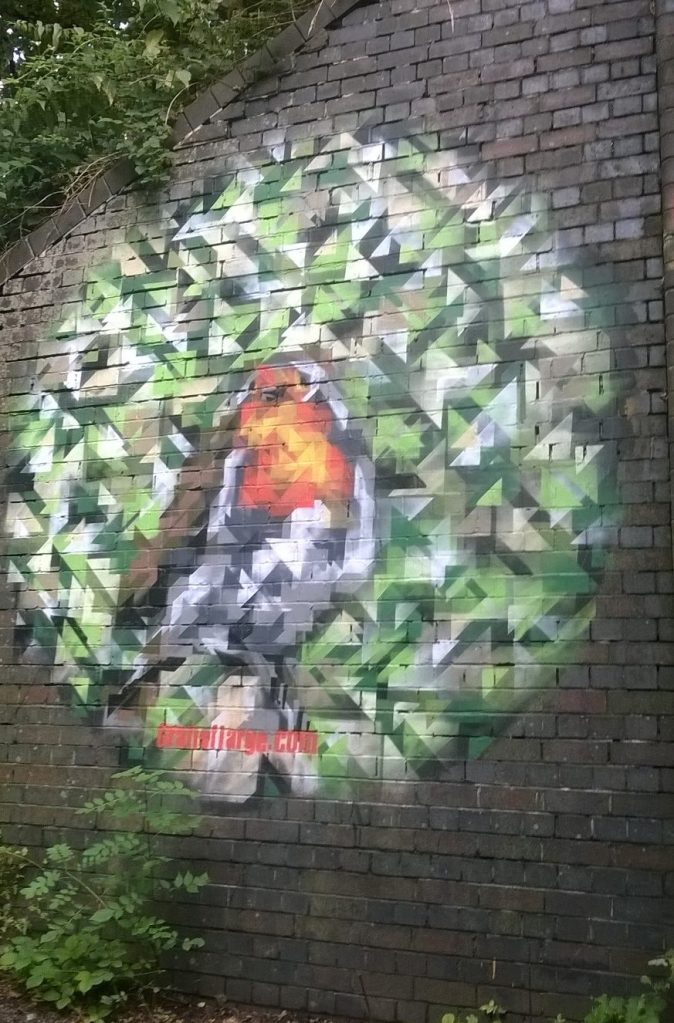
I stumbled upon an arty robin last weekend, well I say stumbled… it was more like rode. I dusted off Bella and wheeled her out into the day light, hoiked her onto the bike rack and off we all went.
It had been way too long since the last time we had an afternoon out in the countryside together, and as we cycled our cares flew from us and we felt light. We stopped at points to play in the stream
race each other,
or just to admire the scenery and breathe out.
And then we stumbled upon this…
(You may have to lean back and squint a little)….Not everyone’s cup of tea, but talented and arty non the less, and it made us smile!
We rode on some more, and returned home fulfilled and tired. The perfect excuse to put up my feet and get out my hook.
I didn’t move until I had finished the main body of this Very V blanket, but I had been undisciplined throughout and had not woven in the ends as I had been hooking!!! Oh my, that is what I have been doing this week…Its a good job I don’t mind weaving in those ends isn’t it!
I am soooo super excited to share this post with you. I love reading other blogs some crochet related, some not. Exploring new blogs within the community is never dull, but I also have my firm favourites which are always a good read and I look forward to their posts and what they have to say.
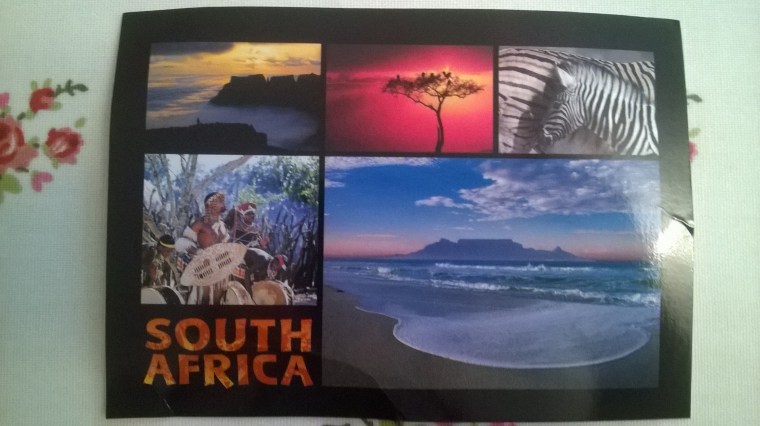
One of those firm favourites is written by Joey over at littleblackdogsa who recently celebrated her 4th fantastic year of blogging with a give-a-way. Here comes the exciting bit…
I WON! Yes….. I won!
I received an email a few weeks ago from Joey letting me know I had won, right in the middle of a ‘research and specialist inquiry’ lecture. Which incidentally was soooo tediously uninteresting, that when I read the email congratulating me on my win, I was so surprised that a rather loud gasp escaped into the classroom….ooops! Needless to say I did not listen to the rest of the lecture, but instead ruminated what I may hook with the yarn I had won.
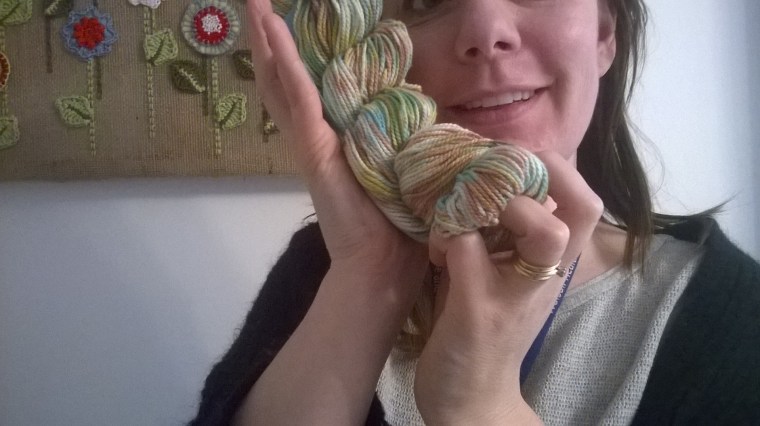
I have waited very patiently since, and then just yesterday I came home to a wonderful parcel which had made it’s way from South Africa…Isn’t this yarn simply stunning.
simply gorgeous
it is super soft
I can’t wait to hook with this yarn and create a beautiful something or other….I’m still undecided as to what to hook, but I will be blogging about whatever it is for sure.
So if you have a spare couple of moments and want a really good read, pop over to South Africa and visit Joey.
It seems that I am busier than ever before which makes any spare time very precious. So as the sun has chosen to shine for a brief couple of days (Seriously…this could be the sum total of the British summer time!!!) I have chosen to spend my time outdoors and make the most of it.
Dining al fresco in the garden
The warmth of the sunshine has caused an explosion of foliage and weeds! So I cleared a patch of rogue nettles in the growing garden and rediscovered a little hosta…
Can you see it at the back…it is tiny!
Mr. R dug up the blackberry and raspberry bushes which quite frankly were looking very ugly. I have pondered their removal for some time, but sometimes you just have to cut your losses. Their fruit bearing has been lousy and that’s a polite way of putting it!
So we have a blank canvas of a flower bed which is going to include Jasmine
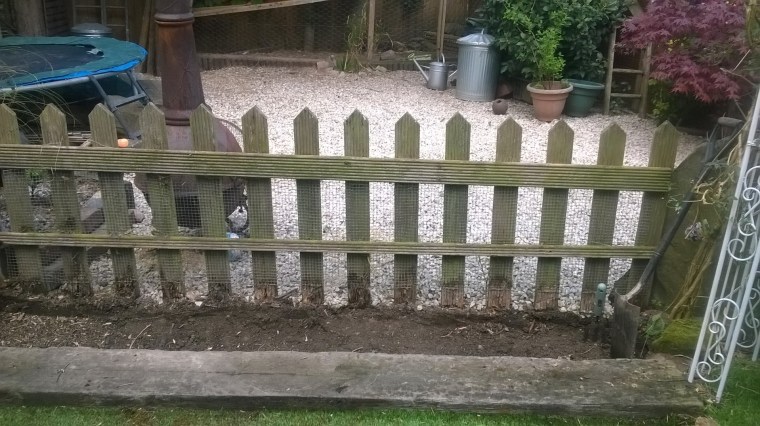
Talking of losses, we lost our last chicken this week…sad news! We have decided not to replace them, so the chicken run has been dismantled and we are deciding what to do with this space.
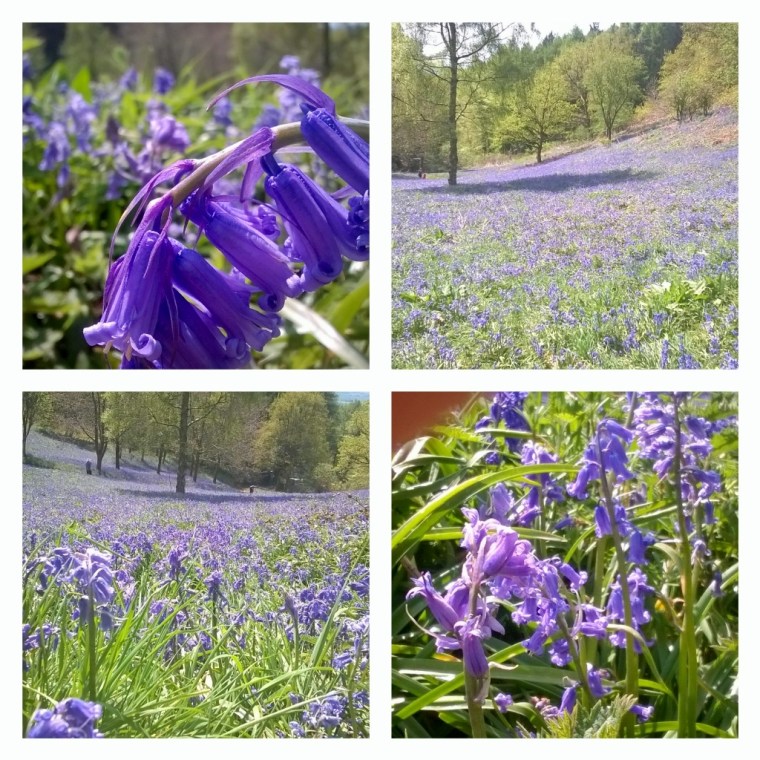
I also made a return to bluebell wood, and was met with this utter spectacle…
And I just had to stop the car to photograph the present crowning glory of the British countryside…
Fields of just WOW!!
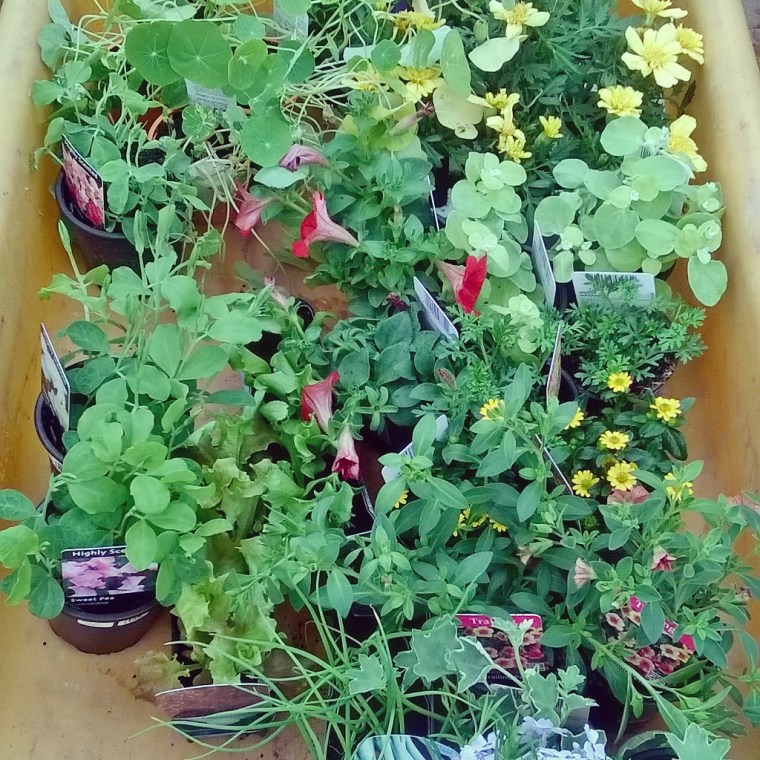
All this colour led me to the garden centre
in pursuit of summer annuals for my kitchen window box
a sweet pea tipee
and a little bit of something yummy…
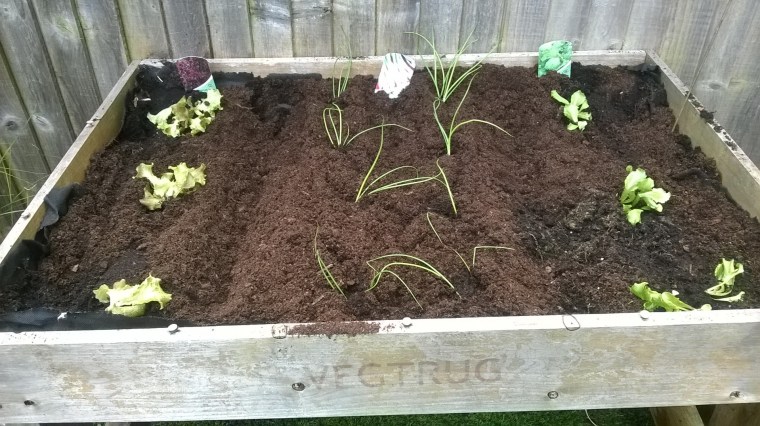
lettuce and spring onions
so not much crochet time, but I did get half an hour in this morning
I have had such a lovely slow Saturday; a stark contrast from recent weekends which have been so hectic with essays and research.
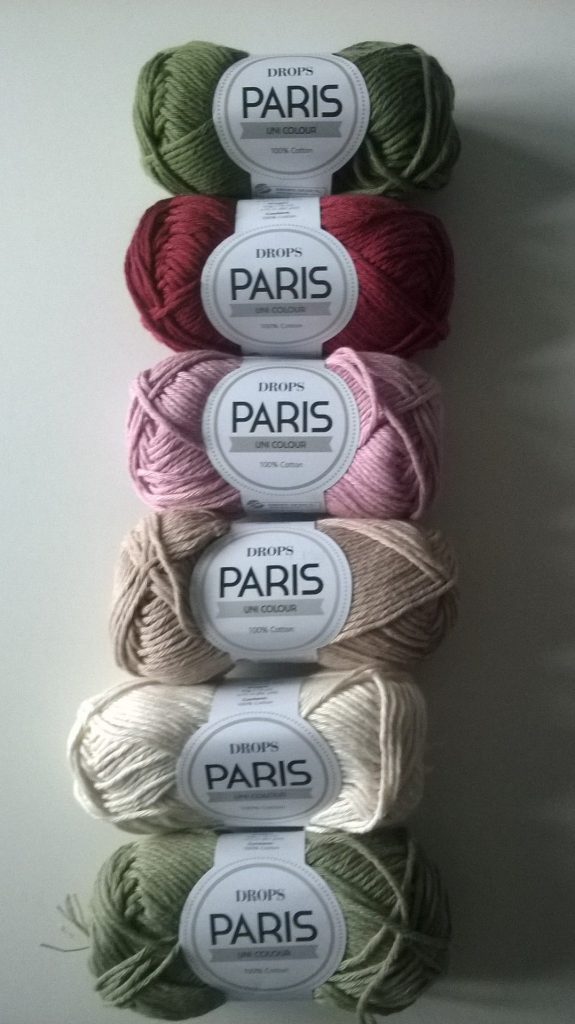
I’ve played with colour ways finally deciding upon this colour way I’ve called ‘cherry stripe’. The yarn being Drops Paris 100% cotton in:
green
rusty red
light old pink
dark beige
off white and
moss green
Then I hit you tube to learn a new stitch and opted for ‘linen stitch’. It is actually a very simple double crochet (single crochet), chain stitch combo. I like it because it hooks quickly, is economical with yardage, gives a lovely solid reversible fabric and is just perfect for my new baby blanket design…’Linen cherry baby bar blanket’.
So, that’s a sneeky peek, I’m off to hook some more.


 2tr in next sp (the sp is the gap between the side of the first sts of each row), 2tr in next sp.
 Continue along the edge until you come to the top corner. 2tr in last sp, ch 1, 1tr in same sp.