A yarny little heart…free pattern.

My hands have been yearning to hook in the evenings lately; but the projects I have on the go at the moment (which have to remain secret at least until after Christmas) are rather more intricate than I dare attempt at such an hour where I am prone to the odd gin and tonic or two as well as a little snooze. 

So whilst creating numerous chains the other evening…see here .  I found myself hooking up a yarny little heart with not a care of the process noted down at all. 

crochet heart

Fast forward a couple of evenings later when the nest was still and quiet, I found myself unable to sleep, thinking of creative yarny possibilities and my yarny little heart began to trouble me. 

So, I found myself unpicking my heart and writing down the pattern and my world was well again. 

So here is my pattern for a ‘yarny little heart’.

This little heart is a great stash busting hook up as it only requires scraps.

You will need:

scraps of yarn, I used baby / sport weight…but you can use what you have. The thicker the yarn the bigger the hearts.

3.5mm hook, (or hook size to suit your yarn choice)

darning needle to weave in the ends. 

Abbreviations used UK terminology (American terminology in brackets)

Ch – chain,         

slst – slip stitch,           

dc – double crochet (single crochet)               

htr – half treble (half double crochet)

tr – treble (double crochet)              

dtr – double treble crochet ( treble )

Begin with ch2

Round 1: 10dc into 2nd ch from hook (10dc). 

Turn circle over and give the tail end a firm tug…this should pull the centre of the circle into a more closed position.

Turn back over.

Round 2:

Ch 1, 2dc in each st around (20dc)

crochet heart

Round 3:

Ch4 (counts as a dtr), 1dtr in the next 3 sts,
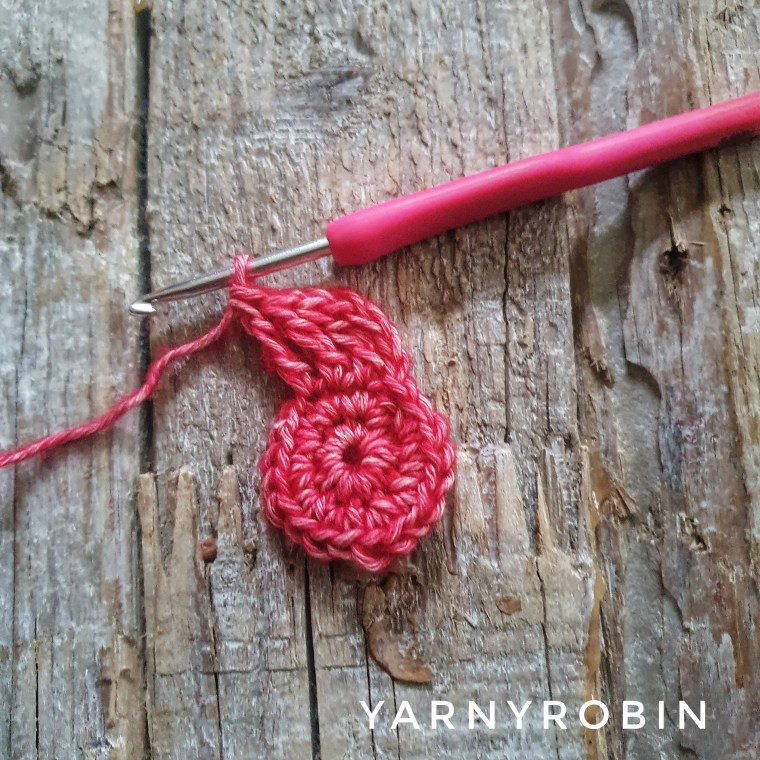
crochet heart

1tr in next 4sts,

crochet heart

1htr in next st, dc in next st,

ch3,  slst into same space (this creates a picot),

crochet heart

dc in next st, 1htr in next st,

1tr in next 4 sts,

1dtr in next 4 sts, slst in to ch1 of beginning ch4.

Round 4: ch4 (counts as a dtr),

3dtr into next 3sts (these are actually the chains from previous round)

crochet heart

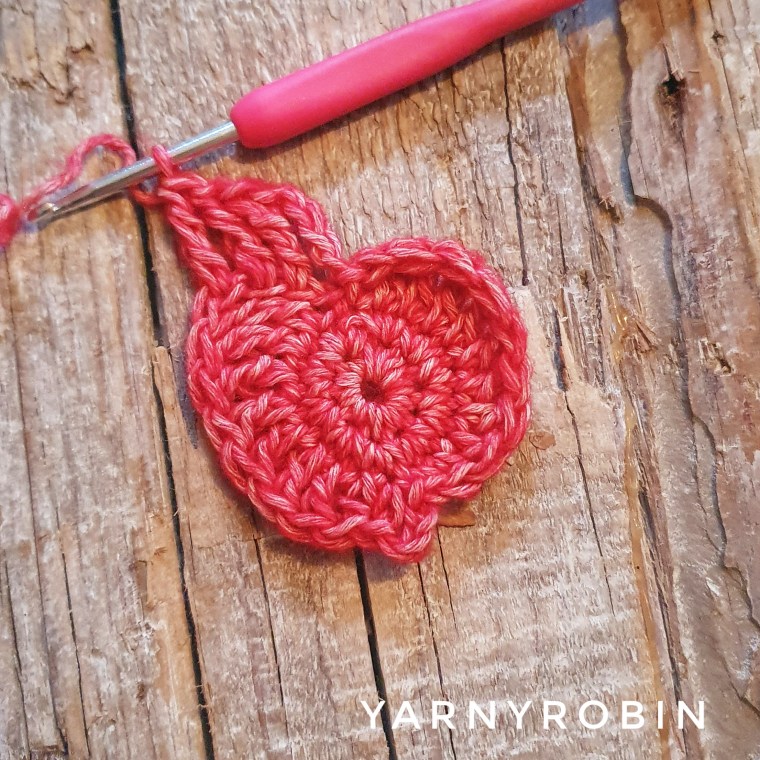
1tr in next 3 sts, 1htr into the next st, 1dc in next 4sts,

Slst in picot space

ch3, slst in to same space (picot made)

crochet heart

1dc in next 4 sts,1htr in next st, 1tr in next 3 sts, 1dtr in next 4sts,

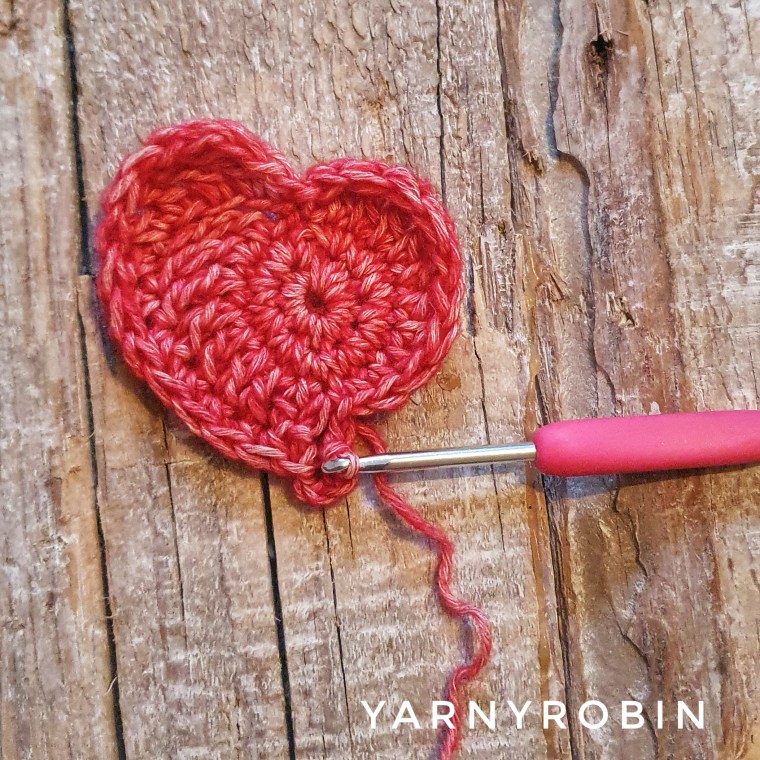
slst in to  the cleft of the heart

crochet heart

Fasten off and leave a long tail if you are going to sew it onto another project as a decoration, or weave in the ends.

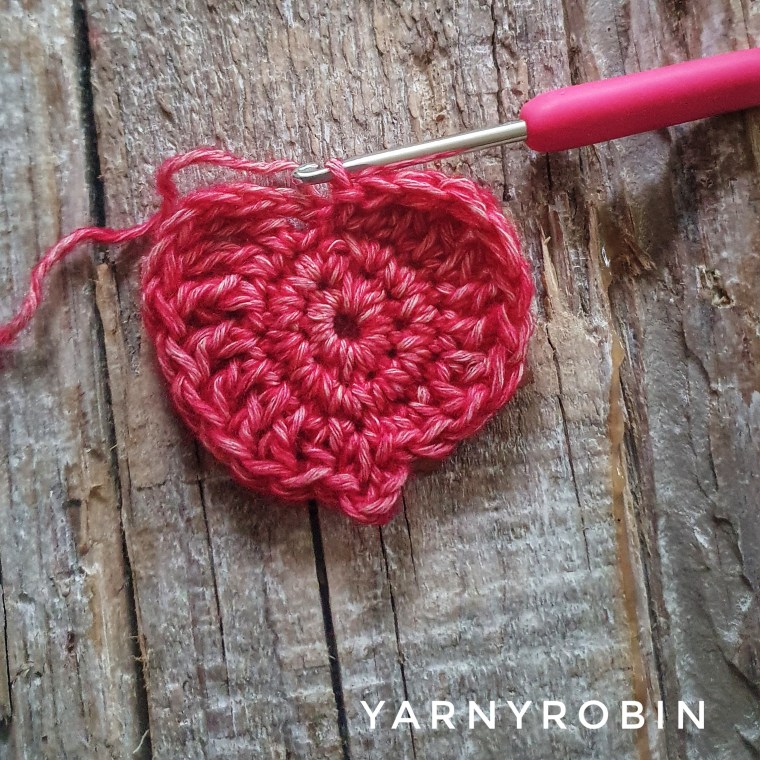
  Repeat until your hearts content.

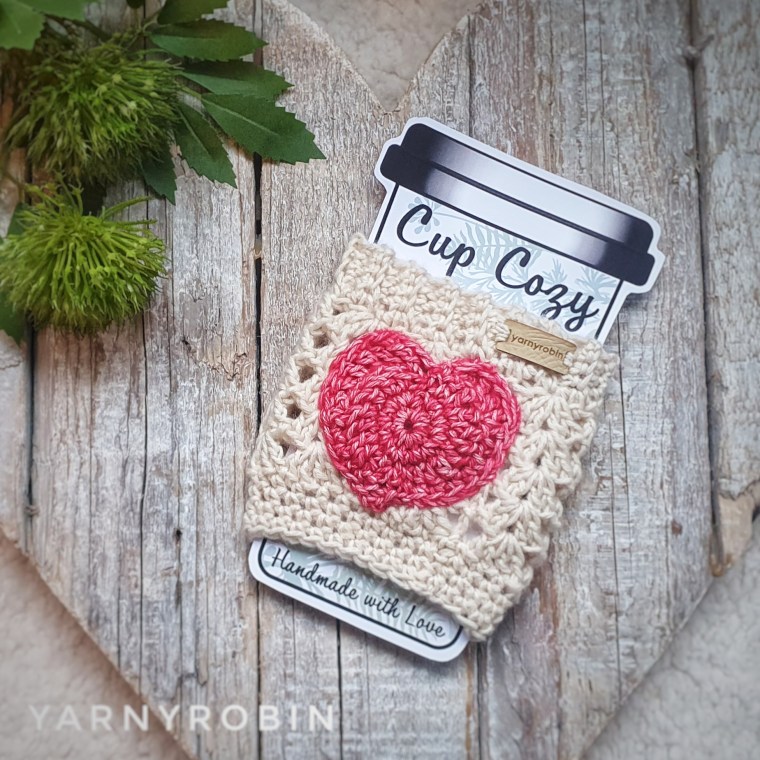
My Galentines cup cosy pattern uses this heart and the cosy pattern can be found for free just here.

heart cup cosy

xxxxx

A yarny little heart ©2016 designed by Nicola Florence @ayarnyrobin 

A little something…a long time in the making!

Do you remember a little while back, in the summer I was lucky enough to win this gorgeous hank of yarn courtesy of Joey of littleblackdogsa all the way from South Africa…WP_20160519_19_02_05_ProWell, this yarn is a dream to hook with and let me tell you I have hooked with it! 

I have hooked and frogged and hooked and frogged, because I wanted this little hank of yumminess to become something special.

WP_20160519_19_01_06_ProYou see this little hank has travelled some miles, all the way from South Africa to the Midlands of England.  Then it wasn’t long before it was travelling again, this time back south to Devonshire. Where it was hooked almost everywhere

InstagramCapture_d6cd7a58-1408-4400-99e6-4f8c05f068f5

poolside… 

InstagramCapture_4cd5d3ea-d57d-47ed-8631-cfc17f410c9b

seaside…

WP_20160817_19_35_55_Pro

and even at the farm.  But, I just didn’t feel the pattern I had chosen was special enough for this beautiful yarn.

WP_20160519_19_01_31_Pro

The yarn as you can see is a 4 ply cotton organic yarn, which slipped over my hook effortlessly.  Its twist meant that it did not split once during all of its hooking and frogging and it also maintained its tension throughout.  But, the best thing about this yarn from One of a Kind Yarns is the amazing and unique  colourway throughout.  My heart swelled each time the delicate colour  blended into the next gentle tone, non so much as when the lemon hues began to merge with the deep lavender…mmm it is still making me smile now! 

Anyway, let me show you what I finally made…

wp_20161024_21_20_16_pro-3


wp_20161024_21_20_39_pro-2

 A little something just for me. 

Thanks to Joey.

xxxxx

Alpaca Walking…yes honestly!!!

I have been so looking forward to writing this post; you see I have been on the most amazing adventure.  However, this post should really come with a warning, so here it is…

This post will make you fall in love; quite a bold claim I realise, so it might be advisable to get yourself a cuppa (or a glass of something bubbly!) depending on what hour of the day it is that you are reading this…and if you are sitting reading this and you are in England then oh my, I take no responsibility!

So warning done, now for the adventure. 

instagramcapture_896916e9-a8ca-4ec6-8aa2-6a9d2ef2a82d
A road trip

It started a month or so a go when the lovely Mr. R booked an anniversary trip of a different kind (don’t worry, this is ‘U’ rated honestly!).  So on Saturday, after counting down the days, we got up early with the boys and headed on a short road trip.  Destination…

img-20161017-wa0001

To say I was excited was an understatement, it took every ounce of control I had not to burst through the gates looking insane.  You will be pleased to know that I think I managed to appear fairly normal!

We were greeted and welcomed into the most amazing farm house by Trish, Zoe and Helen

wp_20161015_14_41_13_proWe were made to feel so welcome and were provided with as much coffee, tea and squash as we desired.  The girls allowed us to relax and take in the view as they chatted and answered all of our questions that we could think of about alpacas; whilst Pip and Tavish the farm dogs snuggled up to us for a bit of fuss.

wp_20161015_14_42_40_pro

After a laid back cup of coffee or two we pulled on our boots and headed outside to be greeted by these lot

wp_20161015_11_37_57_proRight to left

Teddy, Zeus, Tex, Arnie and Brownlee…

all adorable and all ours for the next two and half hours, well not quite, I think Trish had sussed that I was verging on gaagaa over them!!

Arnie chose me to be his walking buddy, he led the pack and was well behaved; gentle and funny.  His top lip got all jittery when he stopped to have a scratch.

wp_20161015_11_49_24_proInquisitive and cautious he constantly surveyed the path ahead, peering his neck around corners to check it was safe to continue; his ears a constant twitch.

We wandered and explored and all the time Trish and the girls guided and chatted and generally put us at ease.  The countryside was just glorious…(Mr R. had ordered the sunshine) and walking with these beautiful creatures filled me with an incredible peace.

wp_20161015_12_33_36_pro-1We paused for a long while next to a babbling stream, drank more juice and paddled, whilst these guys watched us.  We had time to take photo’s too

wp_20161015_12_33_50_proand Yarny and Arnie bonded a little more…

img-20161017-wa0011

(Did you know that alpacas have the most delicious smell; a bit like popcorn). 

Eventually we wound our way back through orchards and fields back to the homestead, where I tried to put Arnie in the car without Trish noticing.  Alas, this did not work and I had to settle for one more photoshoot in the glorious sunshine.

img-20161017-wa0003Before we were treated to more luxurious hospitality, in the form of mince pies and hot cross buns…we had a little chuckle at the clash of Easter and Christmas nibbles, I don’t think I have ever come across that combination before.


wp_20161015_13_51_54_proAt the end of this unique experience,

 I felt like I had partaken in a little peice of heaven and I can’t wait til I can return to  Temevale alpacas   to get up close and personal again with these adorable creatures. 

xxxxx

Nest Rhythm


october-festivities-diversecity

I think that we are  starting to get a rhythm here at the nest…finally.  New job, full time, school, homework, housework and Saturdays.  Oh how I love Saturdays.

  This morning started early with a park run and new personal bests for us all

___-parkrun-is-coming-to-varsity-lakes-parkrun-is-a-free-weekly-5km-timedI have a love, hate, love relationship with running.  I love the idea, I hate the running bit then love the buzz after a run; that lasts for the whole day.

Saturday is always better when yarn is delivered too.

win_20161008_13_26_44_pro

win_20161008_13_27_39_pro

I know exactly what to hook with this ‘new to me’ yarn and I am eager to see how it hooks up as it is ridiculously soft and the colours are divine. 

Rather than complete any PHD’s recently it seems I’ve added to the list…

I had a yearning to do a little more broomstick crochet, but had forgotten how to start and finish each row.

instagramcapture_6f929a33-7f33-4e2c-acb8-004cbd7fb467but a little hooky play during lunchtimes this week has it all sorted

instagramcapture_1ece3533-c4c3-4581-9f76-9fb6326abf27

I think I may make some fingerless mitts, with this yarn now I’ve got the broomstick down.

capture

And of course the next tea cosy in the Grandma collection is being designed, if only in my mind at the moment! 

So cheers for dropping in…

wp_20161001_17_26_27_pro

hope you have a great weekend

xxxxx


Grandma Mary Tea Cosy Pattern

captureThis is a very pretty tea cosy, perfect for keeping your teapot dressed in style and your tea hot.  It is the first of a series of tea cosies which make up the Grandma collection.


Grandma Mary Tea Cosy

Dedicated to the inspiration that was ‘Mary’ the pattern has flowers made on a small flower loom, which are inexpensive to buy and relatively easy to use.  I purchased mine for about £3.

wp_20161001_12_21_06_pro

  The pattern makes a tea cosy that fits a standard 4 cup teapot

I used just under  50g of Rico baby classic dk yarn in colourway (026)

wp_20160826_16_53_44_pro

and scraps of yarn.

  I used scraps of stylecraft special dk in the following colourway (nb/the mint is Stylecraft life dk)

instagramcapture_cb640117-f4ce-4f39-813e-da7bc854082f

Stitches used in this pattern refer to English terminology, however a conversion to US terminology is provided in brackets.

Ch – chain stitch 

slst – slip stitch

dc – double crochet ( single crochet)

dc tog – double crochet together (single crochet together)

You will also need:

a small flower loom

a 4mm hook

a darning needle

scraps of yarn to use as temporary tie markers 

scraps of yarn to make flowers 

a string of beads 50cms long

50cms of lace 0.5cms broad

a stitch marker

Top Tip: safety pins make excellent stitch markers! 

Ok, here we go…

Ch 80 and join with a slst to form a circle (before completing the slst make sure chain is not twisted).

WP_20160829_13_15_50_ProIt is a good idea to check at this point that the circle of chains fits around your teapot. (see end of pattern for instructions about adjusting pattern).

Row 1: Ch1 (mark with a stitch marker, does not count as a dc), dc in each ch around

WP_20160829_14_56_30_Pro

finish with a slst in ch marked with a stitch marker taking care that work is not twisted when completing the slst. (80dc).

Row 2: Ch1 (remove stitch marker from previous row and place in this ch, does not count as a dc)

WP_20160829_15_08_41_ProDc in each st around, finishing with a slst in ch marked with a stitch marker. (80 dc).

Rows 3 – 5: repeat row 2

WP_20160829_15_45_36_ProRow 6: Ch 1 (remove st marker from previous row and place in this ch, does not count as a dc), 1dc in next 14sts, mark next st with a tie marker (different colour yarn which will be removed later – I just tied a bow in red yarn!) see picture below.

WP_20160831_11_11_30_Proslst in same st as tie marker and in next 6 sts  and mark last slst with a second tie marker as shown in the picture above.  This is where the spout hole starts!


1dc in next 33sts, mark next st with a third tie marker, slst in same st as tie marker and in next 4 sts, mark the last slst with a fourth tie marker. This is where the hole for the handle starts!

1dc in next 21 sts, slst in ch marked with a stitch marker. (35dc, 7slst, 33dc, 5slst). Fasten off.

WP_20160831_11_20_31_Pro

This next part of the pattern is worked in rows as side (a) and side (b) and forms the sides of the cosy.

So let’s do side (a) first…

Row 7a: Join yarn in st next to the 4th tie marker and to the right hand side of the stitch markerWP_20160831_11_30_09_Pro

ch1 (does not count as a dc), 1dc in next 35 sts to next tie marker, turn.

Row 8a: ch1 (does not count as a dc), 1dc in next 35sts to tie marker, turn.

Rows 9a – 25a: repeat row 8a, fasten off.

WP_20160831_13_15_48_ProOK, now let’s do side (b).  Turn over work and join yarn in st next to  second tie marker on the right as shown.

WP_20160831_13_16_27_ProRow 7b: ch1 (does not count as a dc), 1dc in next 33 sts to next tie marker, turn.

Row 8b: ch1 (does not count as a dc), 1dc in next 33 sts to next tie marker, turn. Rows 9b – 24b: repeat row 8b.

WP_20160902_11_45_23_Pro

Row 25b: ch1 (does not count as a dc), 1dc in next 33sts to next tie marker, ch5,

slst into 1st st on row 25a as shown.

WP_20160902_12_44_46_Pro

WP_20160902_12_43_31_ProAgain, this is a good point to check the cosies fit on your tea pot.  We return to working in the round again now.

So Row 26: Ch1 (mark with a stitch marker…NB/ this ch does count as a dc), dc in next 34sts, ch7,

WP_20160902_12_50_01_Prodc in next 33sts,

WP_20160902_13_13_20_Prodc in next ch5, slst into ch marked by stitch marker. (80dc).

WP_20160902_13_21_47_Pro

Row 27: ch1 (remove stitch marker from previous row and place stitch marker in this ch, counts as a dc), dc in next 34sts, dc in next 7chs

wp_20160906_15_14_56_prodc in next 38sts, slst in ch marked with the stitch marker. (80dc)

wp_20160906_15_39_50_prowp_20160906_15_39_34_proIt is now time to start decreasing the number of stitches to form the top of the cosy.  To do this a dc tog stitch is introduced.  Top Tip: each row that uses dc tog stitches finishes on a dc tog before slst in to ch marked with st marker!  Here we go…

Row 29: ch1 (remove stitch marker from previous row and place in this ch, counts as a dc), dc in next 5sts, dc tog in next st, *dc in next 6sts, dc tog in next st*

repeat * -* around,

finish with a slst in ch marked with stitch marker. (72dc). 

wp_20160909_13_18_43_proRow 30: ch1 (remove stitch marker from previous row and place in this ch, counts as a dc), dc in each st around, finishing with a slst in ch marked with stitch marker. (72dc).

Row 31: ch1 (remove stitch marker from previous row and place in this ch, counts as a dc), dc in next 3 sts, dc tog in next st,  

* dc in next 4 sts, dc tog in next st *, repeat *-* around,

finishing with a slst in ch marked with stitch marker. (60dc).

  Row 32: ch1 (remove stitch marker from previous row and place in this ch, counts as a dc), dc in each st around,

finishing with a slst in ch marked with stitch marker. (60dc).

Row 33: ch1 (remove stitch marker from previous row and place in this ch, counts as a dc), dc in next 2sts, dc tog in next st, * dc in next 3sts, dc tog in next st *, repeat *-* around,

finishing with a slst in ch marked with stitch marker. (48dc).

wp_20160909_14_01_34_pro

Row 34: ch1 (remove stitch marker from previous row and place in this ch, counts as dc),

dc in each st around, finishing with a slst in ch marked with stitch marker. (48dc).

Row 35: ch1 (remove stitch marker from previous row and place in this ch, counts as dc), dc in next st, dc tog in next st,

* dc in next 2 sts, dc tog in next st *, repeat *-* around, finishing with a slst in ch marked with stitch marker. (36dc). 

Row 36: ch1 (remove stitch marker from previous row and place in this ch, counts as dc), dc in each stitch around, finishing with a slst in ch marked with stitch marker. (36dc). 

Row 37: ch1 (remove stitch marker from previous row and place in this ch, counts as dc), dc tog in next st,

* dc in next st, dc tog in next st *

repeat *-* around, finishing with slst in ch marked with stitch marker. (24dc).

wp_20160909_14_58_12_proRow 38: ch1 (remove stitch marker from previous row and place in this ch, counts as dc), dc in each st around, finish by slst into ch marked with stitch marker. (24dc). 

Row 39:ch1 (remove stitch marker from previous row and place in this ch, counts as dc), dc tog in next st,

* dc tog in next st * repeat *-* around, finish with a slst in ch marked by stitch marker. (12dc).

Row 40:repeat row 39 (6dc).

Row 41: repeat row 39 (3dc). Fasten off.

wp_20160909_15_17_19_proYou should have something that resembles the above …now its time to make the flowers!!!

If you don’t know how to make loom flowers they are simple to make.  I highly recommend you watch a tutorial…I found this one excellent…

loom bloom video tutorial

wp_20160918_17_27_13_pro

Make

x8 white / violet flowers

x10 raspberry flowers

x9 pale rose / plum flowers

all flowers to have the same colour centre…I used mint.  Leave long tails on each flower to make attaching them easier.

Keep back x1 raspberry, x1 white, x1 pale rose and x1 plum flower.

Begin to attach the rest of the flowers to the top of the tea cosy using the long tails and  darning needle.

wp_20160918_19_54_15_proContinue around

wp_20160918_20_07_31_pro

 Evenly attaching the flowers…

wp_20160918_20_32_27_proOnce attached turn tea cosy inside out and tie of all loose ends

wp_20160918_20_33_12_pro

Snipping to make tidy.

wp_20160924_12_48_51_pro

 Next, take the lace. Turning the tea cosy inside out tack the lace around the edge of the opening for the spout and the handle.

wp_20160924_18_13_18_prowp_20160924_18_14_11_pro

Turn, the cosy back to the right side; you should now have a cosy that is beginning to look very pretty indeed…

wp_20160924_18_44_20_pro


Taking the string of beads, thread a darning needle with some raspberry coloured yarn and tie a large knot.

wp_20160924_13_11_09_pro

 Starting at the bottom side of the handle hole pull the needle through from the inside of the cosy to the outside so that the knot cannot be seen.

wp_20160924_12_55_08_pro

Begin to tack between each bead, fixing them in a line around the cosy towards the spout hole.wp_20160924_13_13_06_prowp_20160924_13_15_29_proOnce at the spout hole, snip the beads, turn cosy over and repeat on side b.

wp_20160925_16_57_02_proFinally, attach raspberry coloured flower at the bottom of the handle hole in the space between the beads.

wp_20160925_17_05_30_prowp_20160925_17_08_50_proAttach remaining white, pale rose and plum flower in space between the beads at the bottom of the spout hole. Weave in any remaining loose ends.

wp_20161002_11_46_10_pro

Just one last thing left to do now.  Boil the kettle and make a brew…enjoy and admire.

NB/ TIPS FOR ALTERING THE SIZE OF THE cosy…regularly check the size of the cosy on your teapot.  The body of the cosy has the same amount of stitches as row 1, if yours is more or less than 80sts then keep the number of sts you have up to row 28  in order to create the handle and spout holes, place around your teapot and mark with tie markers as described then count your sts between each marker and substitute your numbers into the pattern.

xxxxx

Grandma Mary Tea Cosy part of the Grandma Collection ©2016 designed by Nicola Florence @ayarnyrobin

The Grandma Mary Tea Cosy

captureIntroducing the ‘Grandma Mary’ tea cosy…the first in the Grandma Collection

Grandma Mary Tea Cosy

Dedicated to my Grandma Mary who was a truly inspirational woman.  Born in October 1916 and christened Vera Mary, she grew up in England in the West Midlands and trained as a primary school teacher.  I was privileged to have had her in my life for 34 years before she left this world at the grand old age of 94.  Granny Mary played a huge part in nurturing my creativity as a little girl, teaching me how to make pompoms and to French knit  using a wooden cotton reel and some nails that my Grandad would have made.  She was a gentle and patient woman, who always had a smile and a piece of chocolate.  I once asked her what the best invention of her life time had been and without hesitation she quipped…’washing up liquid!’ 

wp_20161002_11_46_43_pro

Granny Mary worked hard, but always took time to make things pretty… whether that was pansies in the garden, geraniums in the porch, sugar on a peeled apple, a pretty apron whilst doing the housework or a tea cosy for the teapot.   

Prettiness was important because it was the way she cared for people  and her care was a true blessing. 

wp_20161002_11_46_10_pro

So this cosy had to be pretty, in colours that evoke memories of her and of course had to be covered in flowers.

wp_20161002_11_49_38_pro

  The beads at the bottom of the cosy actually belonged to her.  I  have a bag of broken plastic beads that she gave me – she never threw anything away! 

wp_20160924_13_15_29_pro

I am honoured to put them to good use…I think she would be really very pleased with their new use.

wp_20161002_11_45_46_pro


So that is the Grandma Mary tea cosy in all of its glory, here is the pattern linky thing.

xxxxx

The Grandma Collection

captureI’m so, so, soooo super excited to launch this new series here at the nest.

  I would like to introduce you to a collection of  beautiful tea cosies over the course of the next few months, named ‘The Grandma Collection’.  Each one dedicated to the inspirational women in my life. 

The patterns will of course be crocheted, but will also include other mixed media embellishment, making these cosies the perfect companion for your teapot….and as always the patterns will be free. 

If you have been following me on Instagram then you will have seen some sneak peeks…

WP_20160829_15_45_36_Proinstagramcapture_cb640117-f4ce-4f39-813e-da7bc854082finstagramcapture_894cbc90-dc64-47fa-a617-a09db0fd10bcThe Grandma Mary tea cosy… coming later this week.  I really hope you will enjoy this series with me.

xxxxx

Since this post was written there are now four stunning Tea Cosies available in this series…the links to each can be found below.

Mary

Mabel 

Dot 

Florence 

I do hope you enjoy these free patterns and that your tea pots love their new adornments.

xxxxx

A looming bouquet

You may remember back in April I had to open my birthday present a whole week early to prevent insanity prevailing…you can read about it just here if you feel the urge to do so!

instagramcapture_fc488bef-7c0d-4a11-8108-8f603a1ea72e

Well despite my many Phd’s I began another…I really couldn’t help it.  In my defence this project won’t ever become a phd as it only takes ten little minutes to make each one…

instagramcapture_3d400279-76bc-47ea-9122-5a287dd33a52

Aren’t these little loom blooms the sweetest yarny flowers ever?

They have made me extremely happy.  So happy infact that I found it quite difficult to leave my current yarny nirvana to come and share with you this delight. 

So, if you will excuse me I’m off to finish a looming bouquet.

xxxxx


A lovely week

Well put out the crochet bunting….I’ve qualified!…a long hard slog, but it is done. 

So of course celebrations have been ongoing (both alcoholic and non alcoholic), but my favourite (and the one I am going to share with you) was a blissful week at home, pretty much to myself.  Doing this sort of thing…

wet Jess
Bathing Jess…
InstagramCapture_3735a626-ffcc-447a-8415-d1f7727bedbf
she looks so cute once she gets a blow dry…
drinking coffee from my special mug
drinking coffee …
working on a new tea cosy pattern
working on a new tea cosy pattern…
Enjoying suprise gifts left by a neighbour
Enjoying suprise gifts left by a neighbour…
planting out my winter window boxes
planting out my winter window boxes…

wp_20160907_18_35_41_pro

and hiding daffodill bulbs under the ground
and hiding daffodill bulbs under the ground.
Enjoying a fish and chip picnic
wp_20160908_08_36_13_pro
and contemplating what to do with these bag handles??????
wp_20160909_20_04_04_pro
Enjoying the cosiness of home with friends…
wp_20160909_19_52_45_pro
Yes…a lovely week indeed…Now, the hard work really begins! xxx


A quilting OUCH?

Oh deep joy!!!

The lost hours deep cleaning the back of beyond in my teenagers wardrobe has resulted in screams of delight followed by screams of pain as I fell off the ladder!!…but, I have finally found the long lost quilts….and sprained my ankle.  That aside look, look at these…

wp_20160907_12_09_02_pro

My bravery in summoning up the courage to venture into the teens room was rewarded well, when on tip toe I stood on one foot, precariously balanced on the handle of the step ladder, which of course was not tall enough.  It was also painful to stand on for longer than a second and peering my head into the deep dark recess of the cupboard I could see what looked like a familiar old sewing bag.  And so I grabbed a pillow and placed it over the handle of the step ladders (as in the style of an episode of Casualty*); where the impending injury is starkly apparent to all but the poor human it is about to befall.  I gave a large tug at the bag, screamed with delight as I cast my eye upon my long lost quilts and then drew in sharp breath as my foot slid of the handle of the step ladders and I plummeted to the floor with the quilts in hot pursuit. I will spare you a picture of my bruises!

  It was worth it though.

636089393114987629
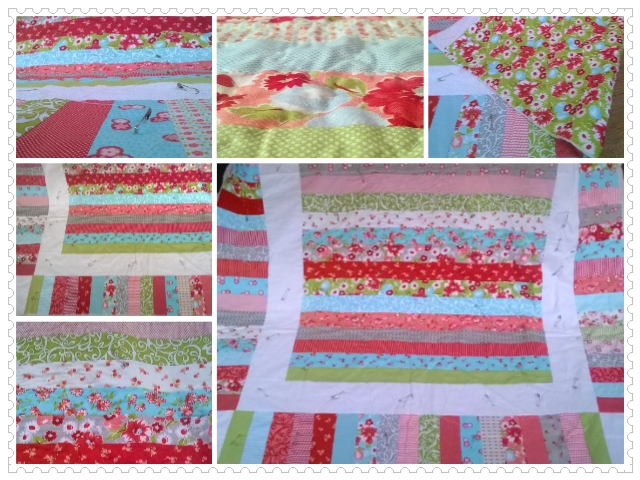
This is a beautiful single quilt patched from a jellyroll…I made it whilst recovering from surgery some years ago.  I have part hand quilted the main section and will have to ponder about how I finish the rest.

636089395575201470
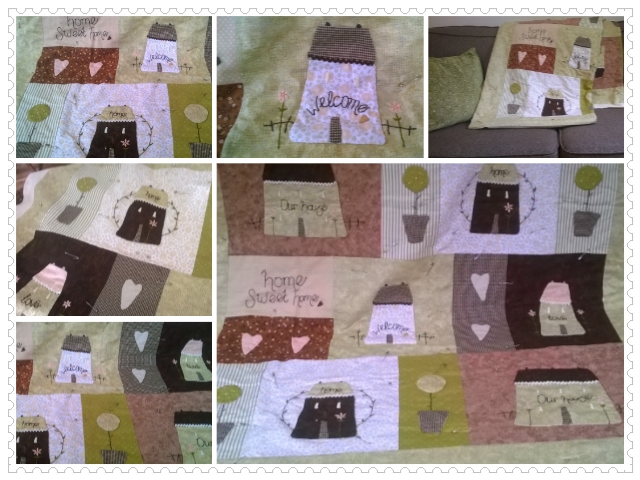
This is a lap quilt I began making years ago, before I learnt to crochet.  It is a Tilda pattern and I remember the roses around the little cottages took a long time to hand sew.  I really must get this quilted before this winter. Alas my PHD mountain has just grown some more!

xxxxx

*Casualty – a BBC drama about an accident and emergency dept