I haven’t got much spare time at the moment, but I wanted to give you all a little Christmas present to say thank you for stopping by and supporting me over the last year…I really appreciate every one of you that reads my posts, likes my posts or leaves me a comment, so I thought a little free Christmas crochet pattern would be the perfect gift for you.
This beautiful Peony Bib set is both pretty and practical as well as perfect for a special occasion. Made from 100% cotton, these bibs are absorbent making them ideal for catching dribble. The patterns are suitable for a beginner with some experience of basic crochet stitches and each bib uses less than 50g of cotton… just perfect for gifting a special little someone!
I have really enjoyed putting this beautiful Peony Bib set together and I hope that you love it just as much as me. The pattern suggests using Drops Safran 100% Cotton yarn and if you have been following my recent posts you will know this is my go to cotton yarn. The cotton makes these bibs super absorbent, so just perfect for dribbling, teething babies. Not only that, but it is also Oeko Tex standard 100 approved; which means the cotton has been certified to be free of harmful chemicals and is safe for human use, as well as being verified as both safe and non irritating to human skin.
The handy Bib printable were made for me by MJHARRISPRINTABLES. I highly recommend this shop for all of your crochet gifts, if you want to label them professionally.
This bib set would make a great baby shower gift, coupled with my free Teething ring pattern…don’t you think? So if you fancy 10% off this pattern use code Happy10… but hurry because that offer won’t be around for long!
This pattern contains affiliate links which means I may earn a small commission if you purchase through them, at no extra cost to yourself. By shopping through these links, you’re helping support this blog and the free content I share — thank you so much.
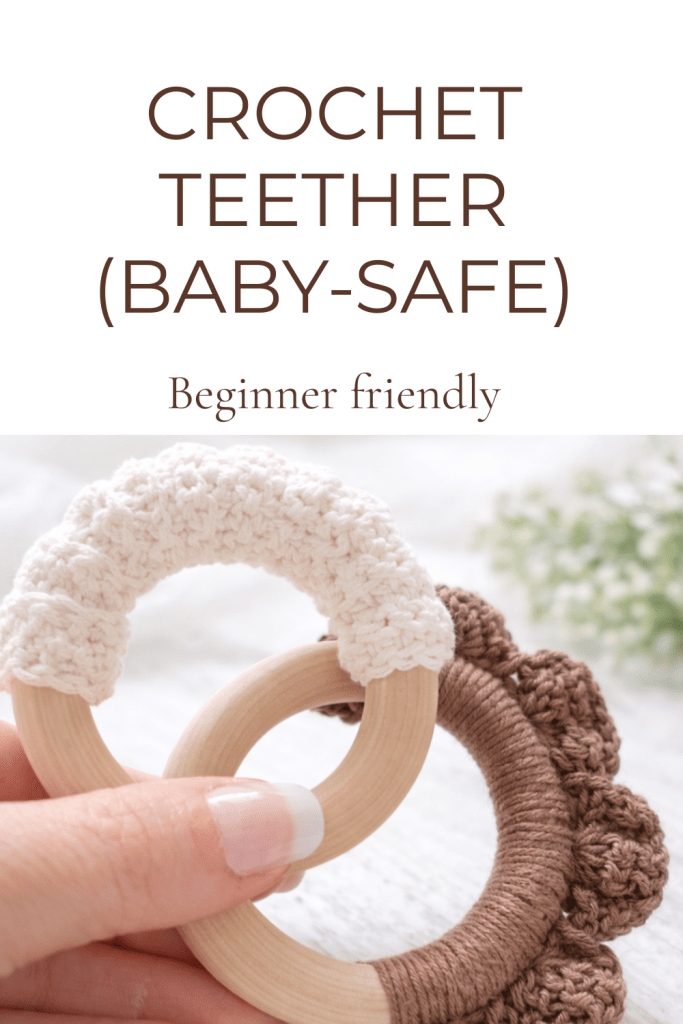
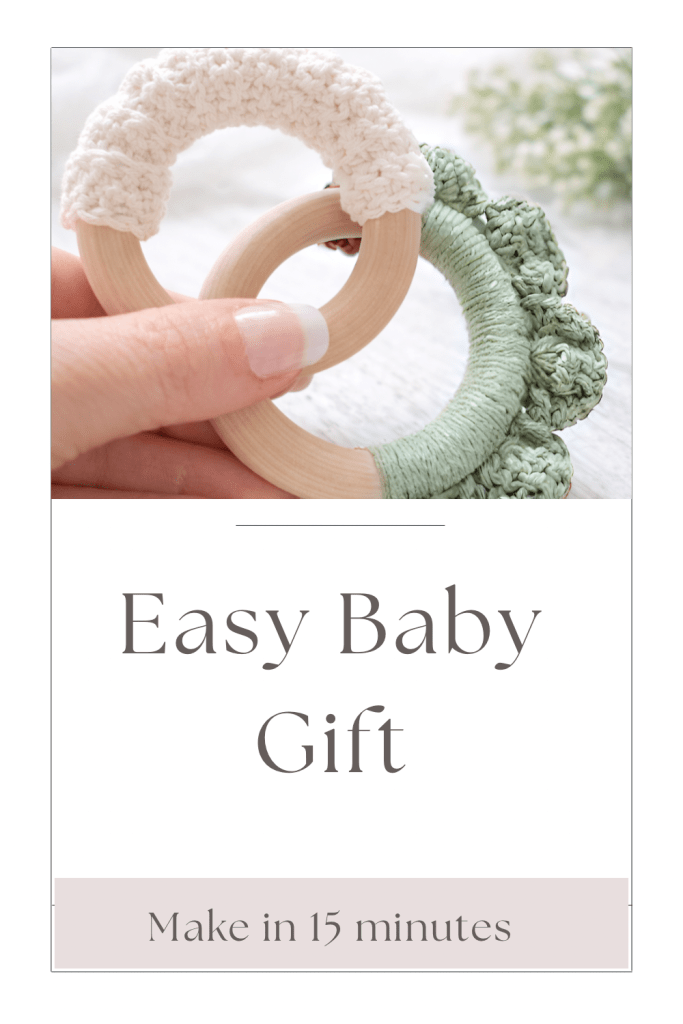
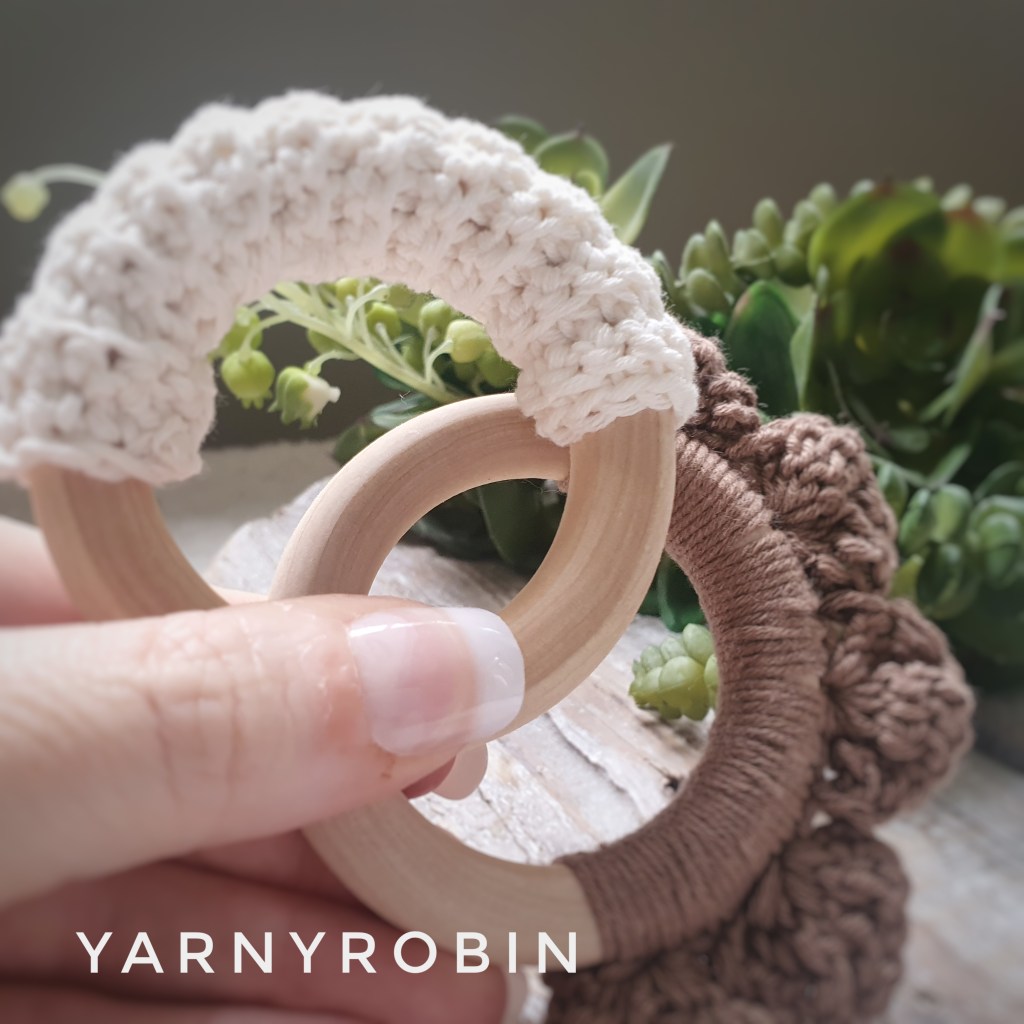
Today I’m going to share with you my amazingly simple pattern for making Crochet Teething Rings.
The pattern is suitable for a beginner and they literally take 15 minutes to make.
Teethers, make cute baby shower gifts on their own. They also make an ideal accessory set when paired with my Spring Bunny Lovey. What’s more they are made with safety in mind and safe for baby to chew on. They are also really useful first toys to help develop Baby’s hand eye coordination and grasp.
Prefer an ad-free, printable pattern? I’ve created a tidy PDF version teething ring pattern with UK & US crochet terms included, perfect for printing or saving to your pattern library.
A word on yarn choice
I have opted to use Drops Safran 100% cotton as it is not only affordable, but it has a great colour pallete too. It was also really important to me that I chose a cotton that was Oeko Tex standard 100 approved. This means the cotton has been certified to be free of harmful chemicals and is safe for human use. It has also been verified as both safe and non-irritating to human skin.
Pattern Protocols
This pattern including all photos are the property of Nicola Florence at ayarnyrobin.wordpress.com. Please do not modify, resell, publish in part or in full, or share this pattern or photo’s as your own. You may sell finished items made from this pattern, (subject to toy making regulations) I hope it becomes a hot item for you; but please credit, with a link, that the item is made using @yarnyrobin pattern
less than 10g of Drops Safran 100% cotton in colour of choice
This pattern is written using UK crochet terminology and the stitch abbreviations can be found below. I have included US terminology in brackets if you wish to convert.
Repeats are marked by asterisks *.
Stitch Abbreviations:
Ch – chain stitch /chain stitch (US)
St – stitch / stitch (US)
Slst – slip stitch / slip stitch (US)
Dc – double crochet / single crochet (US)
Dtr – Double treble / treble crochet (US)
BLO: Work stitch as stated, but in back loop of stitch only.
Dc – Insert hook into chain or under both loops of stitch, yarn over and pull through so there are 2 loops on hook, yarn over again and pull through both loops on hook.
Dtr – yarn over hook twice, insert hook into chain or under both loops of stitch, yarn over and pull through so there are 4 loops on hook, yarn over again and pull through 2 loops, yarn over and pull through 2 loops on hook, yarn over and pull through last 2 loops on hook.
Would you like an ad-free printable PDF version of this pattern? It is useful if you’d prefer to work offline or to keep in your pattern library. It includes both UK and US crochet terminology so you don’t have to keep converting – just download the version you prefer. Click the link below
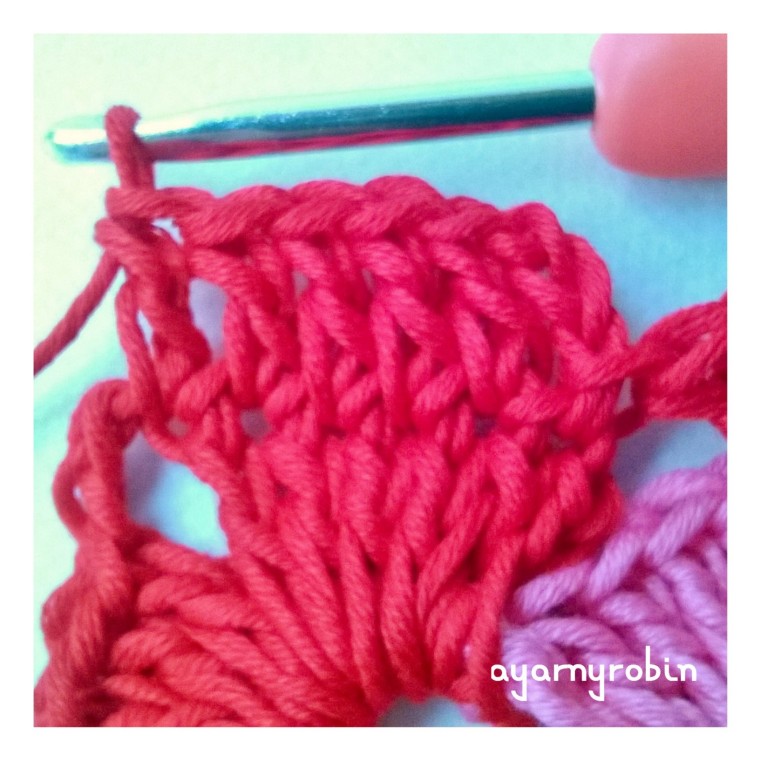
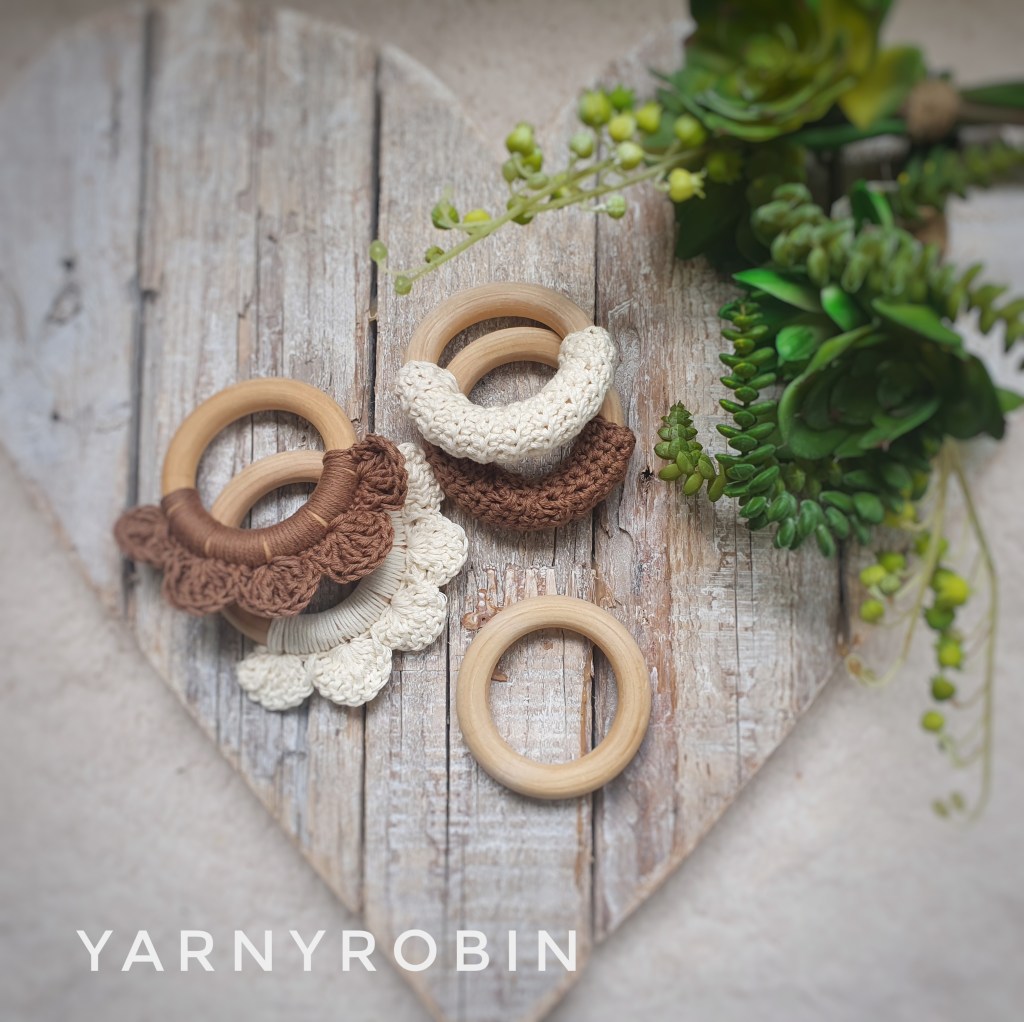
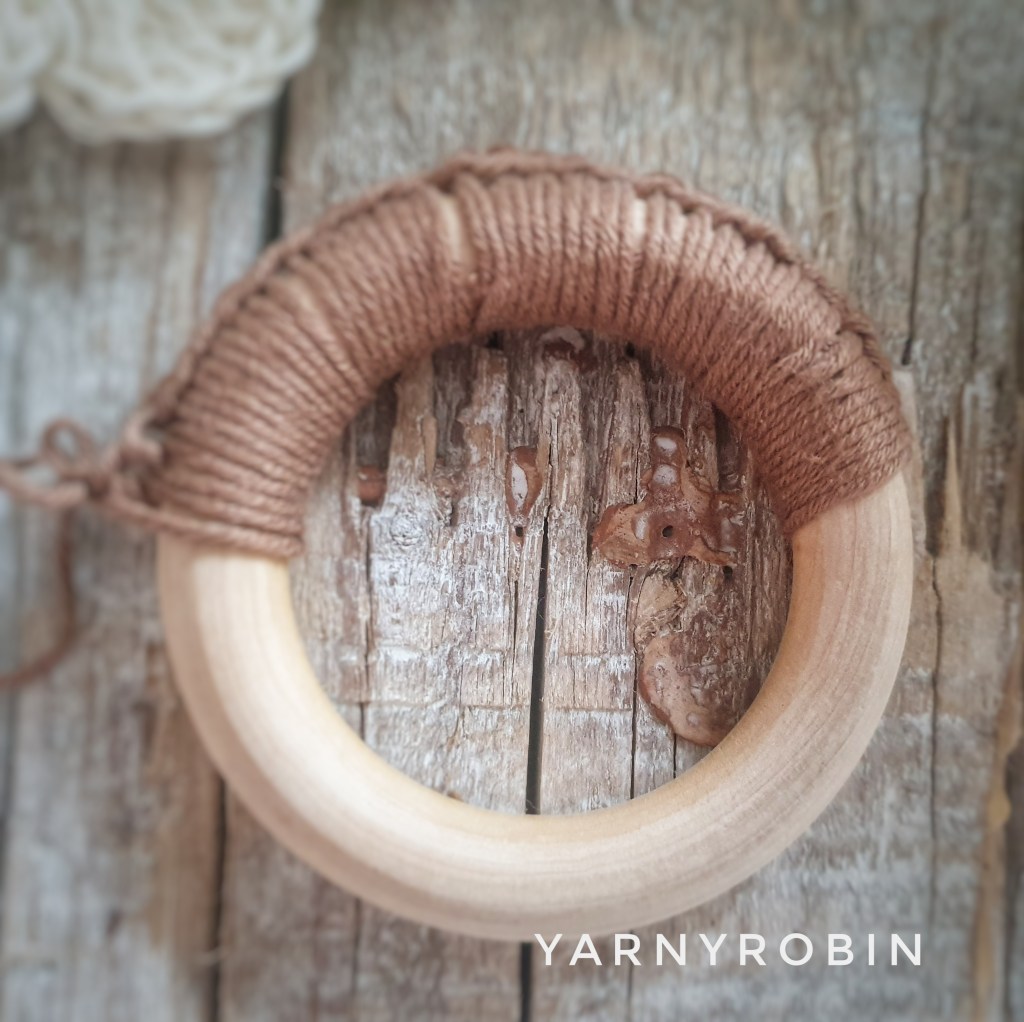
Petal Teething Ring
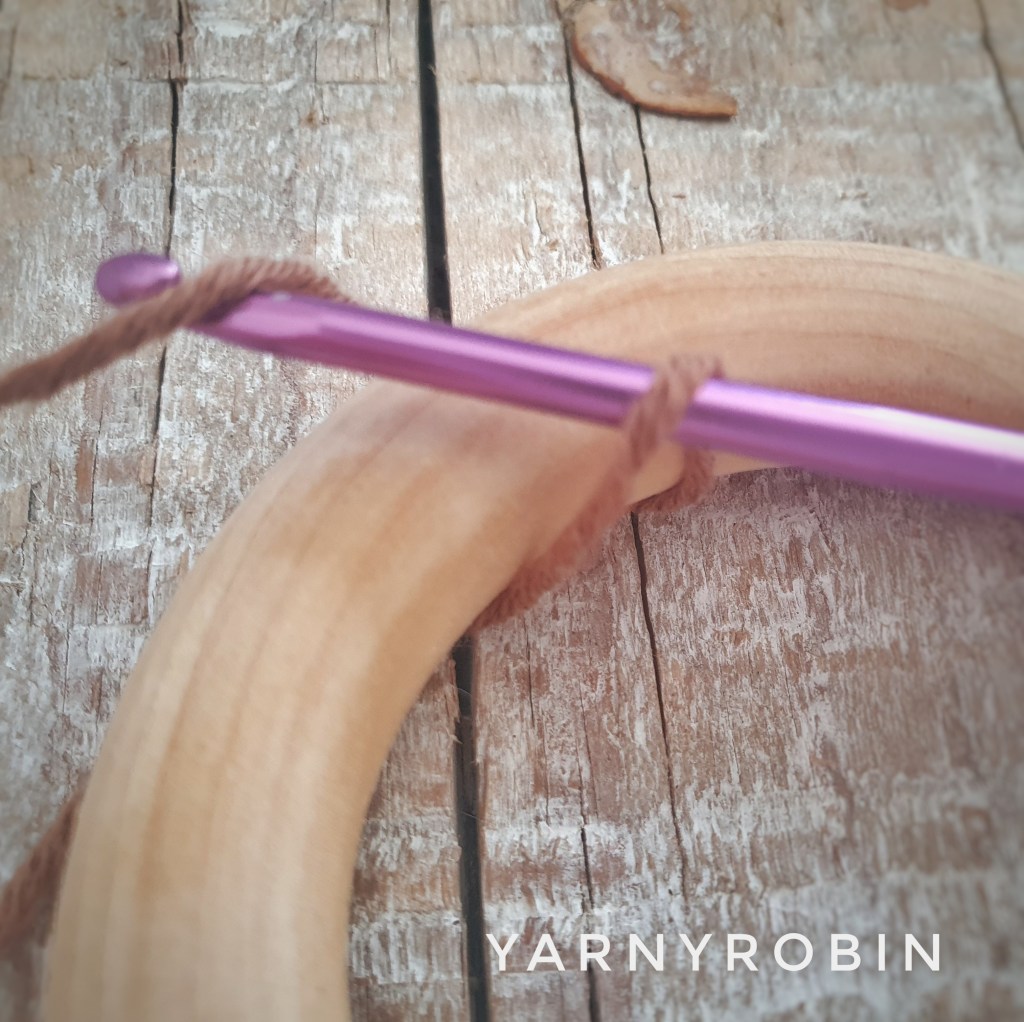
Begin by securing yarn around the teething ring with a slst (this does not count as a st)
28dc around teething ring
ch1 and turn,
miss a st, *9dtr in next st, miss 2 sts, slst into next st, miss 2 sts* repeat * – * 3 more times, 9dtr in next st, miss a st, slst into last st.
Because you are cramming 9dtr into one st, it is easy to miscount the 2 missed sts immediately after; as the 1st missed st tends to hide under the petal made, so if your stitch count isn’t working for you check this first!
Fasten off and weave in loose ends.
The teething rings can be washed in the washing machine, or hand washed as per preference. Always check teething ring for safety before each use.
📌Pin this post for later
Top Tip
Wet the crochet petals with cold water and place the teether in the freezer, for an extra boost of teething comfort
If you’re making these teethers for a baby shower or gift set, you might also like my crochet Bunny Lovey pattern — which is also quick to make and pairs beautifully with these teethers.
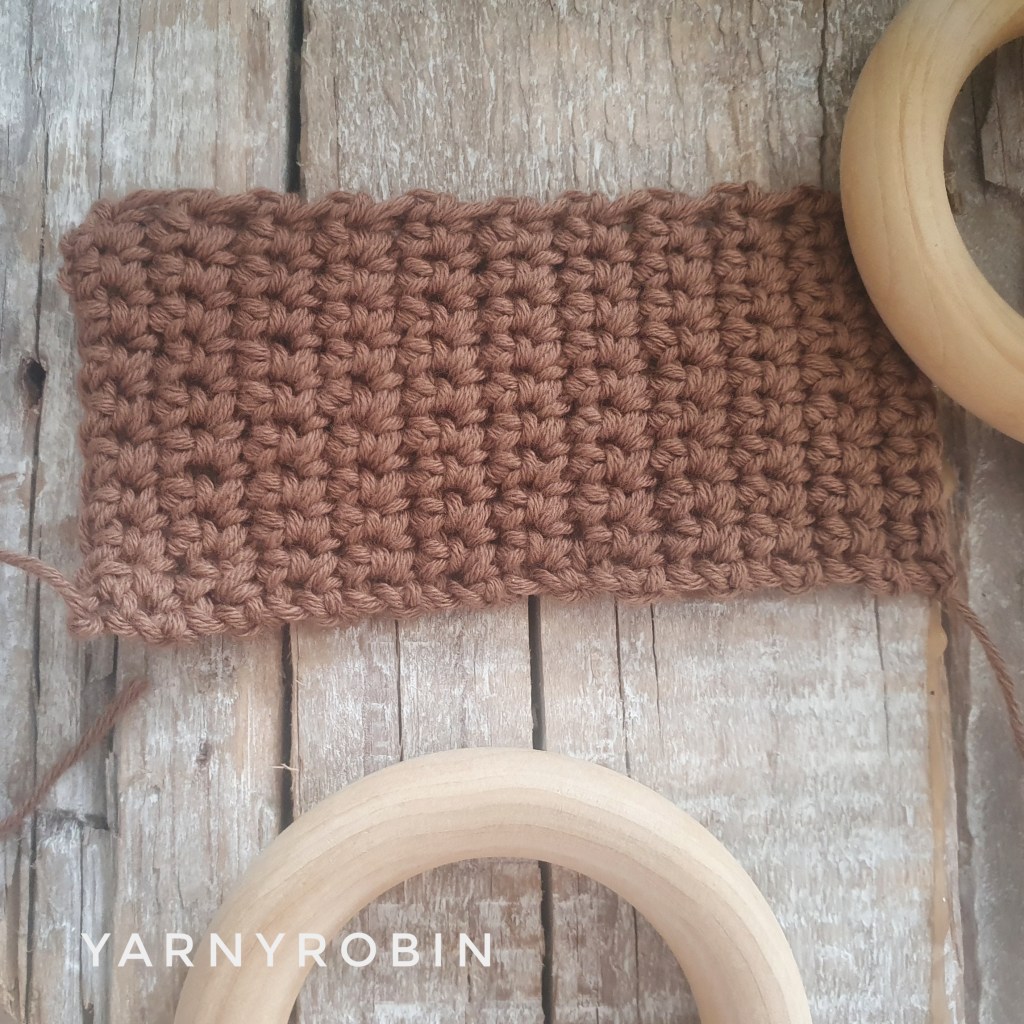
Ridged Teething Ring
chain stitches do not count as a stitch throughout pattern
Ch11, dc in 2nd ch from hook and in each ch along, ch1 turn (10dc)
For ridged teether work remainder of pattern in back loops only -BLO. For a smooth crochet look work sts as normal. NB/ pictures below are not worked in back loop so do not show ridged effect. See picture at the top of this post for ridged effect.
Row 2 – 21: dc in each st along, ch1, turn
Fasten off leaving a long tail for sewing.
Sew long sides of rectangle together around the teething ring, using a whip st. Fasten off and weave in ends.
If you give this teether a go, I’d absolutely love to see it.
Which colour did you choose — blush, cream, sage… or something totally different? Let me know in the comments.
If you enjoy beginner-friendly patterns like this, feel free to have a little browse around the blog and follow along for more cosy crochet ideas.
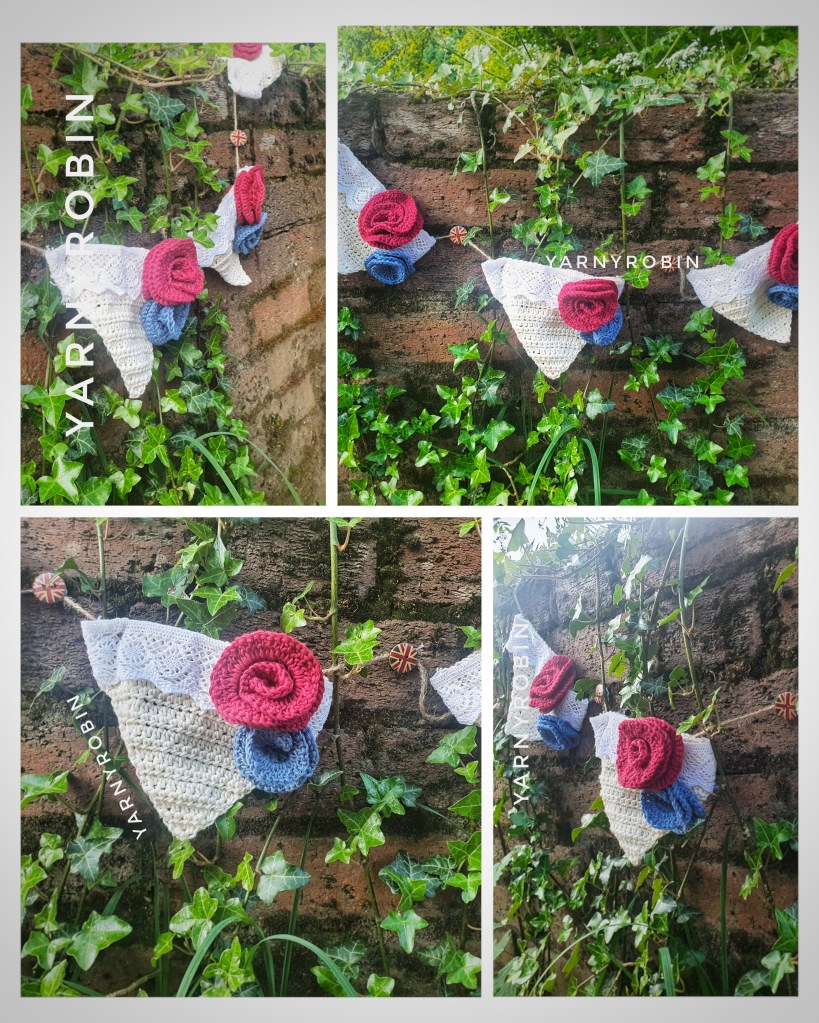
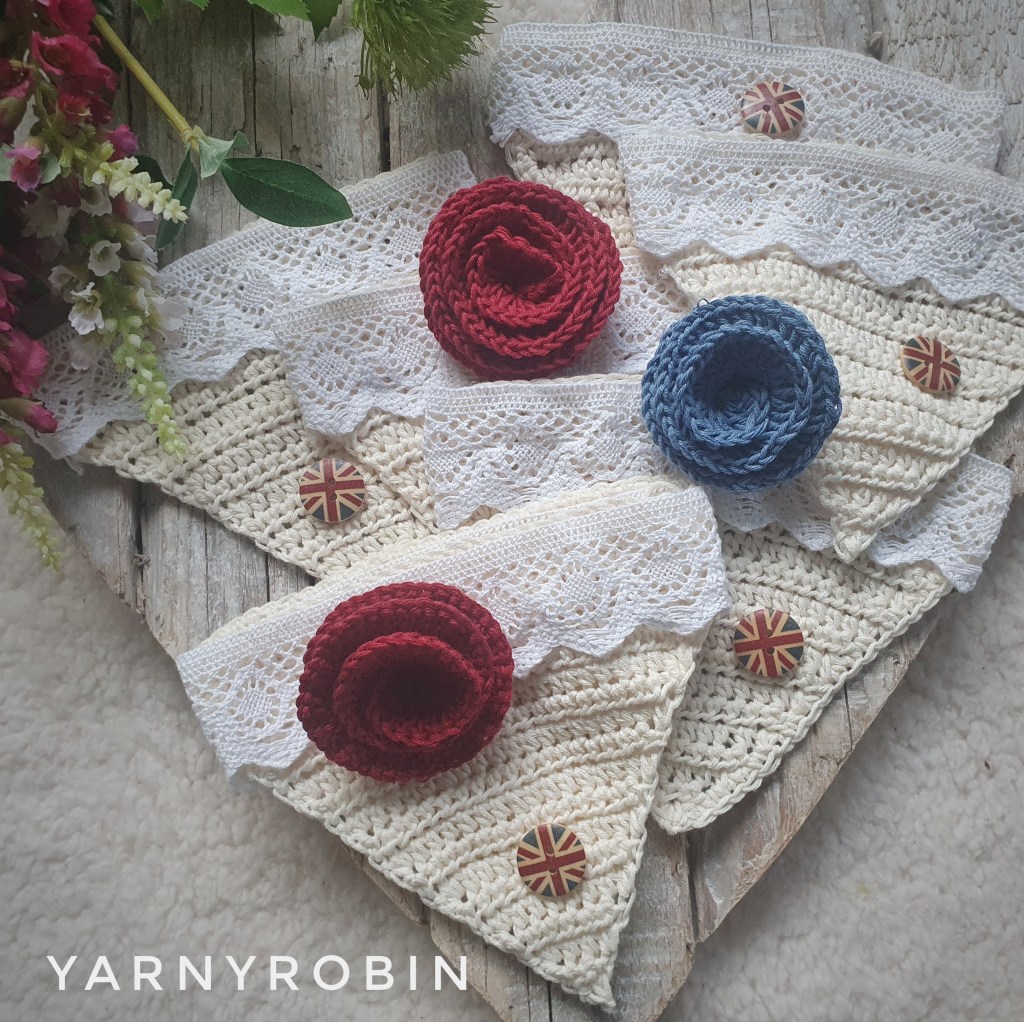
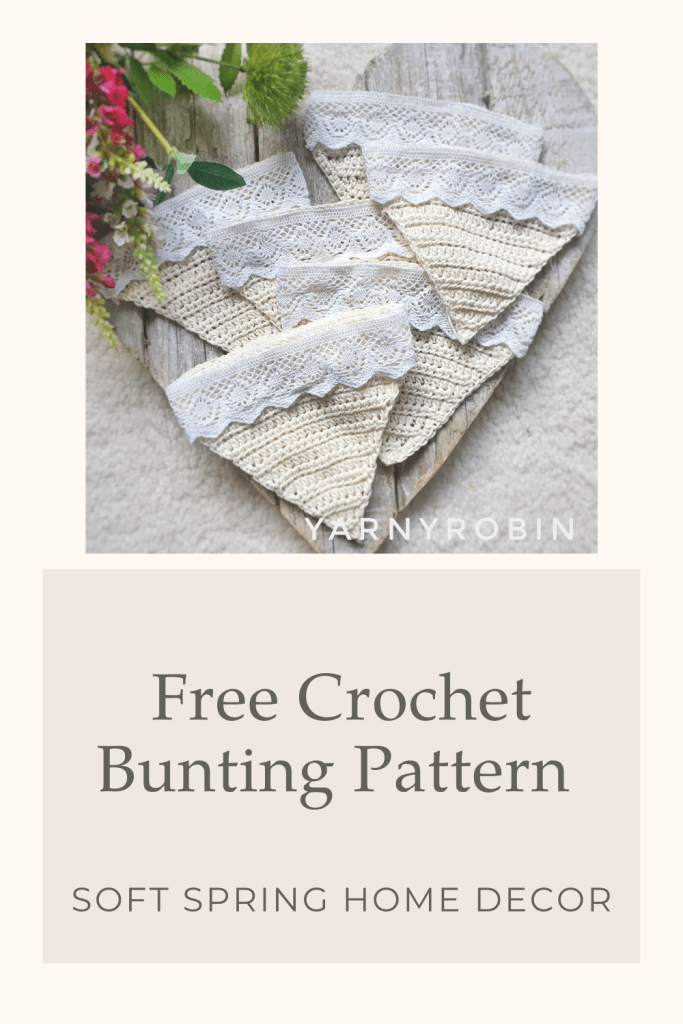
With Her Majesty’s Platinum Jubilee just around the corner I thought I’d share my progress on my Jubilee decorations and share the pattern with you. After all what good is a garden party or afternoon tea without a bit of bunting?
To make the bunting flags please see my previous post just here They are simple to make and the lace trim gives a pretty, vintage vibe. What’s more if you tie your embellishments to the flags rather than sew them on, the bunting can be recycled and dressed up again for the next occasion / holiday season in your calendar…clever eh!
I wanted my Jubilee bunting to be traditional in colour , so of course it had to be red, white and blue, but I wanted it to look pretty and almost understated, so you won’t find any navy or lipstick red here! instead I chose a more muted red tone and coupled it with a mid blue. I also wanted to incorporate the Union Jack and found these gorgeous little buttons, which again are more subtle in tone.
This pattern is written using UK crochet terminology and the stitch abbreviations can be found below. I have included US terminology in brackets if you wish to convert.
Dc: Insert hook into chain or under both loops of stitch, yarn over and pull through so there are 2 loops on hook, yarn over again and pull through both loops on hook.
Tr: Yarn over hook, insert hook into chain or under both loops of stitch, yarn over and pull through so there are 3 loops on hook, yarn over again and pull through 2 loops, yarn over and pull through last 2 loops on hook.
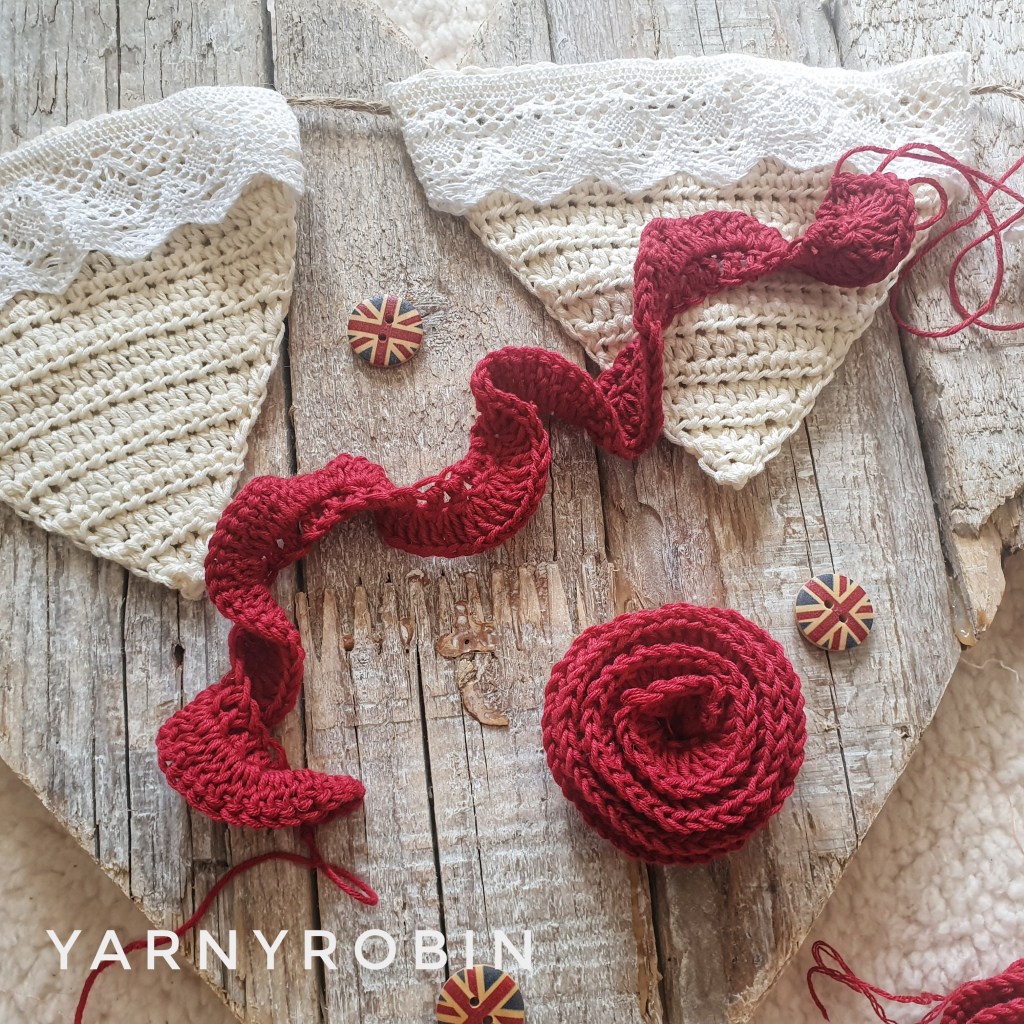
Large Jubilee Rose
In cherry
Leave a long tail, ch 50
Tr in 2nd ch from hook, tr in each ch along, dc in last ch
Ch3, turn
2tr in same space, 3tr in each st a long, dc in last st. Fasten off leaving a long tail
Small Jubilee Rose
In denim blue
Leave a long tail, ch 33
Tr in 2nd ch from hook, tr in each ch along, dc in last ch
Ch3, turn
2tr in same space, 3tr in each st a long, dc in last st. Fasten off leaving a long tail
To assemble
Spiral flower in an anti-clockwise direction with one long tail at the front of the rose and one long tail at the back of the rose. With a darning needle take the front tail through to the back of the rose to secure centre petal. Now make several passes of the needle at back of the rose making sure you catch all the layers of the rose. With other tail, thread darning needle and make several more passes at the back of the rose. Tie tails together in a knot to secure. Attach to bunting by passing both tails with a darning needle through to back of flag and tie neatly so tails tuck neatly behind flag and can be easily removed when you wish to re-dress your bunting. Add buttons to string in between flags with hot glue / glue gun.
If you like this pattern and would like me to continue to share my patterns please give me a clap and follow me on instagram
I would love to see your Jubilee Roses, so please tag me in your makes on social media and I will share your lovely makes.
Hey lovely people, I want to share this crochet pattern for a lovely bunting. It is beautiful and understated, with a distinct cottage-core vibe. I’ve called it ‘dress me up bunting’ because you can dress it up for different celebrations. Add-on decorations allow you to re-dress it all over again. Think crochet flowers, faux flowers, ribbons, buttons etc.
I didn’t want to make bunting repeatedly to fit themes and color schemes. I thought I’d make some pretty bunting flags. These flags look great on their own. I can dress them accordingly and temporarily, making them extremely versatile.
I think this bunting looks so pretty and I have had fun trying it out around the nest. I have strung them for now on some hessian garden twine by simply pulling the twine through a few stitches at the back of each flag.
I really wanted to share the pattern with you, so keep reading if you are itching to make your own. The pattern is quick to make and would definitely elevate your home decor or would make a lovely gift for a crafty friend. The pattern is simple and ideal for beginners, using half treble crochet (UK) or half double crochet (US) and some decrease stitches.
I already have plans to dress this bunting for the Queens Platinum Jubilee celebrations which are just a few weeks away now…so watch this space as I am currently hooking some Jubilee roses.
You will need to gather some simple supplies if you want to hook up your own ‘dress me up bunting’.
Want to make this bunting without hunting for supplies?
I’ve linked my favourite yarns and tools below that work perfectly for this project.
I chose a simple white lace with a depth of 4cms. I used 22cms per flag, so just over a 1m 50cms for the 7 flags I made.
I also used a glue gun to attach the lace, but you could also sew this on if you prefer.
You will also need some ribbon or twine to string your flags with.
Don’t forget to tag me with your bunting makes using @yarnyrobin I would love to share your lovely makes!
If you enjoy making handmade home decor like this, you might also love my FREE Crochet Basket Pattern — perfect for refreshing your space.
Stitches Used.
Ch: chain st
st: stitch
Htr: Yarn over before inserting hook into chain or under both loops of stitch, insert hook, yarn over and pull through so there are 3 loops on the hook, yarn over and pull through all 3 loops on hook.
Htr-dec: Yarn over before inserting hook into chain or under both loops of stitch, insert hook, yarn over and pull through so there are 3 loops on the hook, yarn over and pull through 2 loops, yarn over, insert hook into next st, yarn over and pull through so there are 4 loops on your hook, yarn over and pull through all 4 loops on hook.
The pattern is worked in rows and you will need to turn your work at the end of each row. Turning ch1 does not count as a st
Ch 31
R1: htr in 2nd ch from hook, htr in each ch along, ch1 turn (30htr)
R2 – 4: htr in each st along, ch1 turn (30htr)
R5: htr-dec, htr in next 26sts, htr-dec, ch1 turn (28htr)
R6: htr-dec, htr in next 24sts, htr-dec, ch1 turn (26htr)
R7: htr-dec, htr in next 22sts, htr-dec, ch1 turn (24htr)
R8: htr-dec, htr in next 20sts, htr-dec, ch1 turn (22htr)
R9: htr-dec, htr in next 18sts, htr-dec, ch1 turn (20htr)
R10: htr-dec, htr in next 16sts, htr-dec, ch1 turn (18htr)
R11: htr-dec, htr in next 14sts, htr-dec, ch1 turn (16htr)
R12: htr-dec, htr in next 12sts, htr-dec, ch1 turn (14htr)
R13: htr-dec, htr in next 10sts, htr-dec, ch1 turn (12htr)
R14: htr-dec, htr in next 8sts, htr-dec, ch1 turn (10htr)
R15: htr-dec, htr in next 6sts, htr-dec, ch1 turn (8htr)
R16: htr-dec, htr in next 4sts, htr-dec, ch1 turn (6htr)
R17: htr-dec, htr in next 2sts, htr-dec, ch1 turn (4htr)
R18: htr-dec, htr-dec, ch1 turn (2htr)
R19: htr-dec, (1htr) fasten off and weave in ends.
Use glue gun to attach lace across the top of the flag, making sure to secure a small overlap of lace at the back of the flag to give a neat edge. Alternatively, you could sew the lace in place with a needle and thread.
Make as many flags as you desire and simply string with ribbon or twine by hooking it through a few stitches at the back of the flag, behind the lace.
To make the flags hang nicely I hooked the twine through at 3 points on each flag, on the left, the right and in the centre.
You can now dress your bunting up with whatever you choose. In order to dress this bunting up and down attach any accessories so that they can easily be removed, that way your bunting can be dressed and re-dressed to your hearts content.
Final Thought
If you have enjoyed this pattern you can help support what I do by
• leave me a like or a comment below
• Pin the image below for later on your Pinterest board
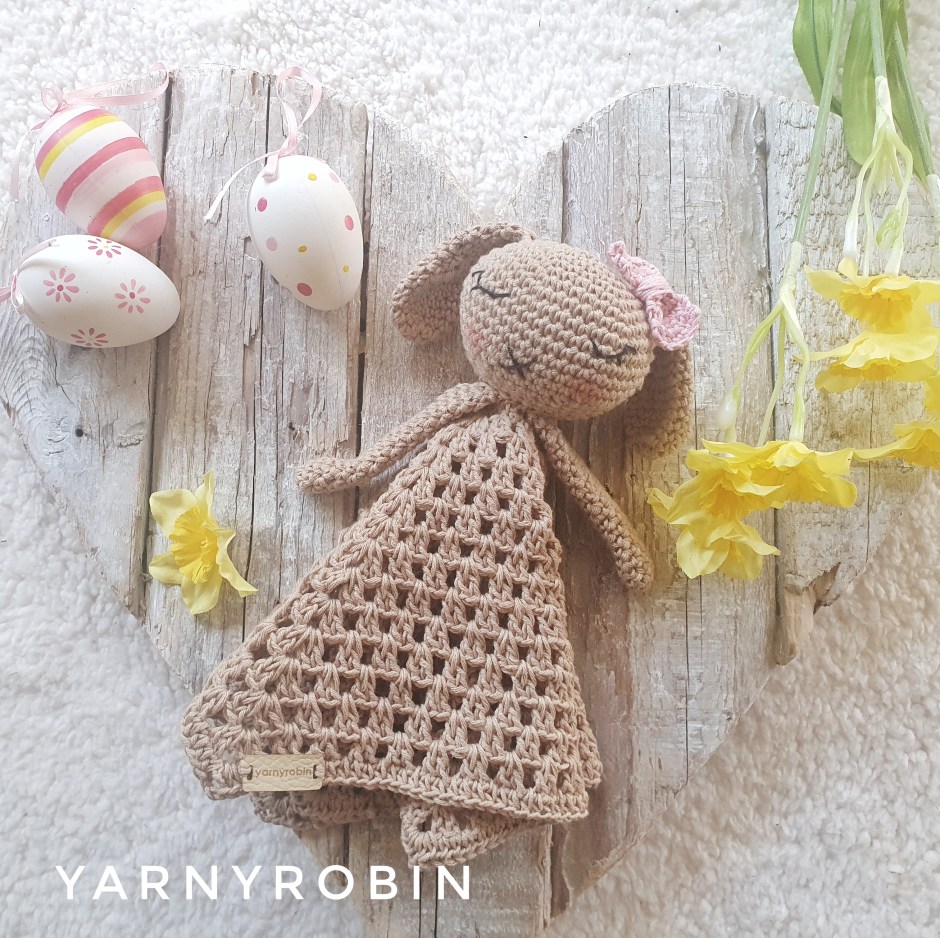
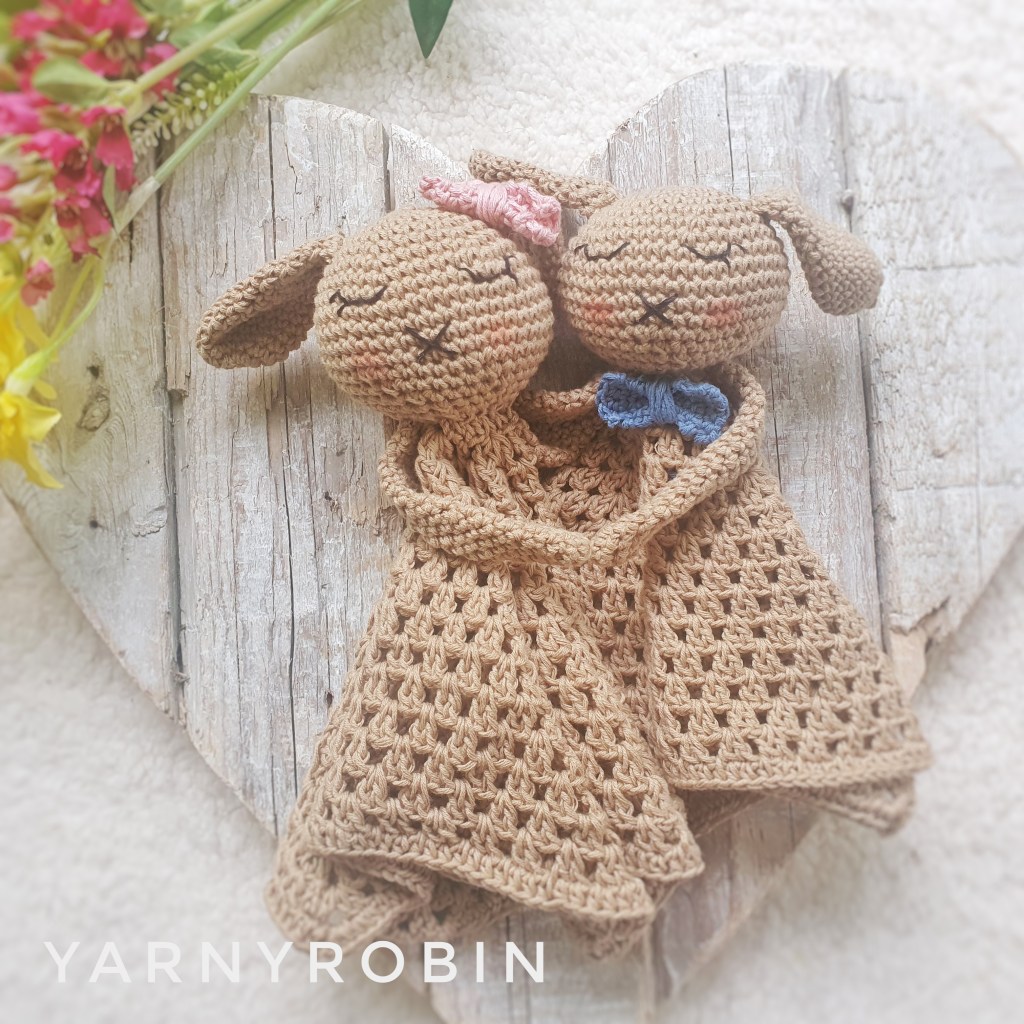
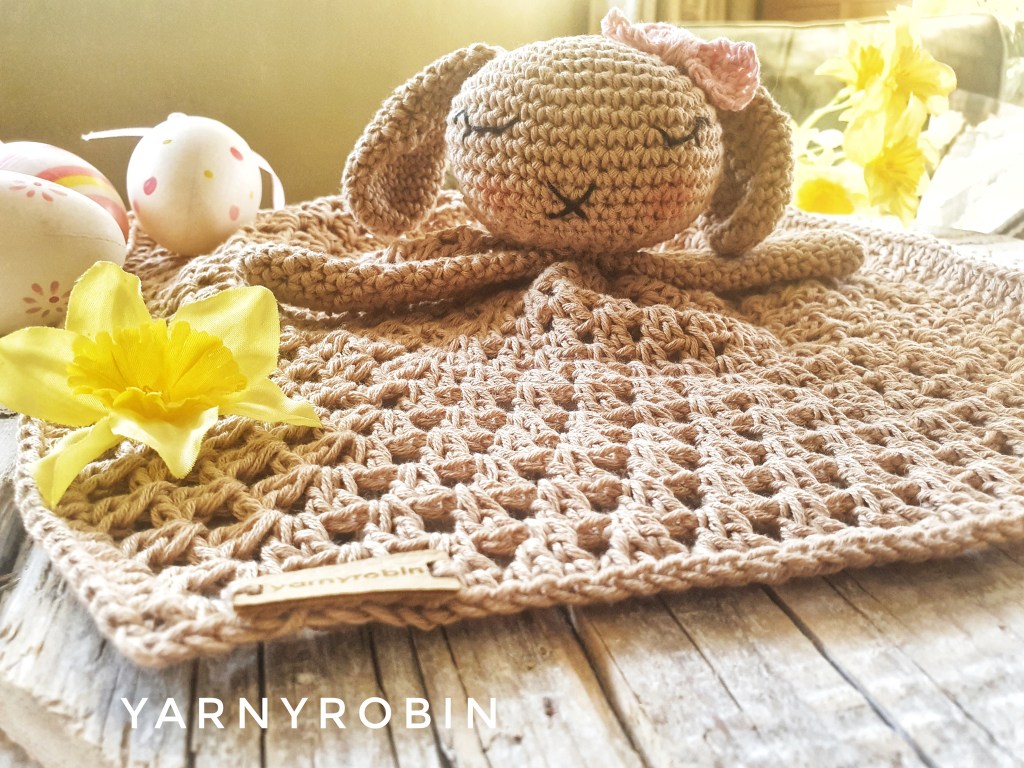
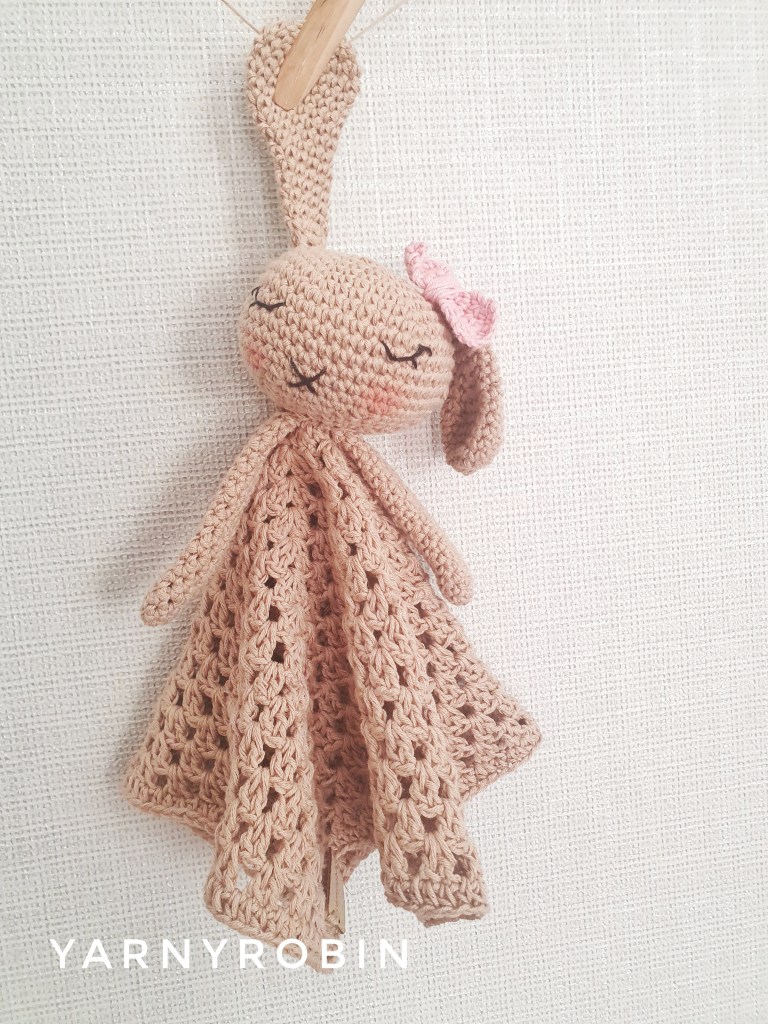
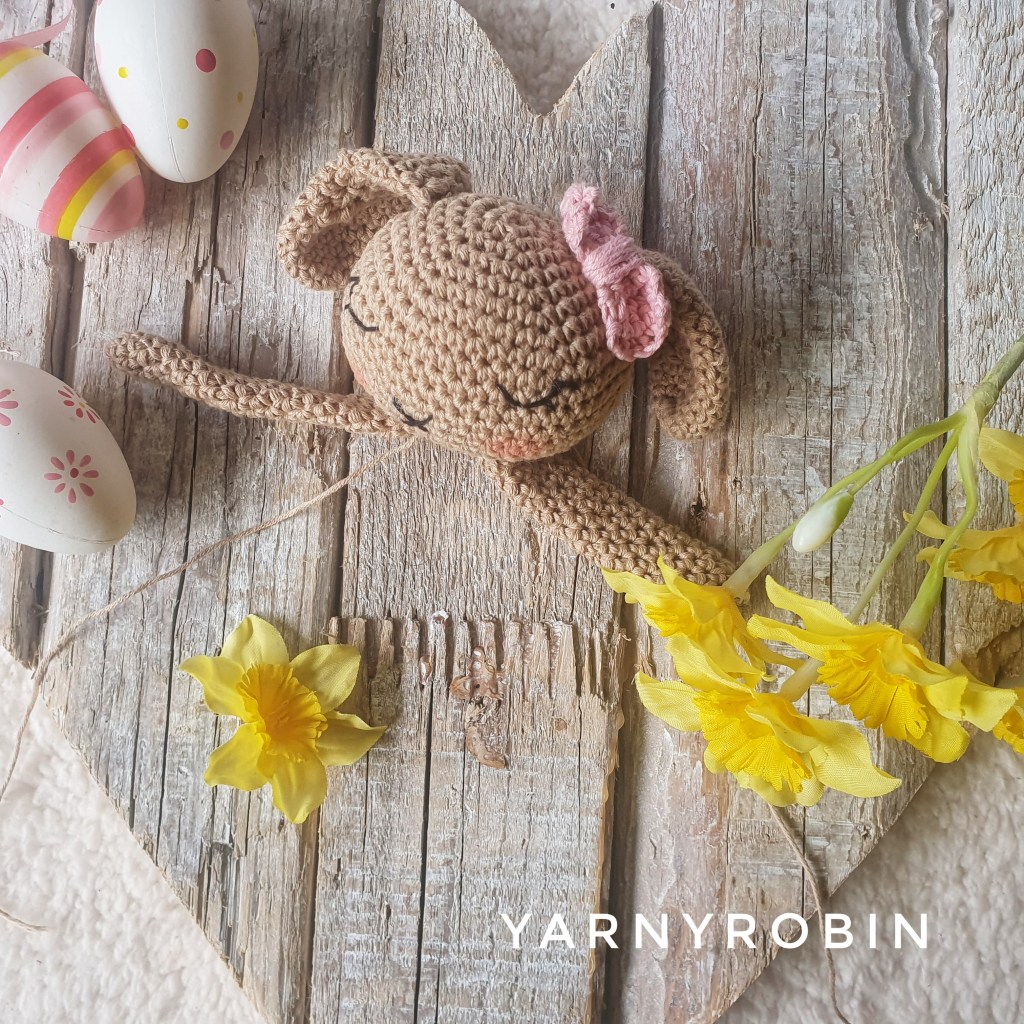
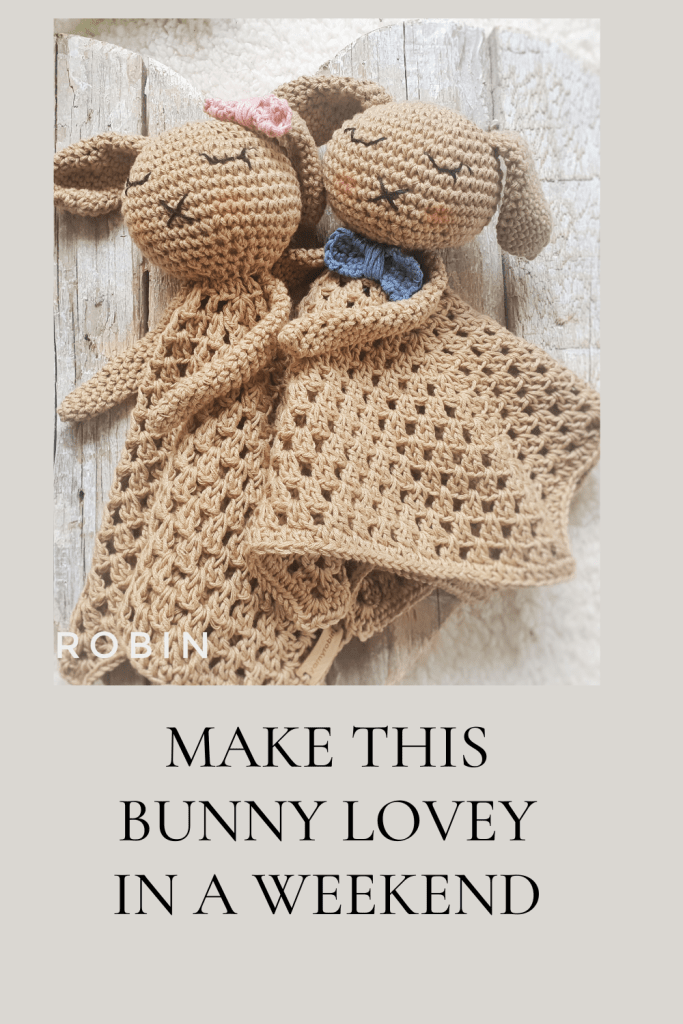
Would you like to crochet your own Spring Bunny Lovey, well you can…because I’m going to share my free pattern with you and just in time for Easter. You will find the full pattern details in this post
Prefer a printable, ad-free version?I’ve created a tidy PDF version of this Bunny Lovey Pattern with BOTH UK and US crochet terms included. This way, you can follow the version you prefer with no conversions. Perfect if you like to print your patterns or follow them offline.
this post contains affiliate links, which help to support my blog at no extra cost to you
The pattern is simple and quick to hook up. It uses only 50g of cotton plus a tiny amount for the bow. This is just perfect for gifting a special little someone! I made this in an afternoon so it really is a quick make.
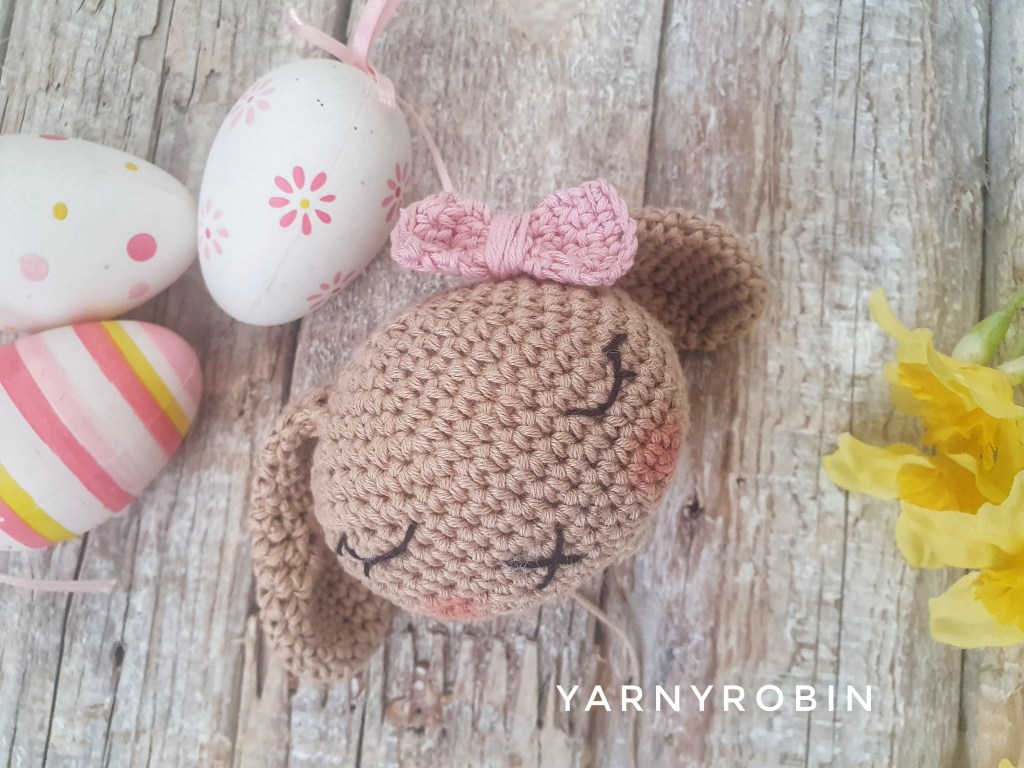
With her rosy cheeks and little criss cross nose, this little bunny has the sweetest face and floppy ears. The granny square blanket adds a vintage vibe coupled with it’s neutral tones.
If you’re putting together a handmade baby gift, I also have a free crochet teether pattern that pairs beautifully with this bunny lovey.
A word on yarn choice
I have opted to use Drops Safran 100% cotton as it is not only affordable, but it has a great colour palette too. It was also really important to me that I chose a cotton that was Oeko Tex standard 100 approved. This means the cotton has been certified to be free of harmful chemicals. It is safe for human use. Moreover, it has been verified as both safe and non-irritating to human skin. As this bunny lovey was inspired by a very precious little human, I wanted to be sure there were no hidden nasties.
Pattern Protocols
This pattern including all photos are the property of Nicola Florence at ayarnyrobin.wordpress.com. Please do not modify, resell, publish in part or in full, or share this pattern or photo’s as your own. You may sell finished items made from this pattern, (subject to toy making regulations) I hope it becomes a hot item for you; but please credit, with a link, that the item is made using @yarnyrobin pattern /
2g of Drops Safran 100% cotton colour 01 (desert rose pink)
Small amount of black embroidery floss
Want a calm, ad-free, printable version with both UK and US terminology included, check out the premium pattern in my Etsy shop — perfect to save with your project notes or take on the go./em> Click below to get the PDF.
Pattern Notes
This pattern is written using UK crochet terminology and the stitch abbreviations can be found below. I have included US terminology in brackets if you wish to convert.
The head, arms and ears are made in continuous rounds or spirals. It is a method commonly used in amigurumi and means there will be no visible seams. Therefore, when you start a new round just work it into the next st. I recommend marking the first st of each round with a st marker.
Starting chains in the blanket section counts as a stitch throughout the pattern unless otherwise stated. Repeats are marked by asterisks *.
Dc – double crochet / single crochet (US) BLO – back loop only
Htr – half treble / half double (US)
Dc2tog – decrease / Sc2tog – decrease (US)
Dc: Insert hook into chain or under both loops of stitch, yarn over and pull through so there are 2 loops on hook, yarn over again and pull through both loops on hook.
Tr: Yarn over hook, insert hook into chain or under both loops of stitch, yarn over and pull through so there are 3 loops on hook, yarn over again and pull through 2 loops, yarn over and pull through last 2 loops on hook.
Htr: Yarn over hook, insert hook into chain or under both loops of stitch, yarn over and pull through so there are 3 loops on hook, yarn over and pull through all 3 loops on hook.
BLO: Work stitch as stated, but in back loop of stitch only.
Dc2tog – decrease st worked over 2 stitches: insert hook under both loops of stitch, yarn over and pull through so there are 2 loops on your hook, insert hook into next st, yarn over and pull through so there are 3 loops on your hook, yarn over and pull through all 3 loops.
Gauge:
Please check your gauge to obtain stated size and to ensure yarn quantities stated are achieved. If your swatch is too small, try going up a hook size to obtain gauge. If your swatch size is too big try going down a hook size to obtain gauge. Of course, gauge isn’t imperative as this is not a garment that is worn. However, if you do not check your gauge, you may need more yarn than stated and your lovey may turn out smaller or larger than stated.
Round 2: 2dc in next st and in each st around (12dc / 12sc )
Round 3: *2dc in next st, dc in next st* repeat around (18dc / 18sc )
Round 4: *2dc in next st, dc in next 2 sts*repeat around (24dc / 24sc )
Round 5: * 2dc in next st, dc in next 3 sts *repeat around (30dc / 30sc )
Round 6: *2dc in next st, dc in next 4 sts* repeat around (36dc / 36sc )
Round 7: *2dc in next st, dc in next 5 sts* repeat around (42dc / 42sc )
Round 8: *2dc in next st, dc in next 6 sts* repeat around (48dc / 48sc )
Round 9 – 13: dc in each st around (48dc / 48sc )
Round 14: *dc2tog, dc in next 6 sts* repeat around (42dc / 42sc)
Round 15: *dc2tog, dc in next 5 sts* repeat around (36dc / 36sc )
Round 16: *dc2tog, dc in next 4 sts* repeat around (30dc / 30sc )
Round 17: *dc2tog, dc in next 3 sts* repeat around (24dc / 24sc )
Round 18: *dc2tog, dc in next 2 sts* repeat around (18dc / 18sc )
Now tightly stuff head with safety toy filling
In Back Loops Only (BLO)
Round 19: *dc2tog, dc in next st* repeat around (12dc / 12sc )
Fasten off leaving a long tail. You will use this to sew the head to the blanket.
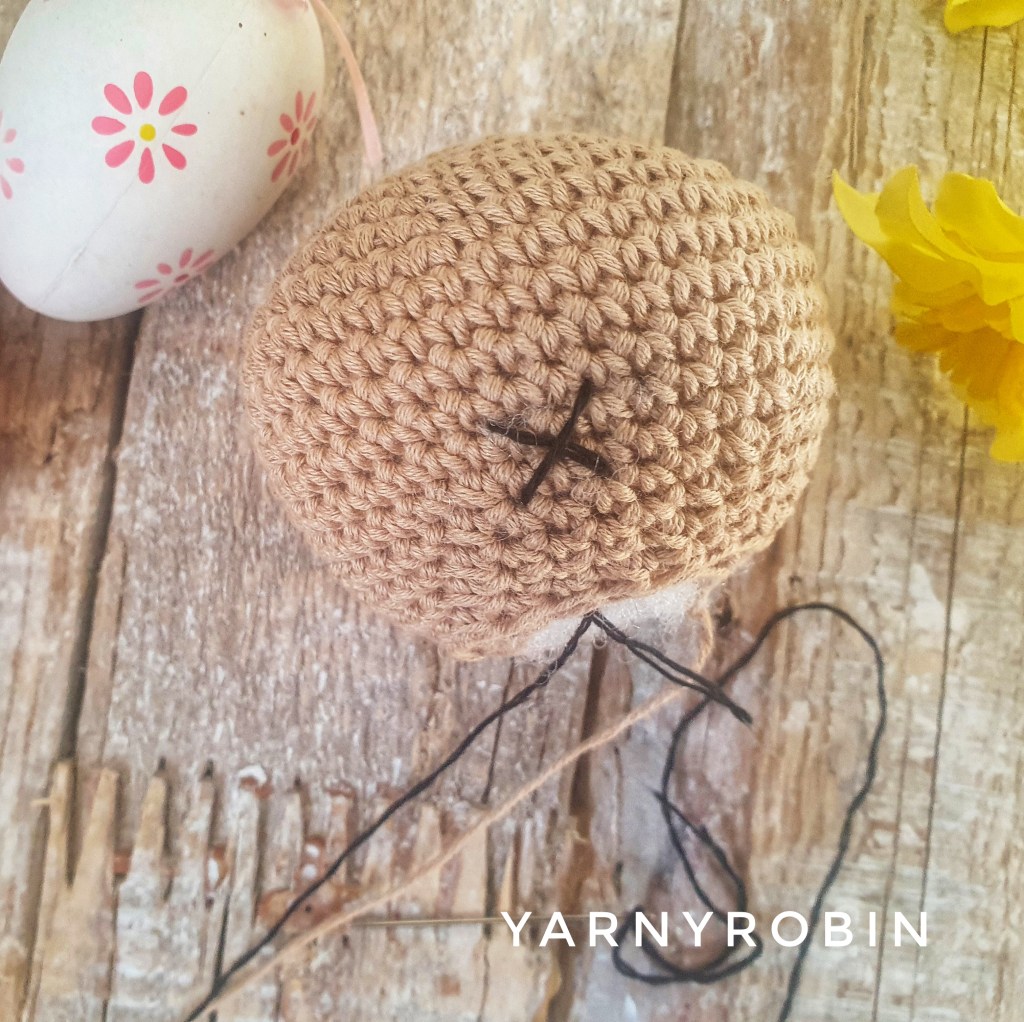
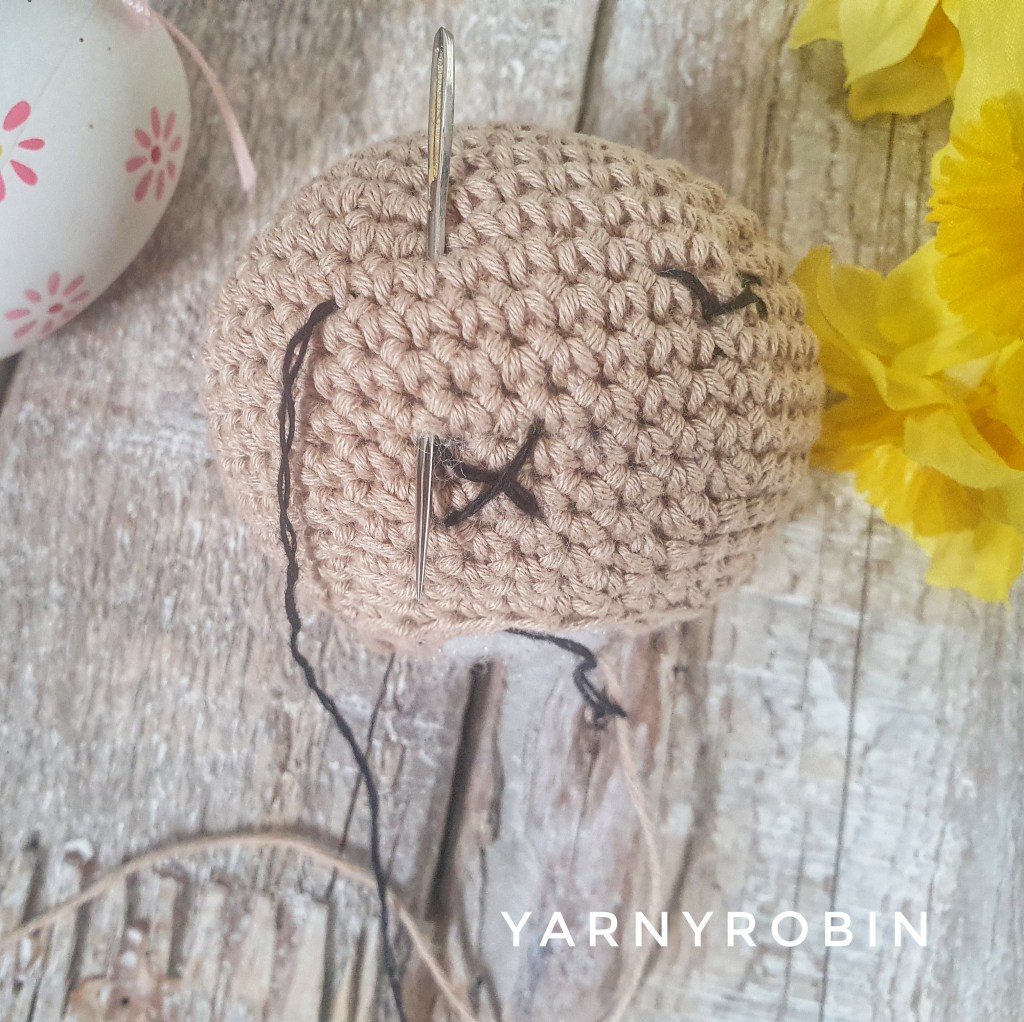
How to embroider the face
Take a long length of embroider floss and split off 3 strands by holding them and pulling down the whole length. When making your stitches do not pull them to tight, a gentle tension is all that is needed. I embroidered the face with one long length of floss, to do this pull your stitches through slowly, to prevent tangling and /or knotting.
Nose:
Start by threading your sewing needle and inserting it through the bottom of the head and leaving a small tail visible hanging from the stuffing. Exit needle on row 6 from the bottom of the head, insert needle diagonally into row 8. I made my diagonal stitch over 3 dc’s width. Exit needle in row 6 under previous entry point and insert at opposite diagonal. Do not fasten off move straight onto the eyes.
Eyes:
Insert pin to mark where the eye will start, above and inline with the outside of the nose on the right side (facing you) with the floss still on your needle exit in st marked by your needle on row 11, insert needle in a gentle diagonal on row below, exit needle horizontally on same row about 2sts across, insert needle at point of last entry (back stitch), exit needle in a gentle diagonal on outside edge of eye on row above the horizontal st just made, exit needle below lid a ¼ of the way from the outside of eye and insert needle in a straight line to eye lid to make first eyelash. Exit needle below outside edge of lid at a slight angle and insert needle at outside edge of eye lid to make final eye lash. Do not fasten off.
Exit needle at point for second eye and repeat process. Finish by bringing floss through the bottom of the head and tie with starting tail and trim ends.
Round3: *2dc in next st, 1dc in next st* repeat around (18dc / 18sc )
Round 4 – 7: dc in each st around (18dc / 18sc )
Round 8: dc2tog, dc in next 14sts, dc2tog, (16dc / 16sc )
Round 9: dc2tog, dc in next 12sts, dc2tog (14dc / 14sc )
Round 10: dc2tog, dc in next 10sts, dc2tog (12dc / 12sc )
Rounds 11 – 14: dc in each st around (12dc / 12sc )
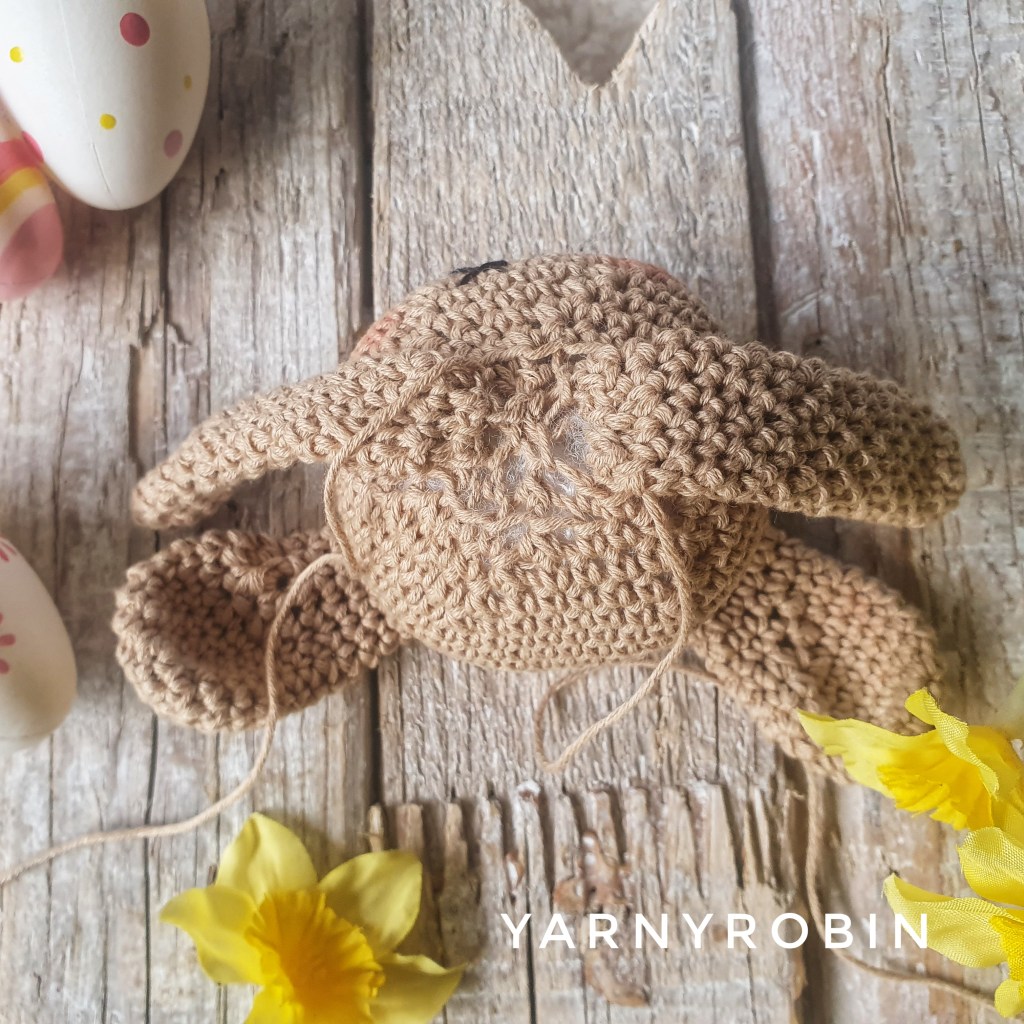
Round 15: dc2tog all around (6dc / 6sc ) Fasten off and leave along tail, now with a darning needle attach the ears securely to the head by sewing along both the outer side and under side of the ear, catching under the stitches of the head and the ear. You may find it helpful to pin the ears into position before you sew them on. This helps you to decide on a good position and will prevent lopsided ears! Once competed weave in any loose ends.
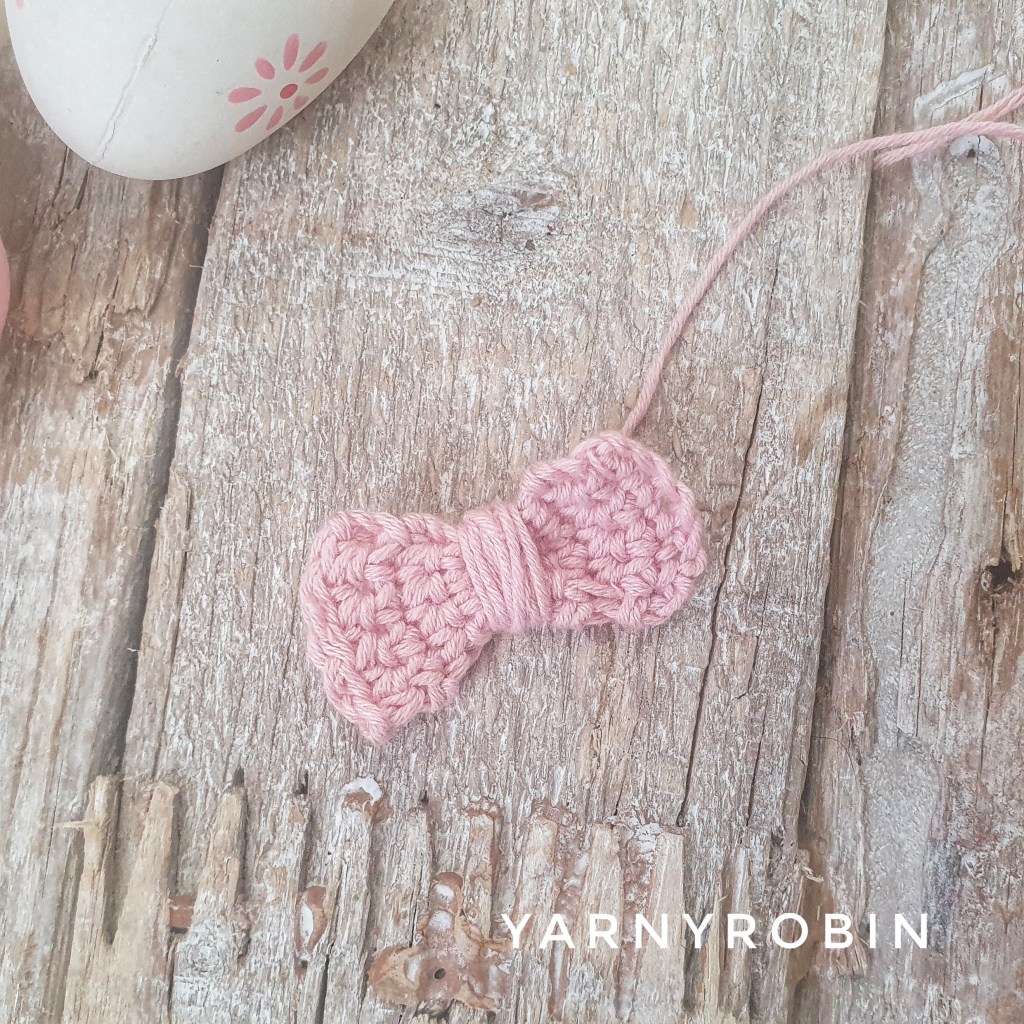
Bow
With pink cotton
Ch 6
Row 1: dc in 2nd ch from hook and in each ch along, turn (5dc / 5sc )
Row 2 – 10: dc in each st along, turn (5dc / 5sc )
Fasten off and weave in ends. Take long piece of cotton and tie a knot in the middle of bow, snipping short the shorter tail. Now wrap long tail several times around the middle of the bow taking care to cover the tail you snipped short. To finish take the cotton wrapped around the bow and thread needle. Finish by taking needle through the wrapped cotton on the backside and knot, leaving a long tail. Now with a darning needle, securely sew bow to the head and weave in any loose ends.
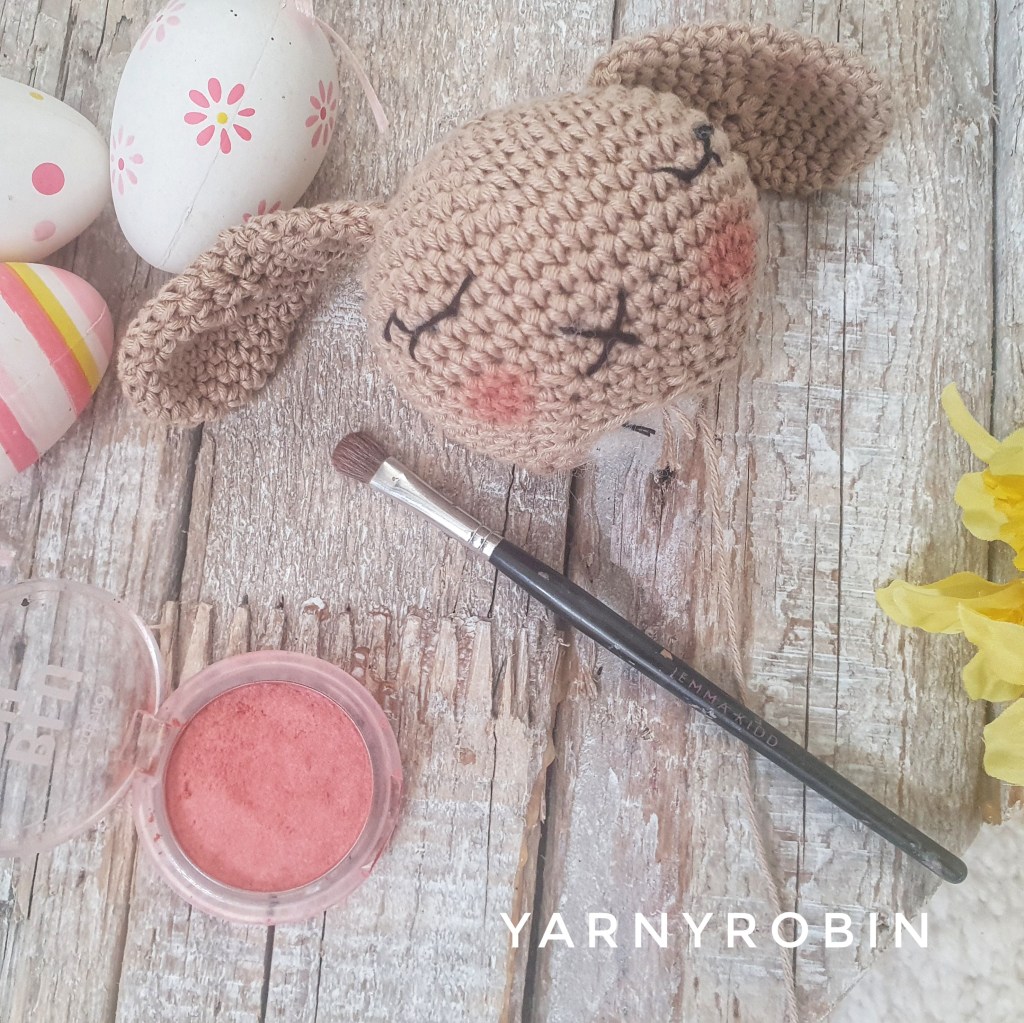
Now with a small amount of blusher on a brush add two little rosy cheeks to the face.
Fasten off leaving a long tail. With a darning needle attach to underside of head securely by sewing along both the outer side and under side of the arm, catching under the stitches of the head and the arm. You may find it helpful to pin the arms into position before you sew them on. Finish by sewing criss cross the bottom of head to close the gap.
Blanket
Ch 6, slst to 1st ch to form a ring
Round 1: Ch3 (counts as tr) 15tr into ring, join with a slst to top of ch3 (16tr / 16dc )
Round 2: ch3 (counts as a tr) tr in same space, ch1, 2tr in same space, *ch1, miss a st, 2tr in next st, ch1, miss a stitch, (2tr in next st, ch1, 2tr in same space)* repeat * – * twice, ch1, miss a st, 2tr in next st, ch1, slst to top of ch3, slst to corner space
Round 3: ch3 (counts as a tr) tr in same space, ch1, 2tr in same space, *ch1, 2tr in next ch space, ch1, 2tr in next ch space, ch1, (2tr in next ch space, ch1, 2tr in same space)* repeat * – * twice, ch1, 2tr in next ch space, ch1, 2tr in next ch space, ch1, slst to top of ch3, slst to corner space
Rounds 4 – 8: continue rounds as round 3, you will have an extra set of 2tr, ch1 along each side in each row.
Ie/ continue with corner spaces = 2tr, ch1, 2tr, ch1
Sides = 2tr, ch1
Rounds 9 – 14: Continue as rounds 4 – 8 but add 2ch in corner spaces
Ie/ continue with corner spaces = 2tr, ch2, 2tr, ch1
Sides = 2tr, ch1
Round 15: ch2 (counts as htr), htr in same space, ch2, 2htr in same space, htr in each st and in each space along edge
Corner space = 2htr, ch2, 2htr
Fasten off and weave in ends
Now with the long tail from the head, thread darning needle and position head in centre of blanket with the face pointing to a corner of the blanket (on the diagonal) sew securely all around utilising the front loops from round 19 of head. You will also need to sew blanket to the arms also. I like to sew around the head twice just for added security.
Thank you so much for crocheting along with me — I hope you enjoy making this pattern.
If you enjoyed this pattern, you may also like my crochet teether patterns. They are perfect for using leftover yarn. You can create a complete handmade baby gift with them.
And if you want to save this pattern for later why not use the image below to save to your Pinterest board
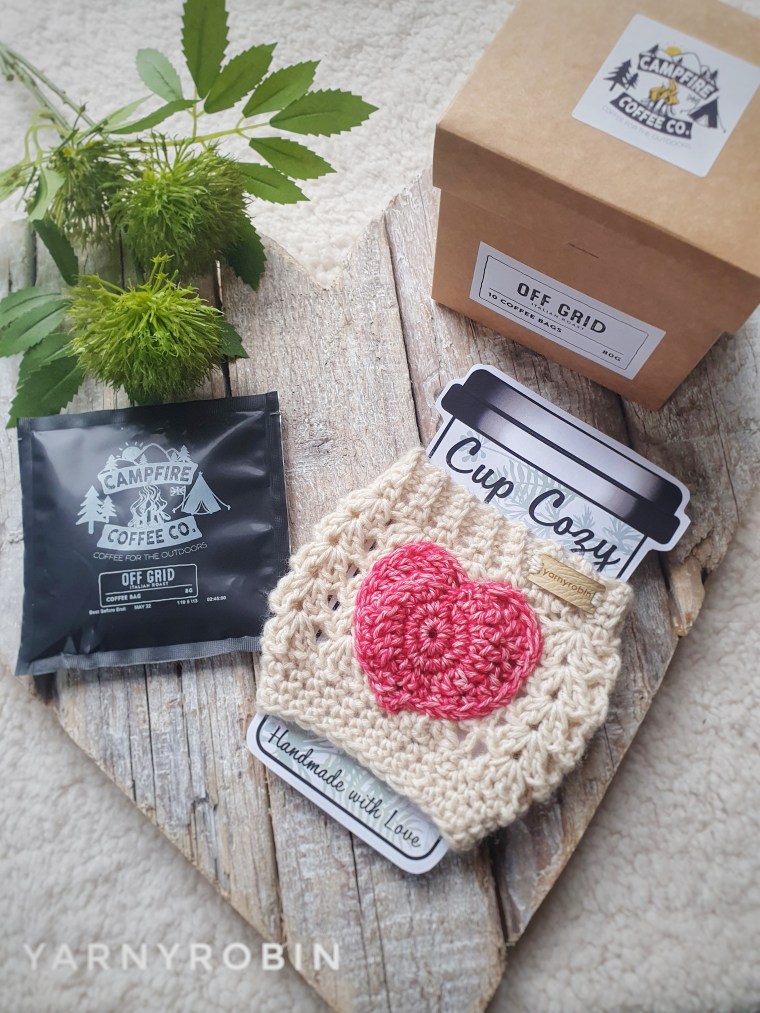
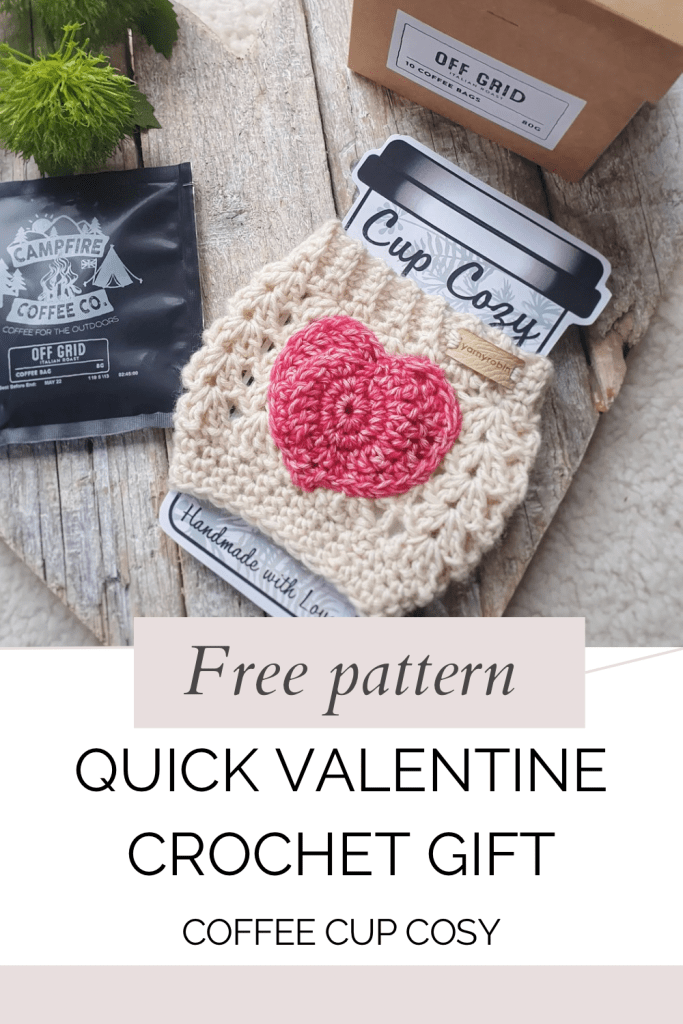
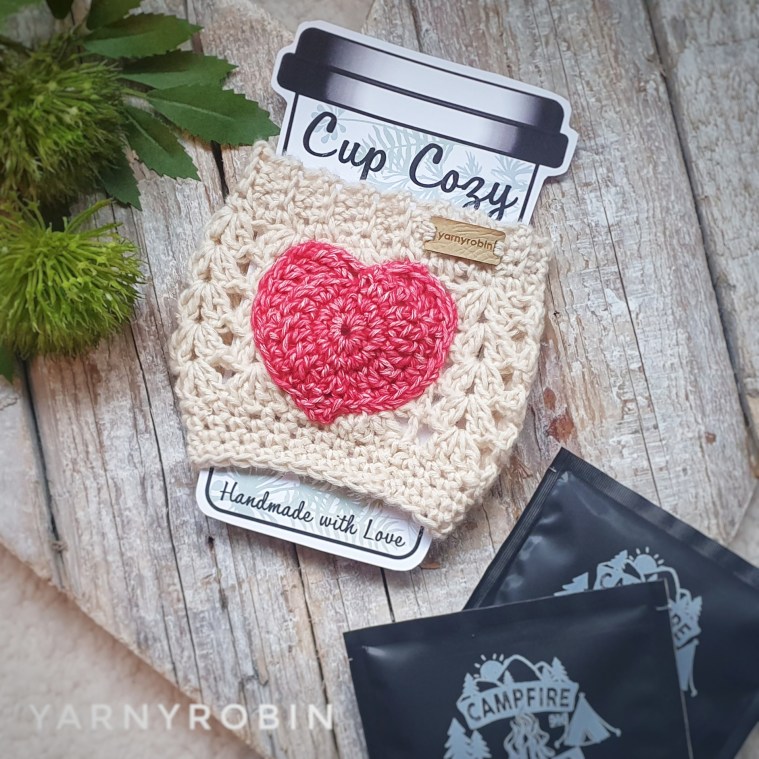
This easy crochet cup cosy is a quick and thoughtful handmade project, perfect for gifting, craft fairs, or everyday use.
Although this crochet cup cosy was originally designed as a Valentine’s Day make, it’s a lovely little project to crochet all year round. Whether you’re making one as a small handmade gift, a cosy treat for yourself, or a quick stash-busting project using yarn you already own, this cup cosy is simple, practical, and perfect for everyday use.
This easy crochet cup cosy tutorial shows you how to make a cosy step-by-step using simple stitches — perfect for beginners and a fun stash-busting project.
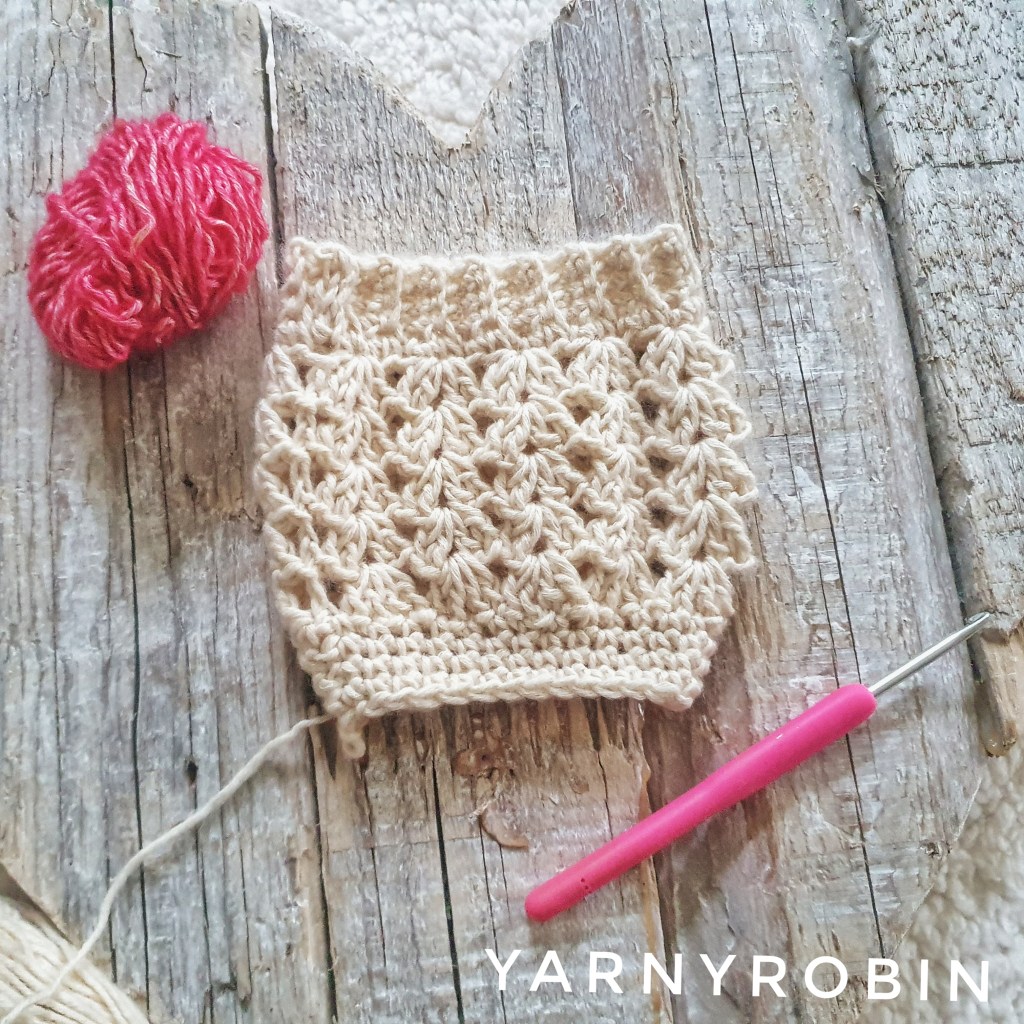
This cute coffee cup cosy has a cute ribbed top brim and a chic lacy body made from clusters of v stitches, before nipping in at the base with a band of double crochet stitches and being finished with a yarny little heart.
The pattern is simple and quick to hook up and can be made from stash… just perfect for gifting and treating your best friends or of course yourself! They are also great sellers at markets, so if you are a finished piece seller, they make a great low-cost, high-appeal item for fairs and craft markets.
this post contains affiliate links, which means if you choose to purchase through them, i earn a small commission at no extra cost to you, which helps to support this blog.
If you’d prefer a printable, ad-free version of this pattern, the PDF is available to download below in both UK and US versions — ideal for offline crocheting or for keeping in your pattern library.
Materials
a small amount baby / sport weight yarn. I used Scheepjes stone washed in Moon Stone and Red Jasper. Pattern does share how to make cosy smaller or larger, so dk yarn will work also.
Turning ch does not count as a st unless otherwise stated
V st – in same st, 2tr, ch1, 2tr (in same st 2dc, ch1, 2dc)
BLO – work in back loop only
Ribbed Brim.
Ch5
Row 1: Dc in second ch from hook and in each st along (4dc), ch1 turn,
IN BACK LOOPS ONLY
Row 2: Dc in each st along, ch1 turn (4dc)
when making the rib, crochet into the back loop of each stitch only as shown.
Rows 3 – 33: repeat row 2 (increase or decrease rows in rib to fit around your cup. Rib number of rows must however be a multiple of 3, remember the cosy will stretch) join rib ends with a slst to form a circle, ch1
Round 1: work 33 dc into top of rib, ch2 (or dc the equivalent number to rows in your rib eg/ 30 rows in rib then 30dc in row 4)
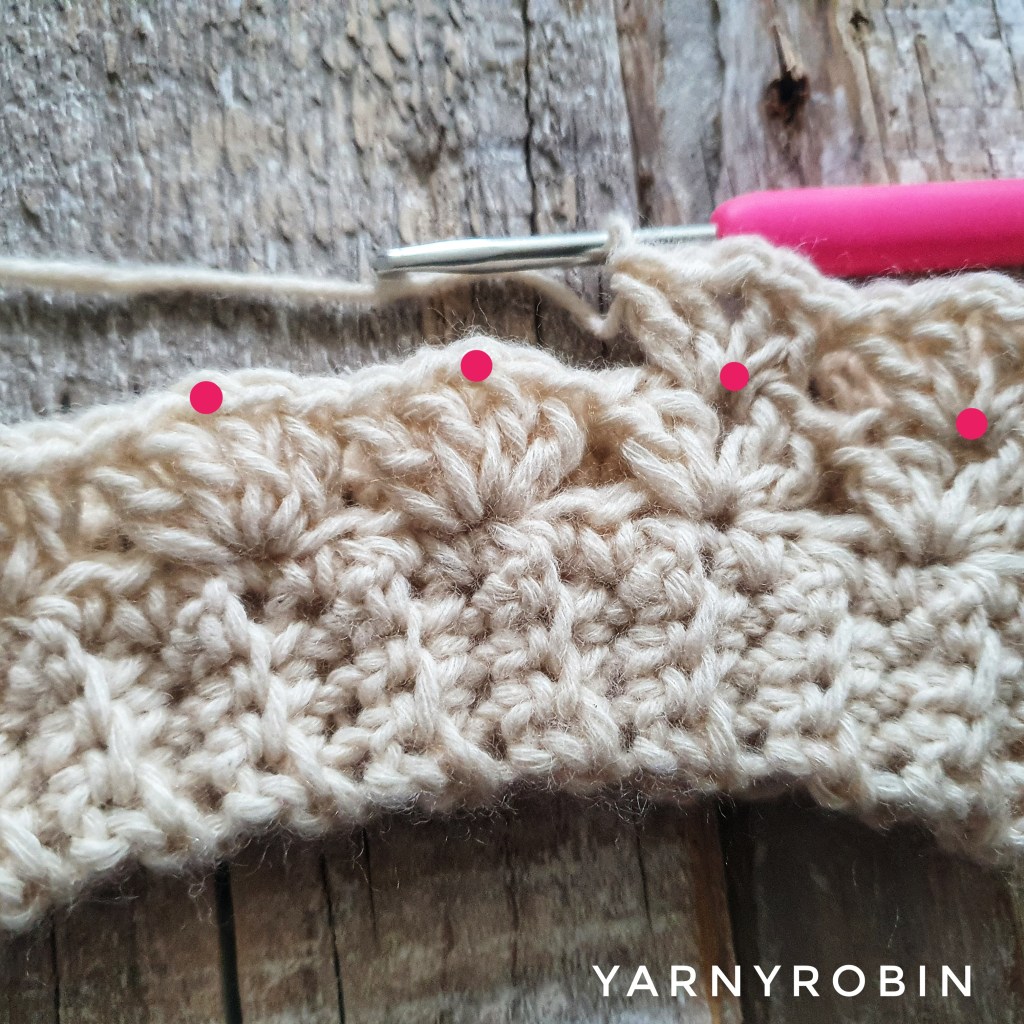
Round 2: * v stitch in 1st st, miss 2sts,* repeat * – * to end of round, join with a slst in top of ch2 (11 v stitches)
Round 3: ch2, *v stitch in ch 1 of previous round* see picture below. Repeat * – * all around, slst in top of ch2
Round 4 – 6: repeat round 3
Round 7: ch1, dc in first st, *miss a st, dc in next st* repeat all around, slst in top of ch1 (29dc)
Round 8 – 10: ch1, dc in each st around, slst in top of ch1 (29dc) fasten off at end of round 10.
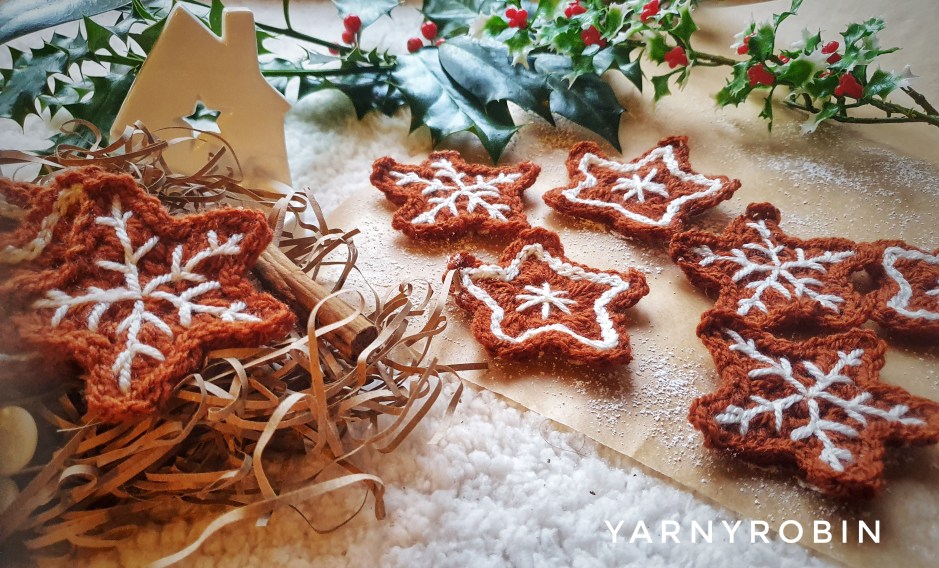
In accent colour make heart. If you would like more of a photo tutorial for this click here otherwise follow the instructions below.
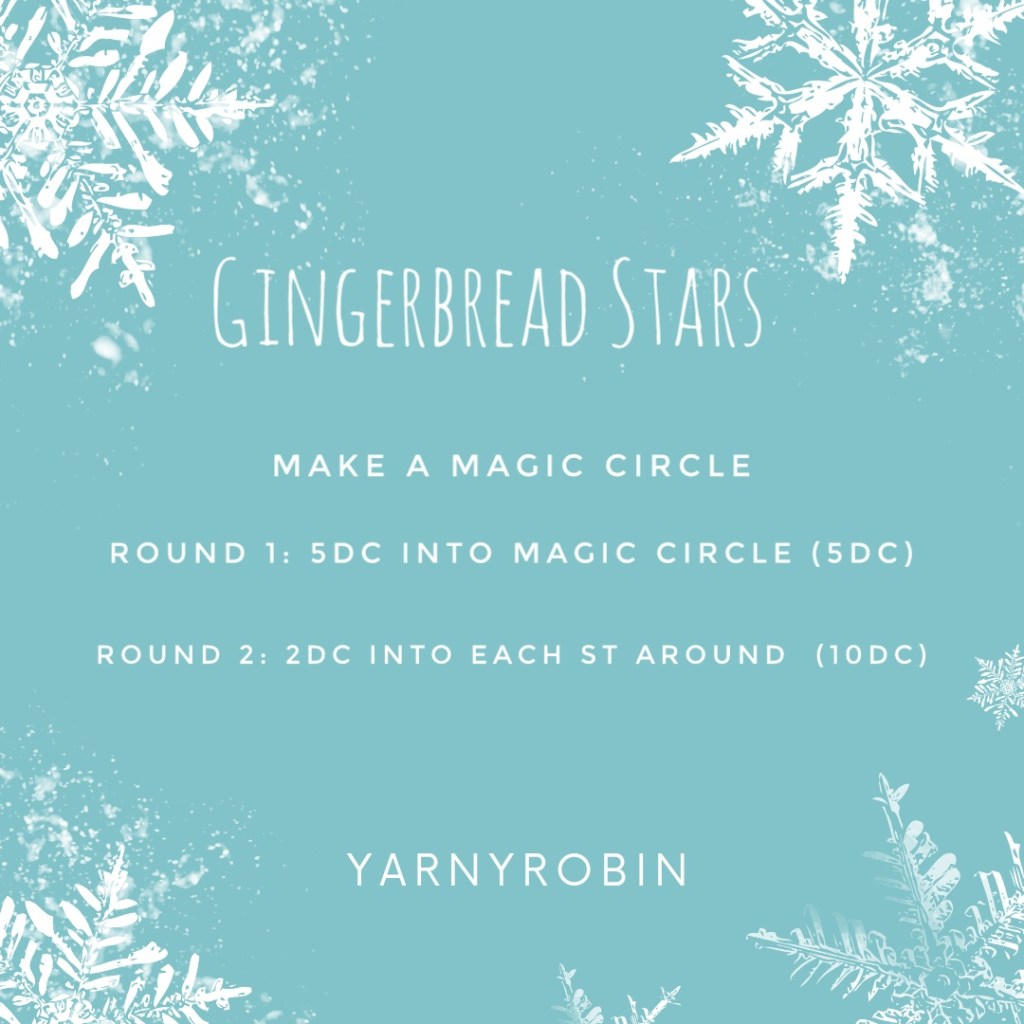
Ch2
Round 1: 10dc into 2nd ch from hook, slst in to top of 1st dc form a circle
Round 2: Ch 1, 2dc into each st around (20dc)
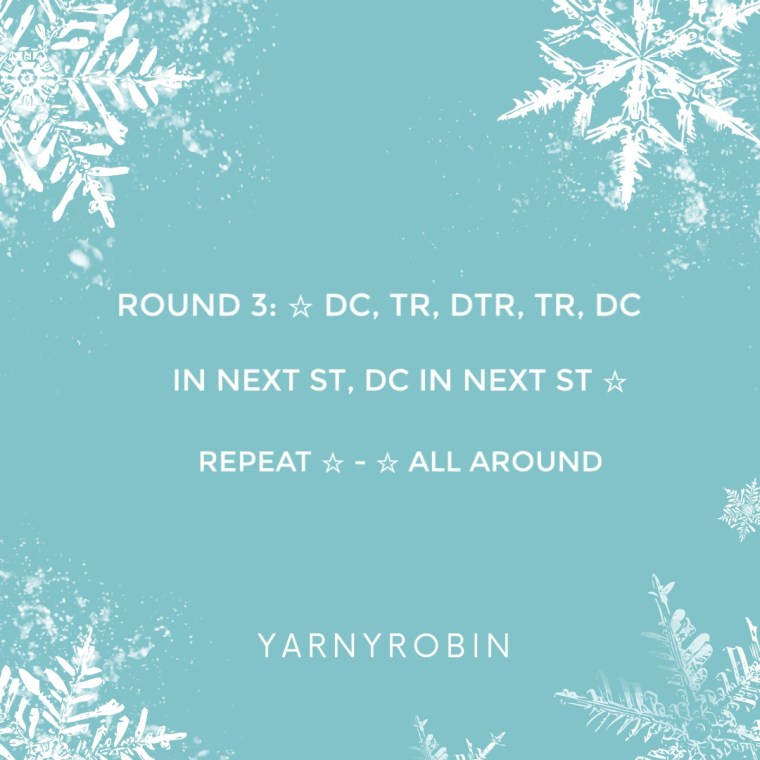
Round 3: Ch4 (counts as a dtr), 1dtr in the next 3 sts, 1tr in next 4sts, 1htr in next st, dc in next st, ch3, slst into same space (this creates a picot), dc in next st, 1htr in next st, 1tr in next 4 sts, 1dtr in next 4 sts, slst in to bottom ch1 of beginning ch4.
Round 4: ch4 (counts as a dtr), 3dtr into next 3sts, (these are actually the chains from previous round) 1tr in next 3 sts, 1htr into the next st, 1dc in next 4sts, slst in picot space, ch4, slst in to same space (picot made), 1dc in next 4 sts,1htr in next st, 1tr in next 3 sts, 1dtr in next 4sts,
slst in to the cleft of the heart to finish. Fasten off leaving a long tail and sew to cosy, weaving in any loose ends.
Now, just make as many cosy’s as you have best friends or just make one for yourself!
If you enjoyed this pattern, I’d love to know. Please leave a comment below, give the post a like, or save it to Pinterest so you can find it again later. Every little bit of support helps keep these free patterns coming — thank you so much for being here.
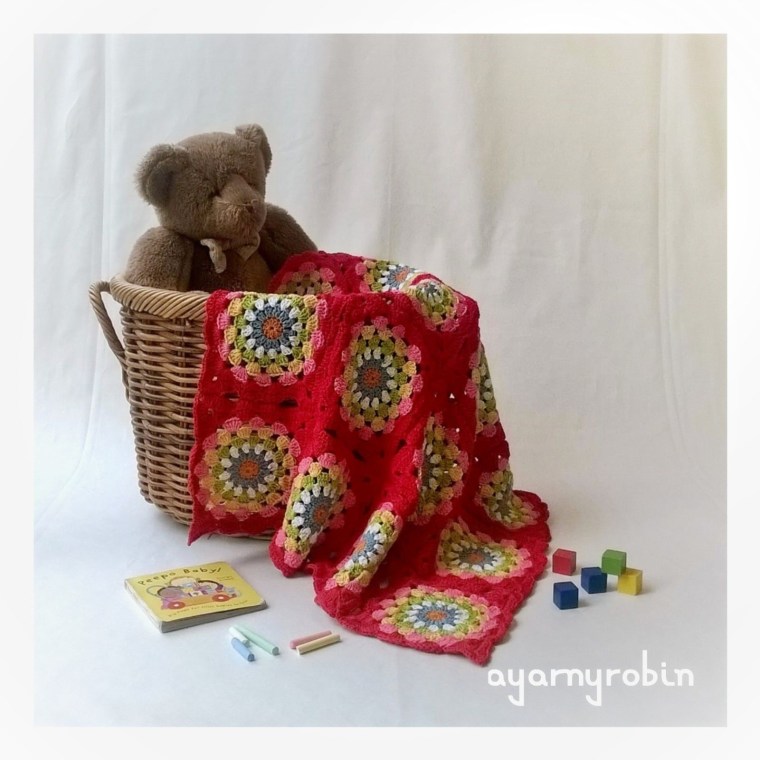
I hope you are all ok? I thought I would just drop in to show you my latest make and to thank you for all the kind feedback I have received regarding my free baby blanket pattern…The Angelece Baby Blanket
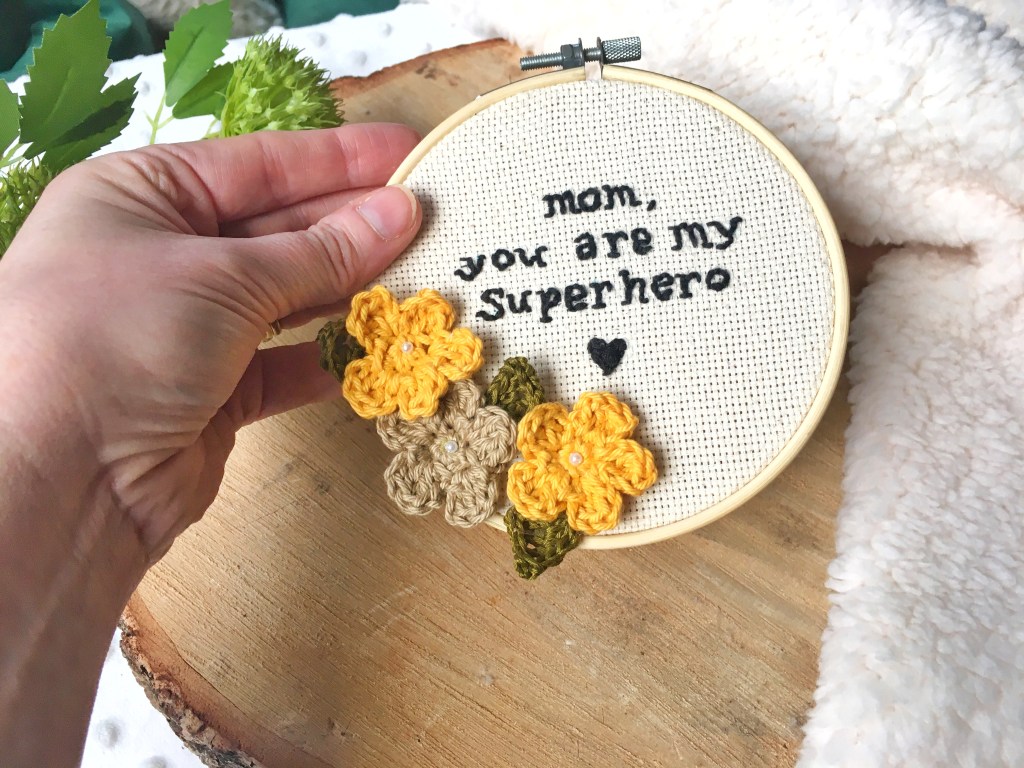
I have really enjoyed playing around with something a bit different to usual, and this is what I came up with. Of course, it had to have a bit of crochet somewhere and these little flowers were just perfect.
I am not the worlds greatest when it comes to sewing, but I do find it quite soothing, if the embroidery floss doesn’t get in a tangle. I did order some cheap embroidery floss to start with…this was a BIG mistake as it split and tangled so easily. Suffice to say the more expensive thread was of a much better quality and made the embroidery a pleasure.
The leaves and flowers are hooked from scraps of cotton and I glued them into position with a hot glue gun, and finished the centres with a tiny white bead.
Finally, I finished my hoop with a circle of mustard felt, which I also glued into position, just to give a tidy finish. It is a small piece of happiness.
I may just make some more, but I think I will keep each one completely unique…I have some other Mama sayings that I would like to stitch.
The ‘Florence cosy’ will add a large dose of fun to your teapot with a fluffy oversized pompom and woven ribbons.
and the ‘Kathy cosy’ offers understated off the shoulder glamour in traditional granny stitch style.
Each patterns is free and comes with a photo tutorial. They are easy to hook and make great weekend projects; which makes them the perfect gift for tea lovers.
Which one is your favourite?
I hope you will have fun hooking these great tea cosies.
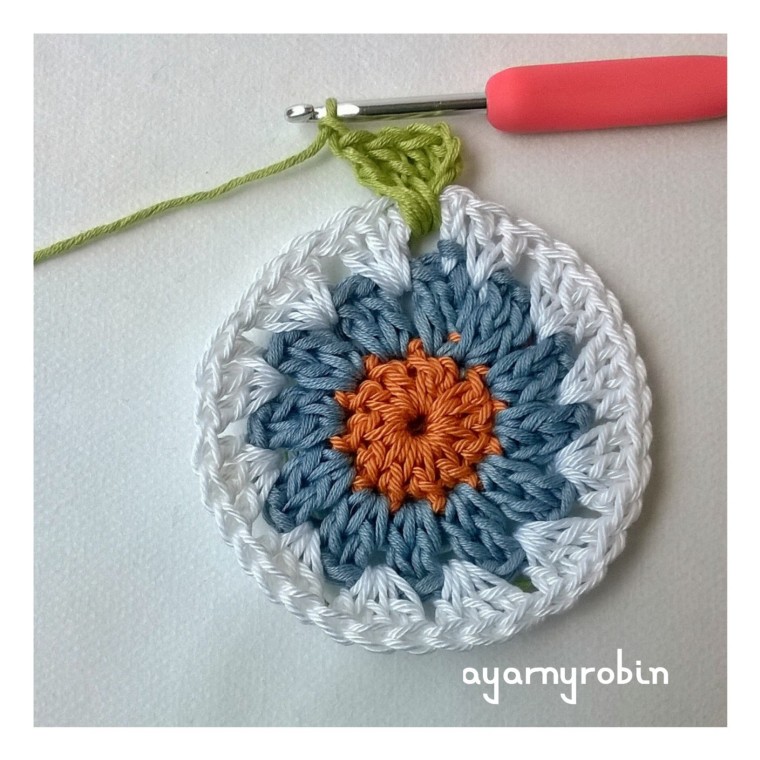
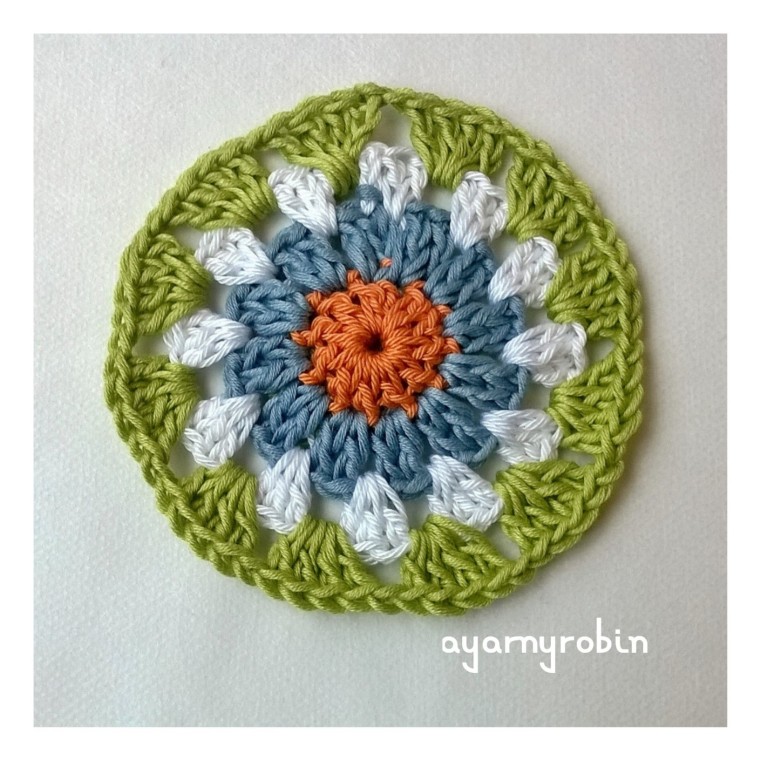
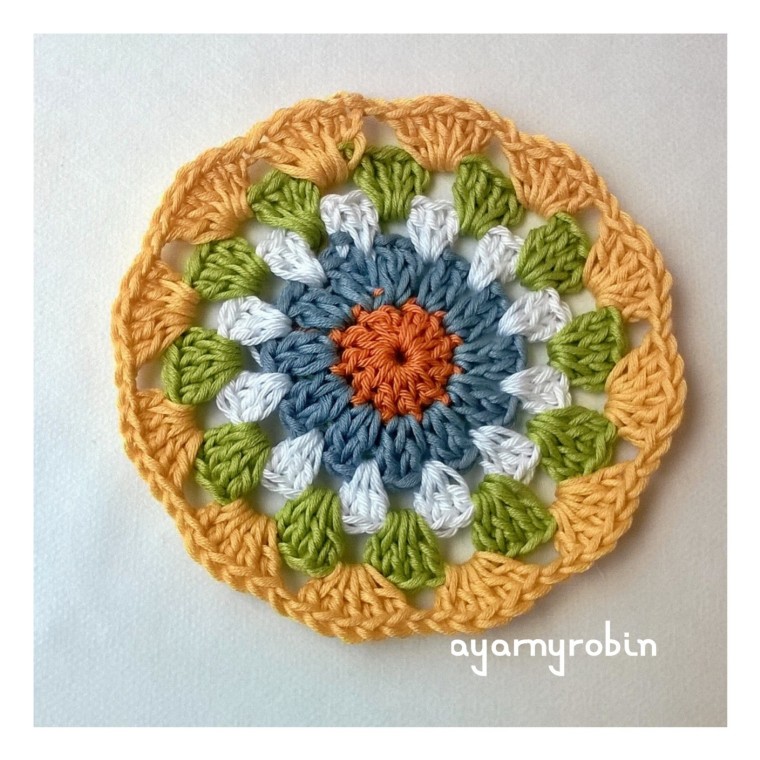
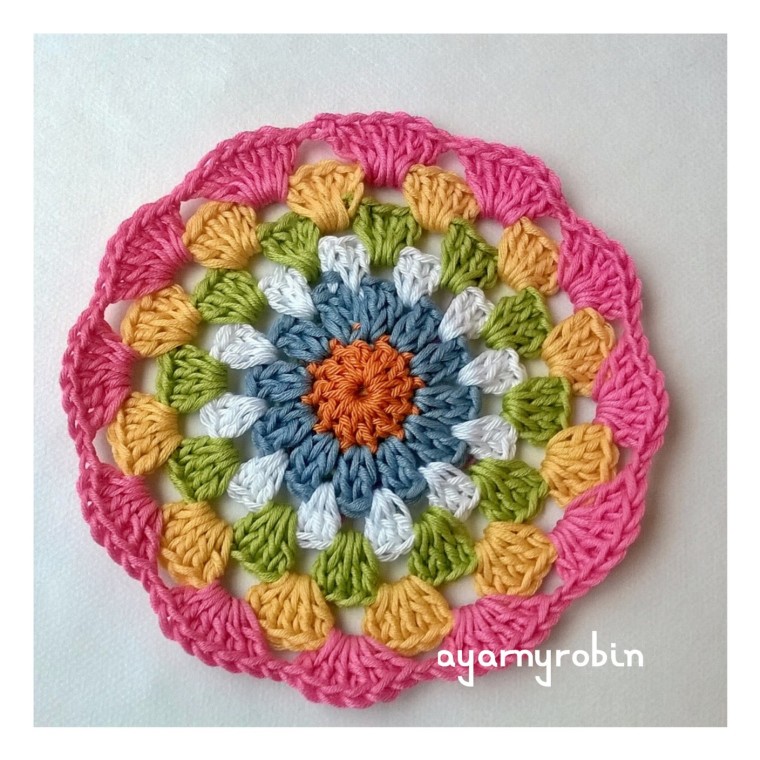
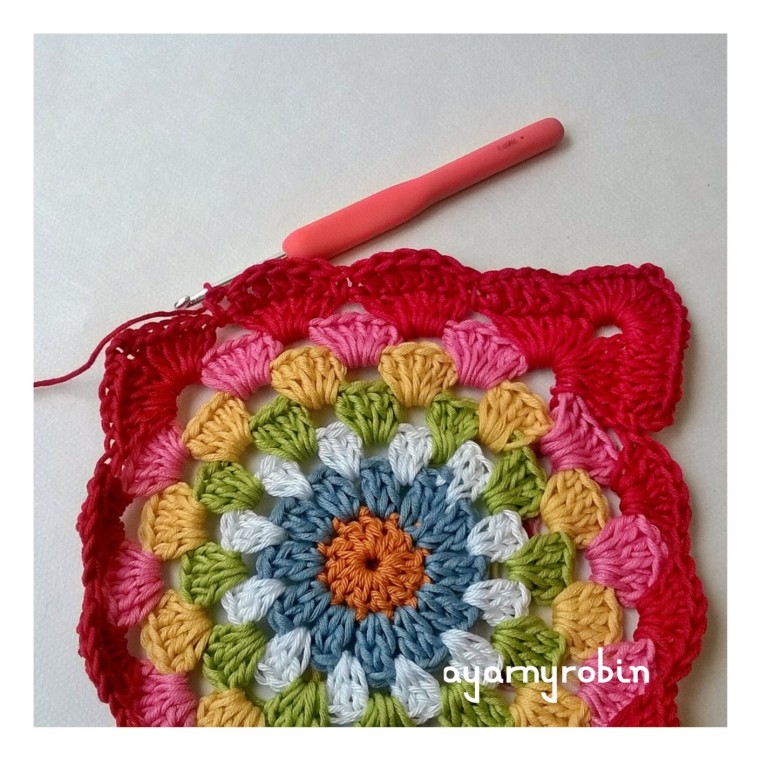
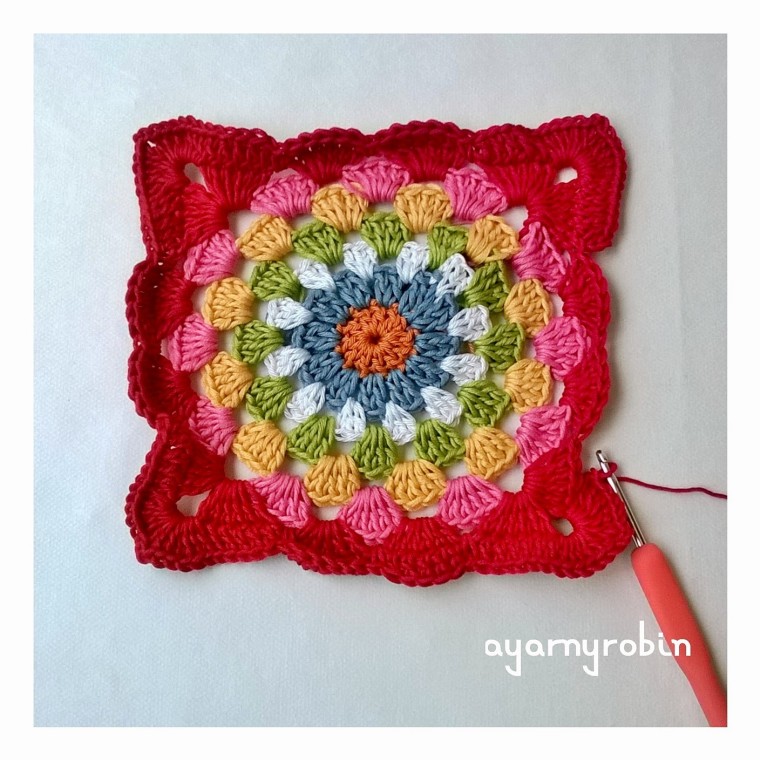
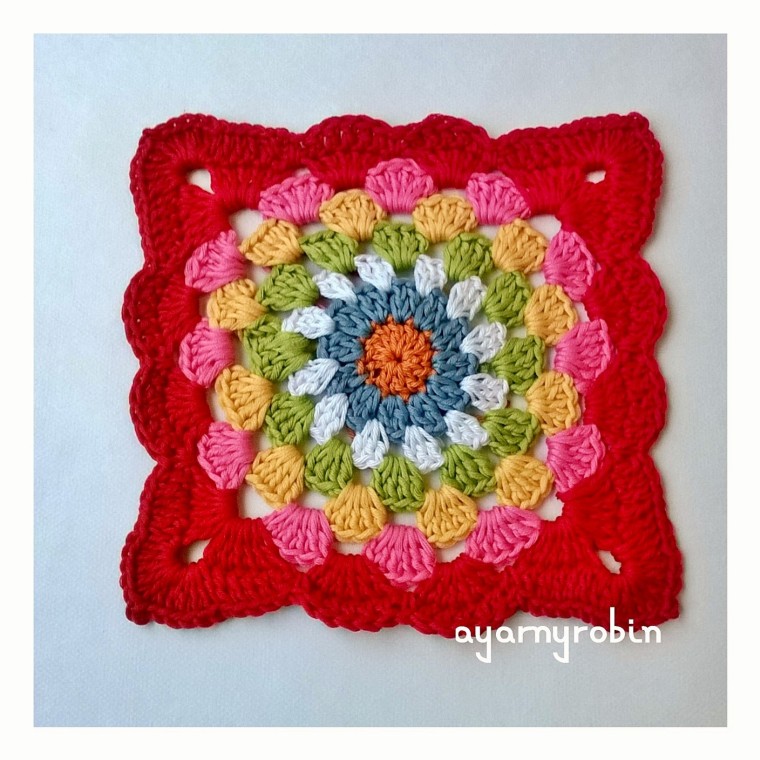
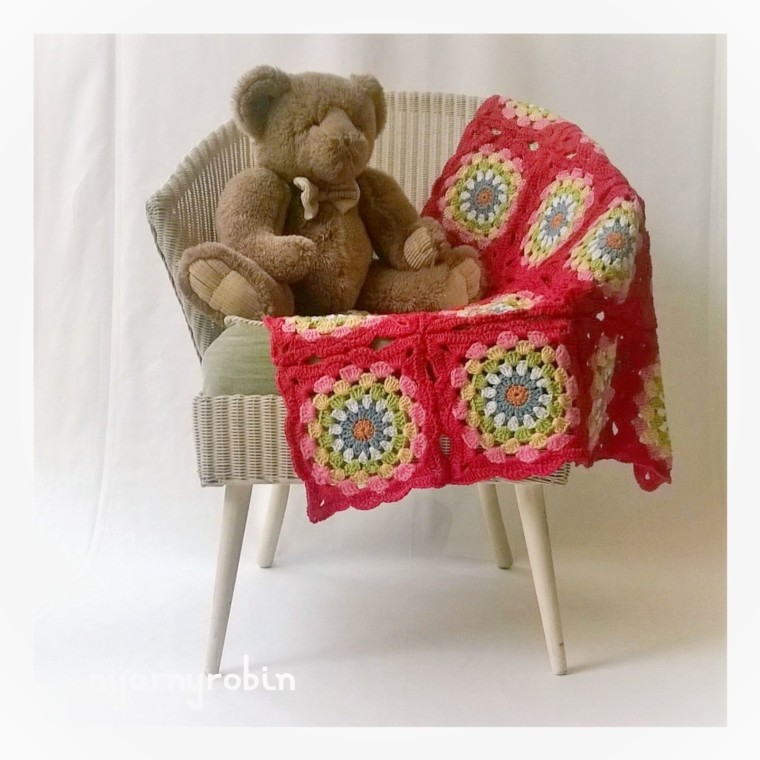
I am so thrilled to be able to introduce the Sunshine Jelly Baby blanket to you.
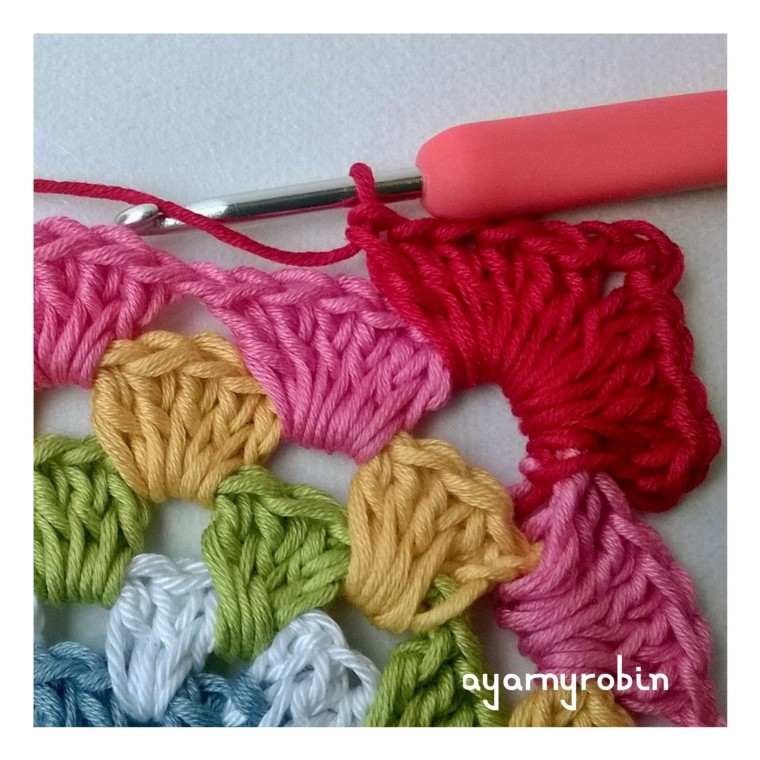
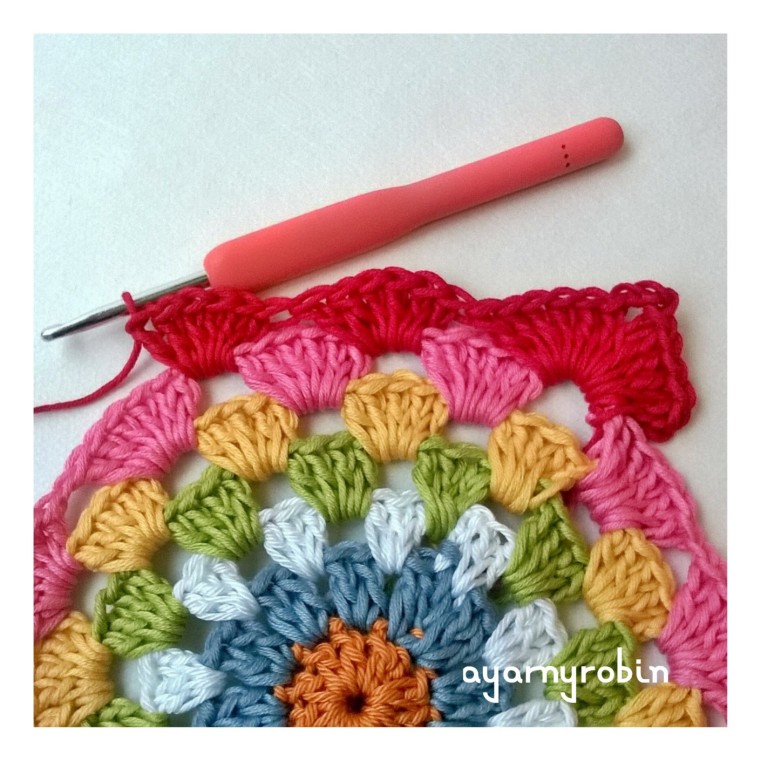
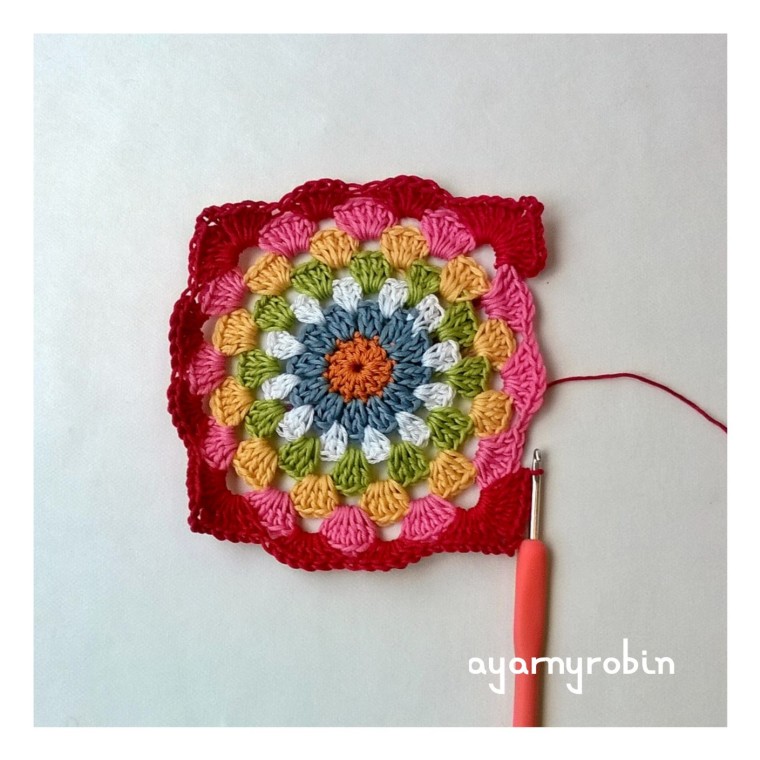
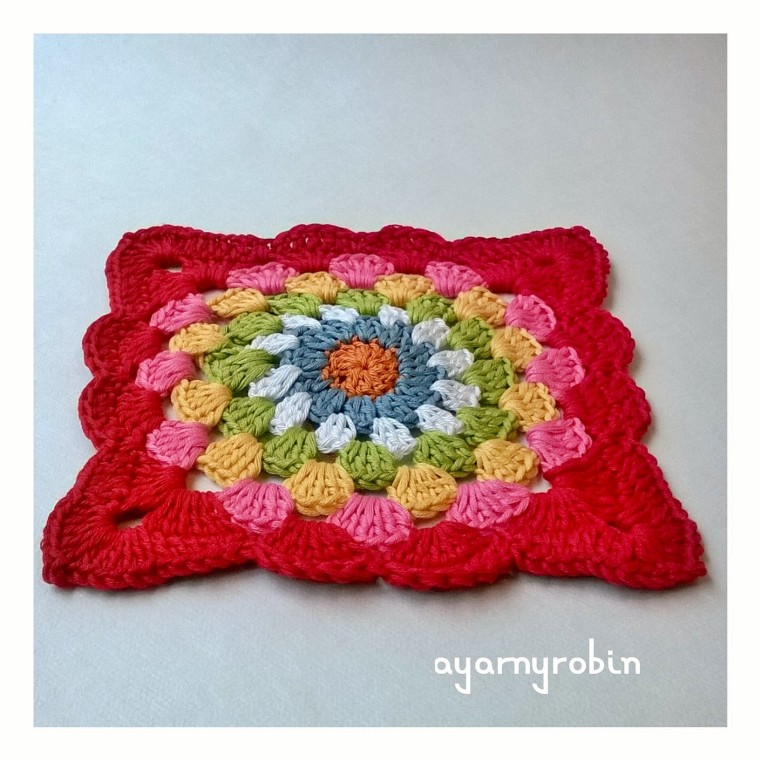
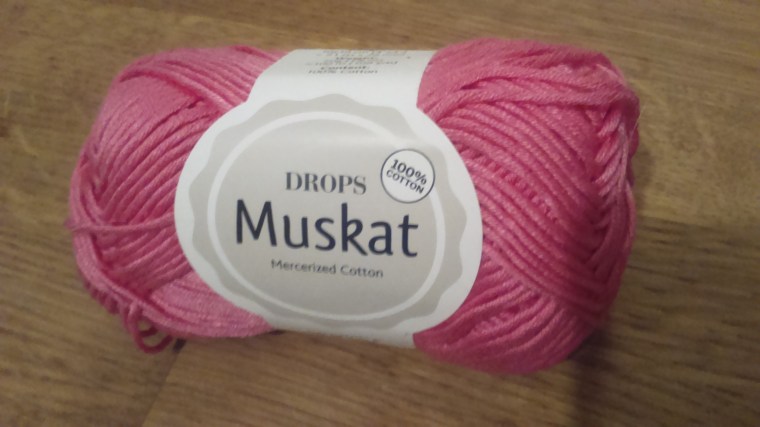
This delightful crochet blanket is vibrant and fun to hook and the pattern is available, complete with a photo tutorial just below. Made from Drops Muskat cotton, it measures 74cms x 74cms or 29″ x 29″…the perfect pram blanket size, of course you can make the blanket bigger by adding more squares if you wish. You can also check out my latest free baby blanket pattern…The Angelece Baby Blanket by clicking this link. This delicious blanket is made using the Robins Nest square which I designed a few years ago and if you are a regular here you will know that I have recently updated this pattern. When I firstdesigned this square I always intended to make a baby blanket…I guess somethings just take a while to come to pass.
As always I’m using English crochet terminology. Ch – chain Slst – slip stitch dc – double crochet tr – treble crochet
ch3 – counts as a treble unless otherwise stated. I’m using drops muskat cotton.
and I’m using the colours and quantities listed below red – 100g old pink – 80g white – 50g vanilla yellow – 65g dark orange -20g
sky blue – 35g
apple green – 50g
and a 4mm crochet hook and a 3.5mm crochet hook
Each lovely yarny square measures 7″ x 7″ or 18cm x 18cm once blocked.
You will need to make 16 squares to make this blanket arranged
4 x 4…
of course you can make more squares if you wish to make a larger version.
So here goes…
with a 4mmhook ch2, join with ss to form a tiny ring (you could make a magic circle instead if you prefer)
Row 1: ch3,
11tr into ring,
join blue yarn and slst into 3rd ch
(12tr in total).
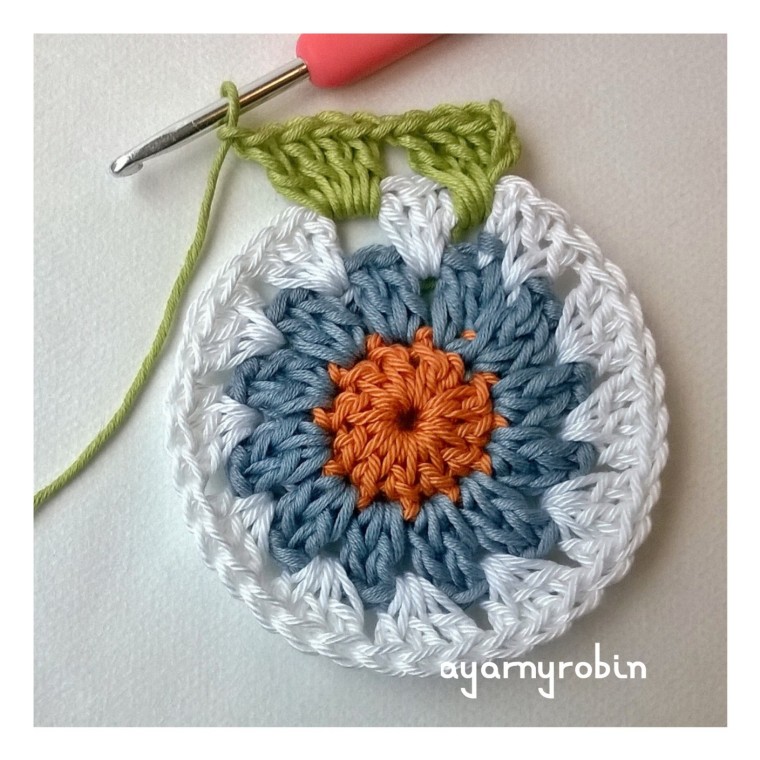
Row 2: ch3,
1tr in same space, ch1
2tr in next st, ch1
*2tr in next st, ch1*, repeat * * x10 times,
join white yarn and slst into 3rd ch
(12 clusters of 2tr and 12 ch spaces).
Row 3: ch3,
*3tr in next ch space*,
repeat * * x10 times, 2 tr in next ch space,
join with slst in top of ch3 and fasten off.
(12 clusters of 3tr).
Row 4: join green yarn in between any cluster of 3tr of previous round and ch3,
3tr in same sp, ch1
*4tr in between next cluster of 3tr, ch1*,
repeat * * x10 times, join with slst in ch3 and fasten off. (12 clusters of 4tr and 12 ch spaces)
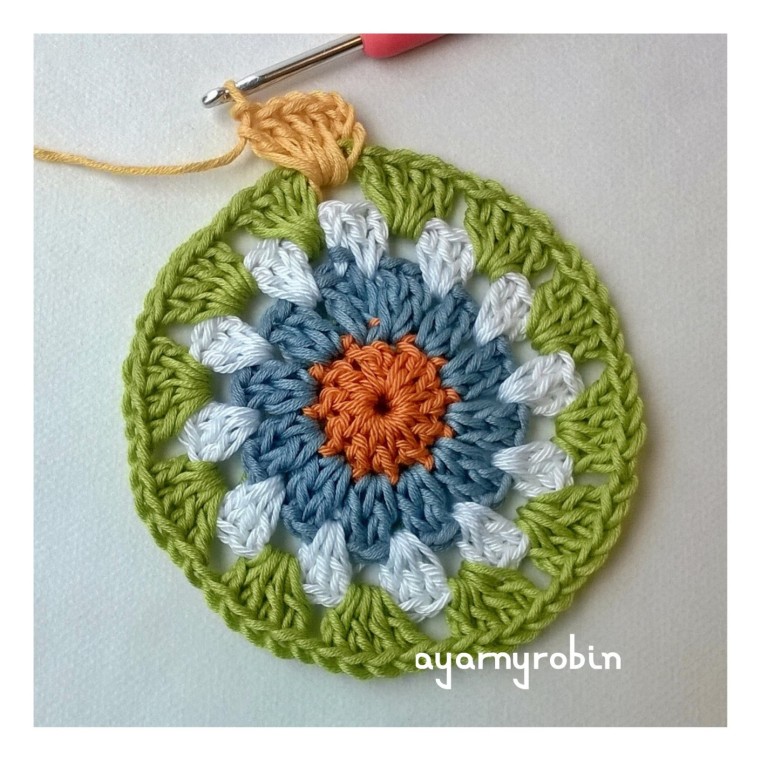
Row 5: join yellow yarn in any ch space and ch3, 4tr in same sp, ch1
*5tr in next ch space, ch1*, repeat * * x10 times, join with slst in ch3 and fasten off. (12 clusters of 5tr and 12 ch spaces)
Row 6: join pink yarn to any ch space and ch3, 5tr in same sp, ch1, *6tr in next ch space, ch1*, repeat * * x10 times, join with ss in ch3 and fasten off. (12 clusters of 6tr and 12 ch spaces)
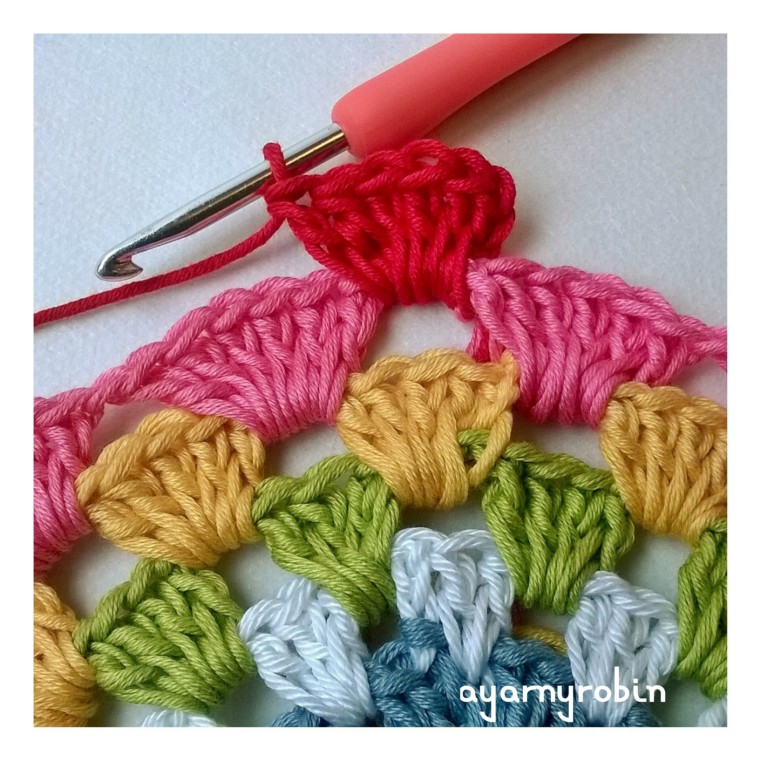
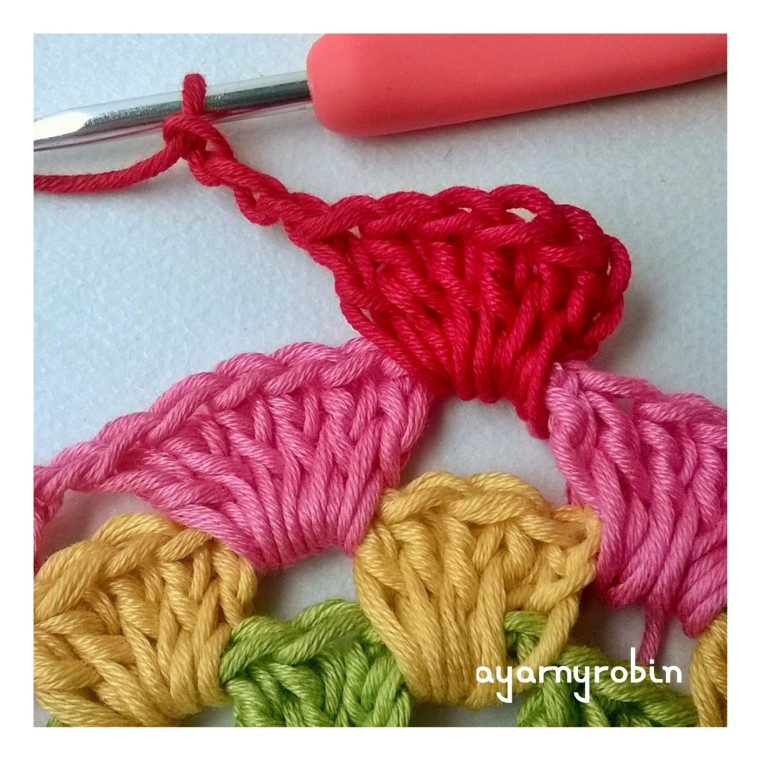
Row 7: join red yarn in any ch space, ch3, 5tr in same space,
ch3,
6tr in same space (corner made),
*6tr in next ch space, 6tr in next ch space,
6tr in next space, ch3, 6tr in same space* (2nd corner made) repeat * * x2 times
6tr in next space, 6tr in next space, join with slst in beginning ch3. Do not fasten off.
Row 8: ch3,
1tr in next 5sts,
*6tr in ch3 sp, ch2, 6tr in same space (corner made),
*1tr in next 5sts,
dc UNDER next stitch (indicated by the hook)
1tr in next 5sts, dc under next stitch, 1tr in next 5sts, dc under next stitch
1tr in next 6sts, 6tr in ch sp, ch 2, 6tr in same space*
repeat * * x2times
1tr in next 5sts, dc under next stitch, 1tr in next 5 sts, dc under next stitch, 1tr in next 5 sts, dc under next stitch, slst to beginning 3rd ch to finish. Weave in ends.
Blocking:
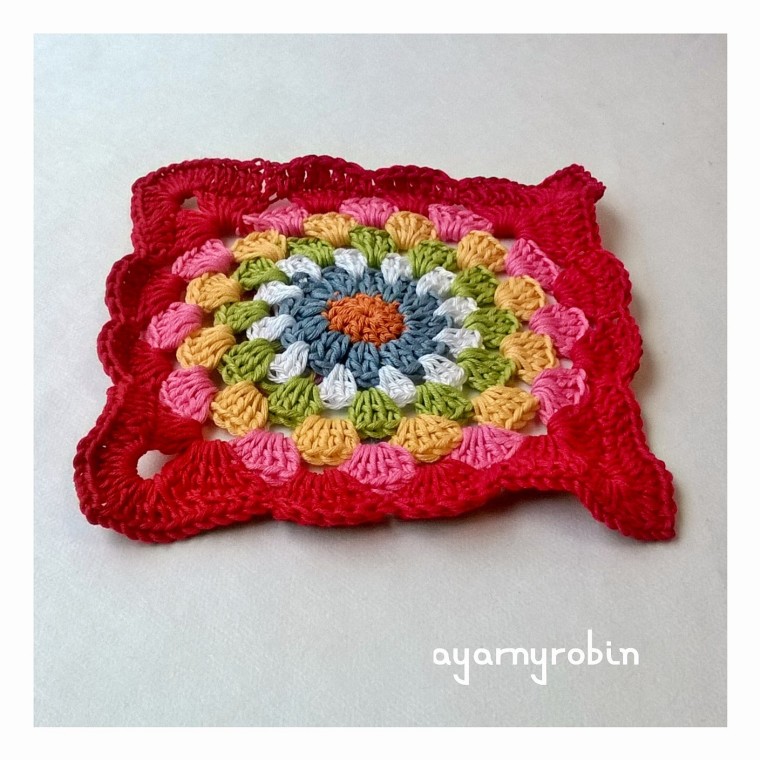
A word on blocking: Before blocking…
Your square will be wibbly. After blocking…
Your square will lie flat and will look much better. Blocking is really worth the extra effort and isn’t difficult or expensive to do. I just pinned this square to my ironing board so that it measured 7″ by 7″ and hovered my iron just above the square and blasted it with steam. Allow to cool before unpinning and store carefully. Alternatively, you could pin the square to the required measurements to a towel or a pin board, spritz with water and allow to dry.
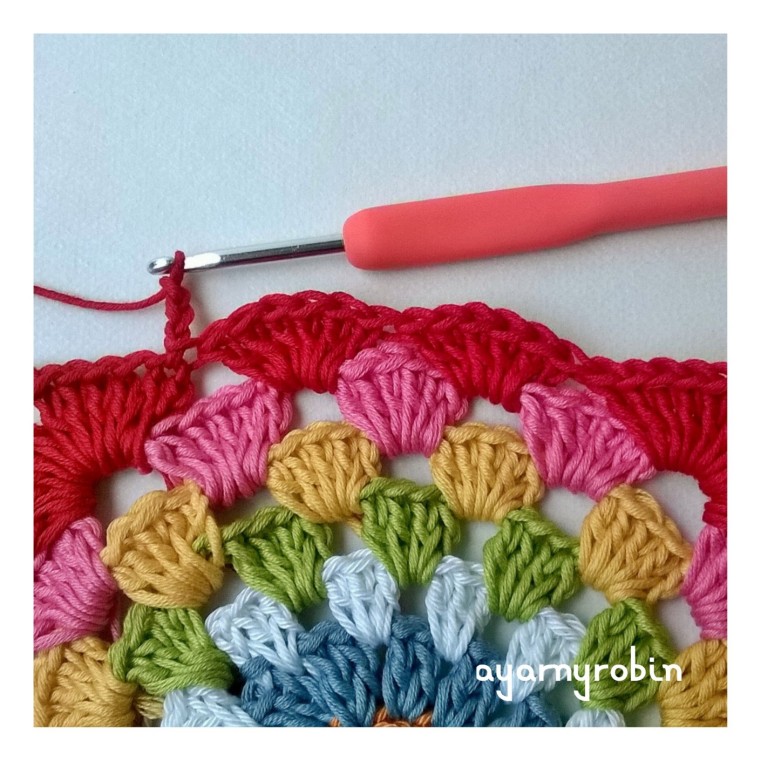
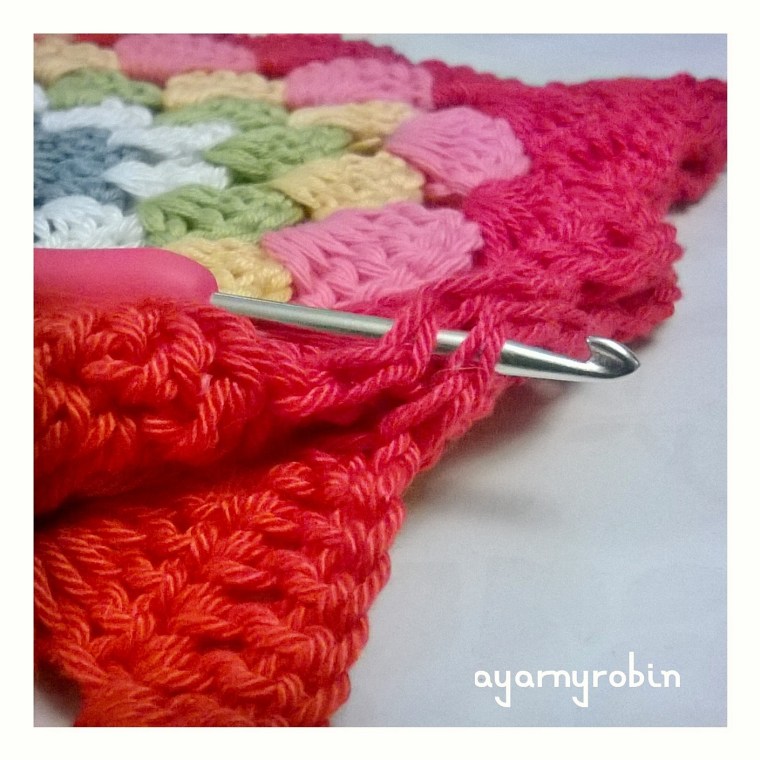
Joining:
I have used a simple and easy slip stitch to join these squares. I have chosen this join for two reasons. The first reason is that it is secure and does not add anything to the squares, allowing them to showcase themselves.
The second reason is it uses the least amount of yarn and also creates less ends to weave in.
So to join the squares start by placing 2 squares with the right side to the right side…ie/ the wrong side of each square will be facing outwards.
Note that this join requires you to place slip stitches in the top of the stitches along the edge of the square and you should go under both loops of each stitch.
Some stitches will require you to slip stitch in both stitches of each square, these stitches should be the corresponding stitches for each square. Some stitches will require you to slip stitch in the top square only. This is because the squares are only joined to each other at each corner and in the middle of each scallop.
Join yarn in 2nd ch of any corner space and with a 3.5mm hook slst,
in both squares slst in the next 6sts,
in top square only slst in next 6 sts (tr), slst in next st (dc), slst in next st (1st tr of scallop),
*in both squares slst in next 3 sts (2nd, 3rd &4th st of scallop),
in top square only slst in next 3sts (tr,dc,tr)*
repeat * – *
in top square only slst in next 5sts,
in both squares slst in next 6 sts, miss chst, slst into 2nd ch of corner space.
Repeat this process for each side of the square which requires joining. You will not need to cut your yarn at the end of each side joined as you can continue round by adding another square. I started joining in the middle of the blanket. You will have to join in a new corner space for some of the joins, but the process remains the same.
I would love to see your makes and you can share on social media by using the following hashtags
#ayarnyrobin #yarnyrobin @yarnyrobin
This pattern to include the photos are the property of Nicola Florence @ayarnyrobin. You can’t modify, resell or share this pattern. You can sell finished items made from it, but please mention that the item is made using AYARNYROBIN pattern.


 join blue yarn and slst into 3rd ch
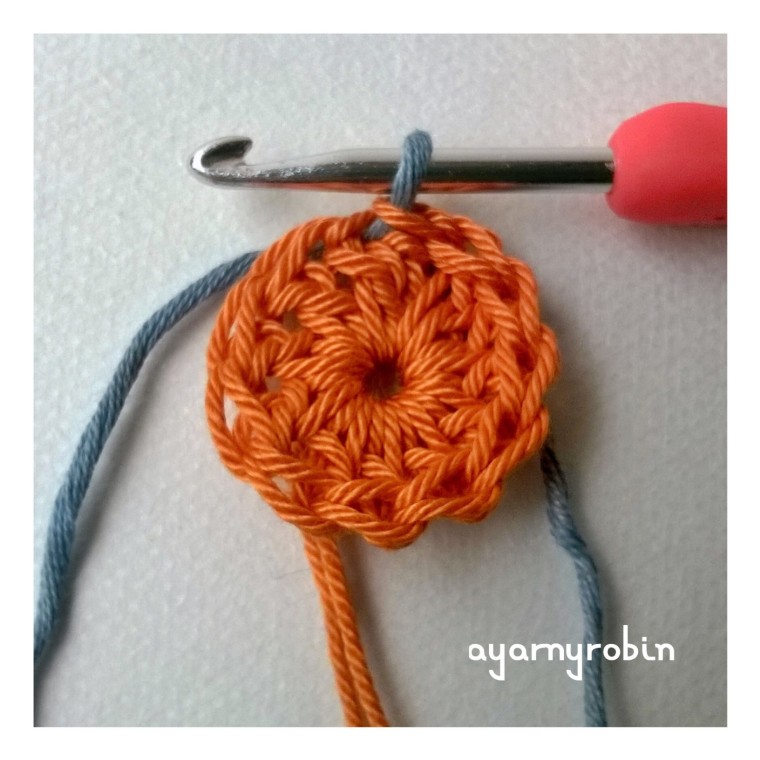 Row 2: ch3,
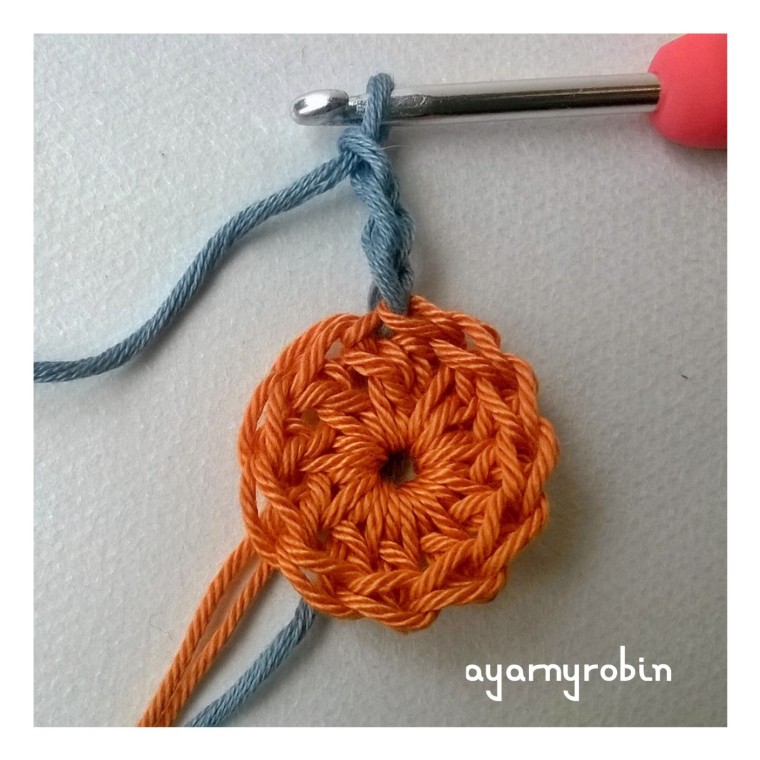 1tr in same space, ch1
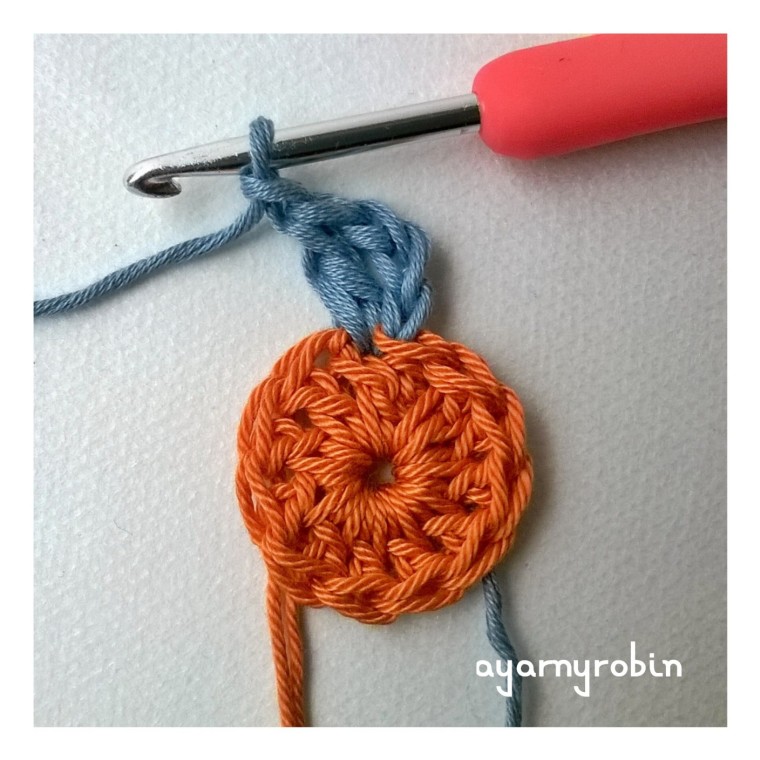 2tr in next st, ch1
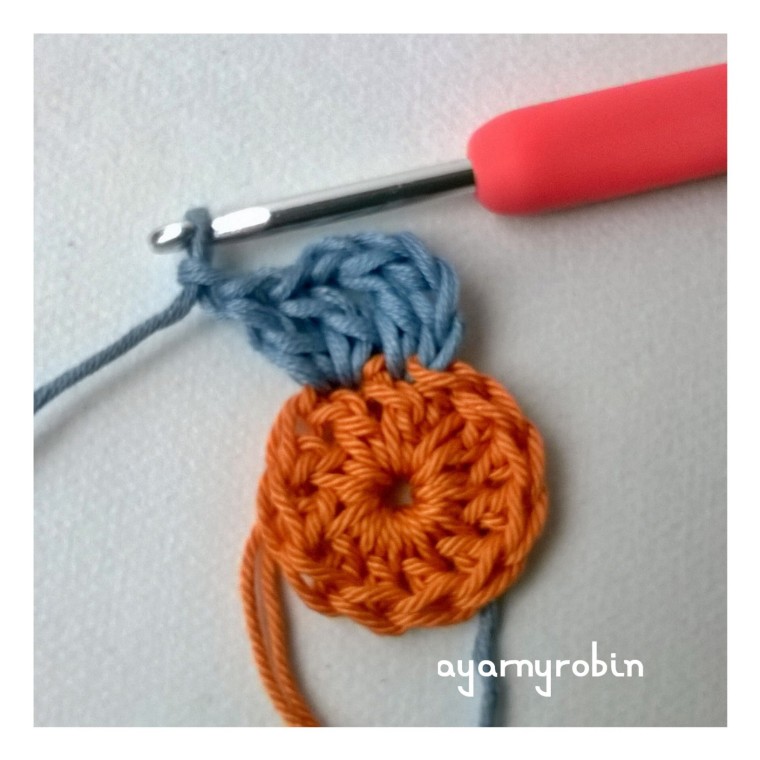 *2tr in next st, ch1*, repeat * * x10 times,
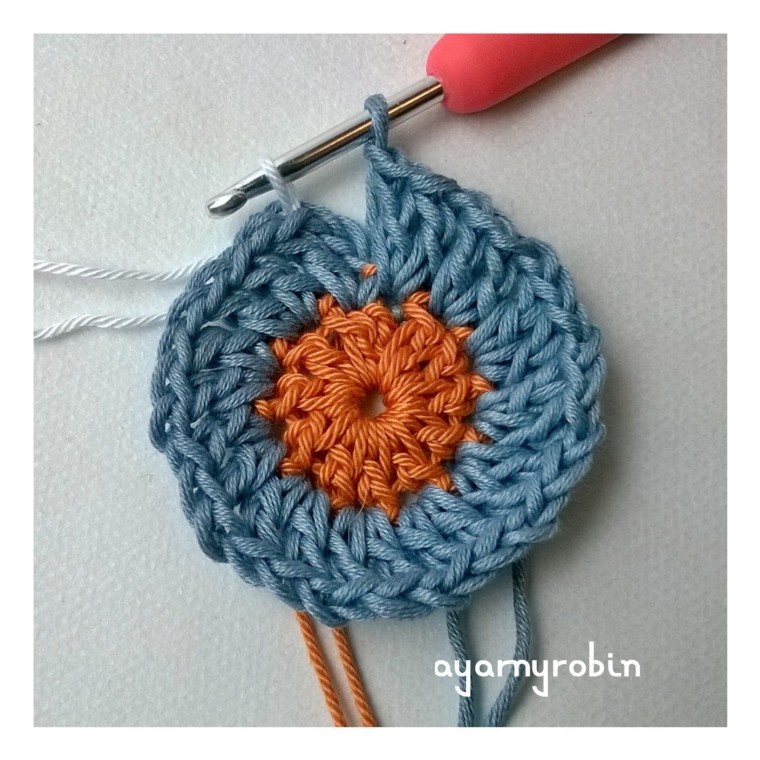 Row 3: ch3,
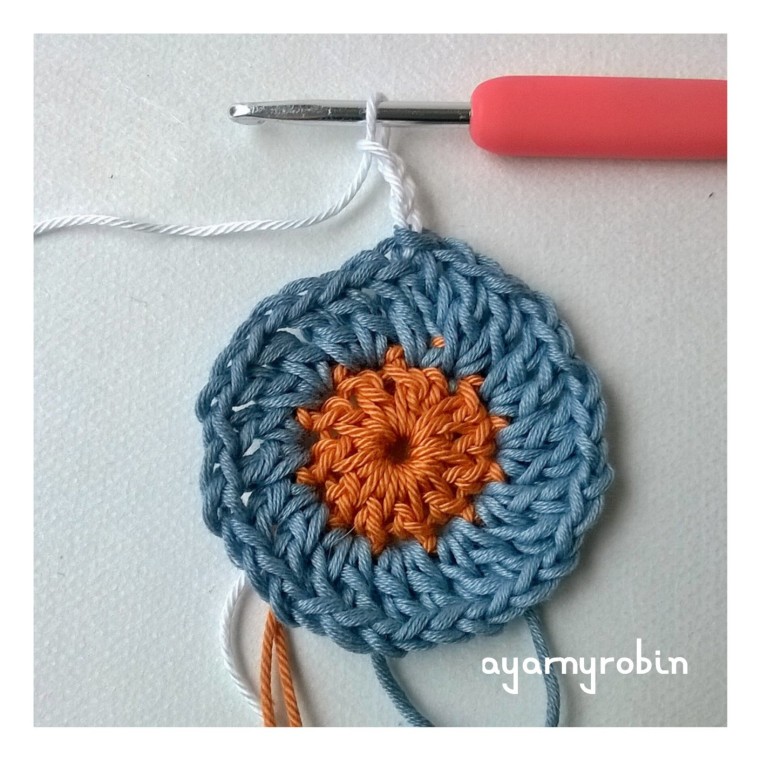 *3tr in next ch space*,
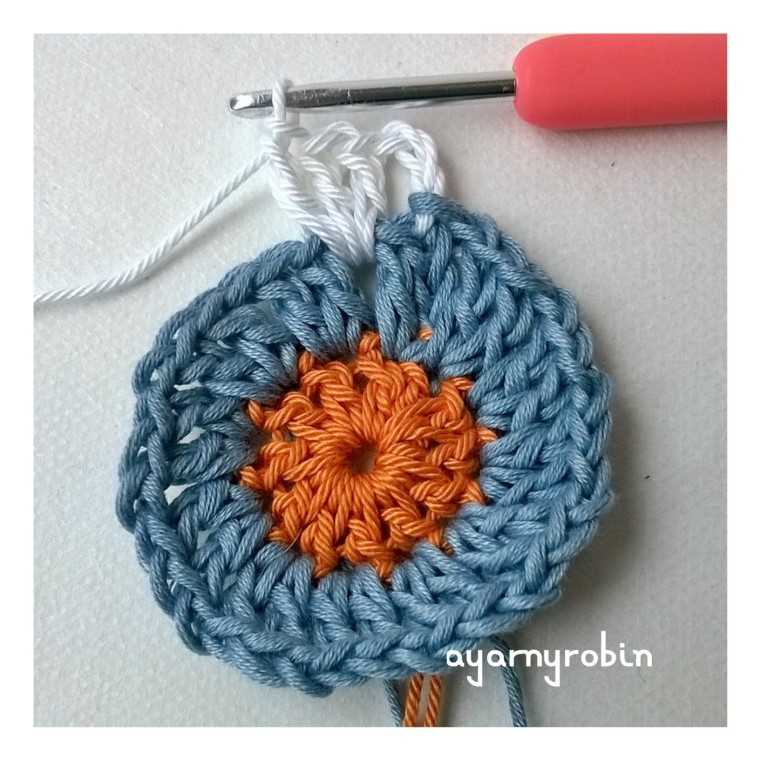 repeat * * x10 times, 2 tr in next ch space,
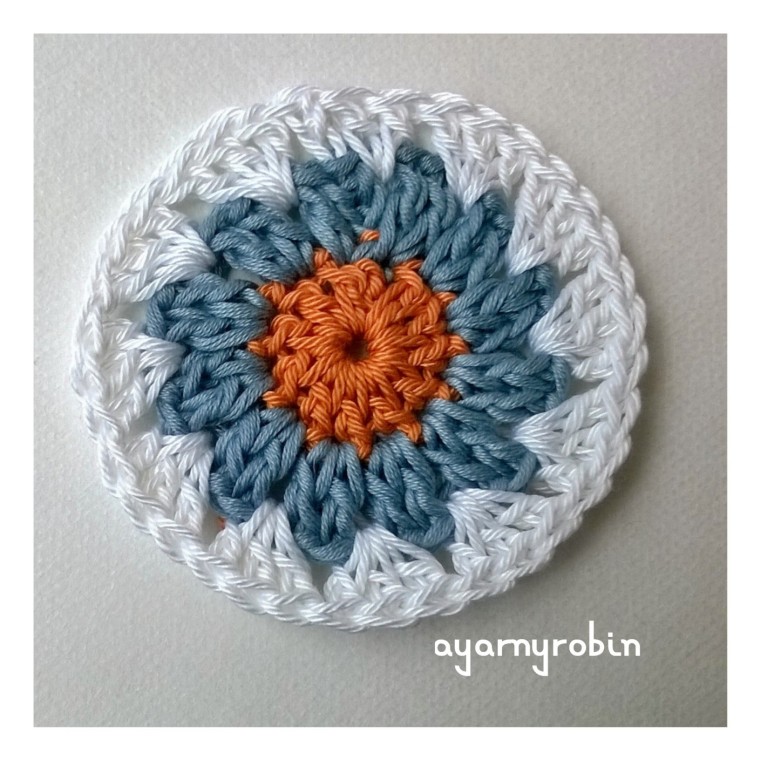 join with slst in top of ch3 and fasten off.