Do you fancy pattern testing this cute fox bonnet? then carry on reading for details of how to apply.
Crocheters of all abilities may apply -pattern available in both UK and US versions
You will need to supply your own yarn…drops brushed silk alpaca (aran) x3 balls.
You may use your own colour choice
Must have a public IG or FB account
Must be able to provide good quality, well lit photos…IG worthy!
If you are intrested and can meet the above, send me a dm with size you would like to test Newborn, 0-3mths, 3-6mths, 6-9mths, 9-12mths, 1-2yrs or 2-5yrs
If successful, you will receive the fully edited pattern once completed and another pattern of your choice from my Etsy shop.
Market prep and gifting your hand-made makes just got a whole lot easier with these printable care cards!
Care tags
Give your hand-made items that professional look with this I’m Hand-made’ set of Printable PDF’s which will help your customers understand how to care for their hand-made item. Great if you sell your crochet finished pieces or if you gift your makes!
Tags can be hole punched to enable you to attach to your items with twine or ribbon, or just slipped into your beautifully packaged item. Simply hand write the material used for your item and colour or circle the relevant washing instructions, so the receiver of your precious items can care for them safely.
I recommend printing on thick card stock for a professional finish.
Join my email list and get 30% off these care cards – offer valid up to the end of May 2023
Processing…
Success…welcome to The Nest…please allow 24 hours for your email to update
Whoops! There was an error and we couldn't process your subscription. Please reload the page and try again.
Don’t forget to pop over to my socials to say hi…I would love to see what’s on your hook. @yarnyrobin
Spring is upon us, although I’m bracing for the April showers, which seem to have started early here! Whether you’re looking for a quick Easter make, for that last minute gift or Easter basket filler, I’ve got some patterns to tempt you…and most of them are FREE… Hurrah!
How about this as a sweet Easter basket filler for baby. Using Oeko Tex standard 100 approved 100% cotton in a 4ply; these lovey’s are soft to snuggle and safe to chew on…and are sure to become baby’s best friend.
This luxurious set of reusable soft textured facecloths and squishy scrubbies would make the perfect Easter gift for baby, Mom’s-to-be, or just that special girl in your life. They are quick and easy to make, so are perfect to add that handmade touch to gift baskets.
FREE crochet Spring Printable PDF
For the month of April 2023 only, if you sign up to my email list, you will receive a pdf for these beautiful spring printable mini tags and postcards, perfect for printing on your choice of card stock (I recommend business card stock) and attaching to your hand-made gifts this Spring / Easter. Please allow 24 hours for your email to update.
Processing…
Success…welcome to The Nest…please allow 24 hours for your email to update
Whoops! There was an error and we couldn't process your subscription. Please reload the page and try again.
Why not hook this beautiful baby blanket, ideal for the spring / summer. A beginner’s introduction to filet crochet, the pattern is free and gives instructions on how to size up for a bigger blanket too!
The simplicity and sweetness of this beautiful Spring tea cosy, makes it quick to make. Suitable for a beginner with a little experience of working in the round, this tea cosy is sure to keep your Easter cup of tea as warm as your freshly toasted hot cross bun!
Don’t forget to pop over to my socials to say hi…I would love to see what’s on your hook. @yarnyrobin
I made this blanket a few weeks ago now. If it looks familiar, it’s because it is my Angelece blanket, which has been a free pattern here on my blog for a good while now. It has proven to be a popular pattern in the past and I have really enjoyed re-visiting it. I love this pattern for its simplicity. You can certainly put your feet up and get lost in a box set and still hook this as you go, which makes it a pleasurable project. This blanket is also the perfect introduction to filet crochet, so if you have never done a bit of filet before, you should definitely try this pattern out.
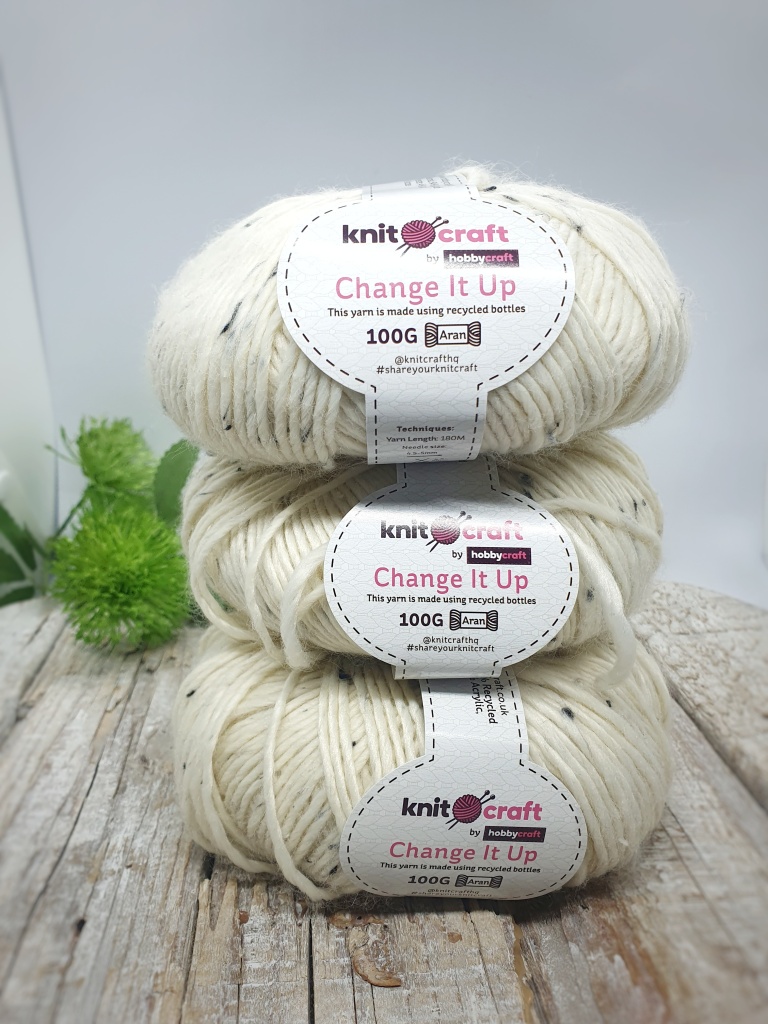
I used this aran / worsted weight yarn which I found in Hobbycraft. It is beautifully soft and it is made from mostly recycled bottles…I still don;t understand how it feels so soft and squishy!!!
So here are the pattern details, for this blanket I added an additional round of double crochet – UK (single crochet – US) to make a wider border and I made my tassels super chunky by wrapping them more. I actually cant remember how many balls of yarn I used…I think it was 6…which works out at 300g and I have some left over too!
Processing…
Success! You're on the list.
Whoops! There was an error and we couldn't process your subscription. Please reload the page and try again.
The January Beanie is now available for you to hook. This pattern is a bottom up construction and features a comfy ribbed brim and a beautiful ridged texture.
Suitable for all the family this beanie is quick to hook up and comes in sizes
There is also a section for adjusting for a custom fit if necessary.
Materials you will need: Double knit / light worsted weight yarn – pattern recommends Stylecraft Special DK, Papatya Batik, Scheepjes DK but you could substitute. (4.0mm) crochet hook or hook needed to acquire correct gauge Tapestry needle Tape measure stitch marker (optional) faux fur pom
The hat is designed to look great whether you choose to make it in one solid colour, or choose to to use a self striping yarn as in the picture below or in a fun colour fade as in the picture above.
It’s also a great stash busting project too, making these beanies a great addition to your stock if your a finished piece crochet seller or you sell at craft fairs, because you can make them from left over yarn from your other projects.
This crochet pattern has been fully pattern tested and is written in both UK and US crochet terminology. UK stitches used – DC, TR, FPTR, Dec and working in back loops US stitches used – SC, DC, FPDC, Dec and working in back loops You will have access to a 25 minute video tutorial also.
Why not subscribe to my brand new email list…where you will receive occasional emails with crochet inspiration, free crochet patterns and exclusive discount codes.
Processing…
Success! You're on the list.
Whoops! There was an error and we couldn't process your subscription. Please reload the page and try again.
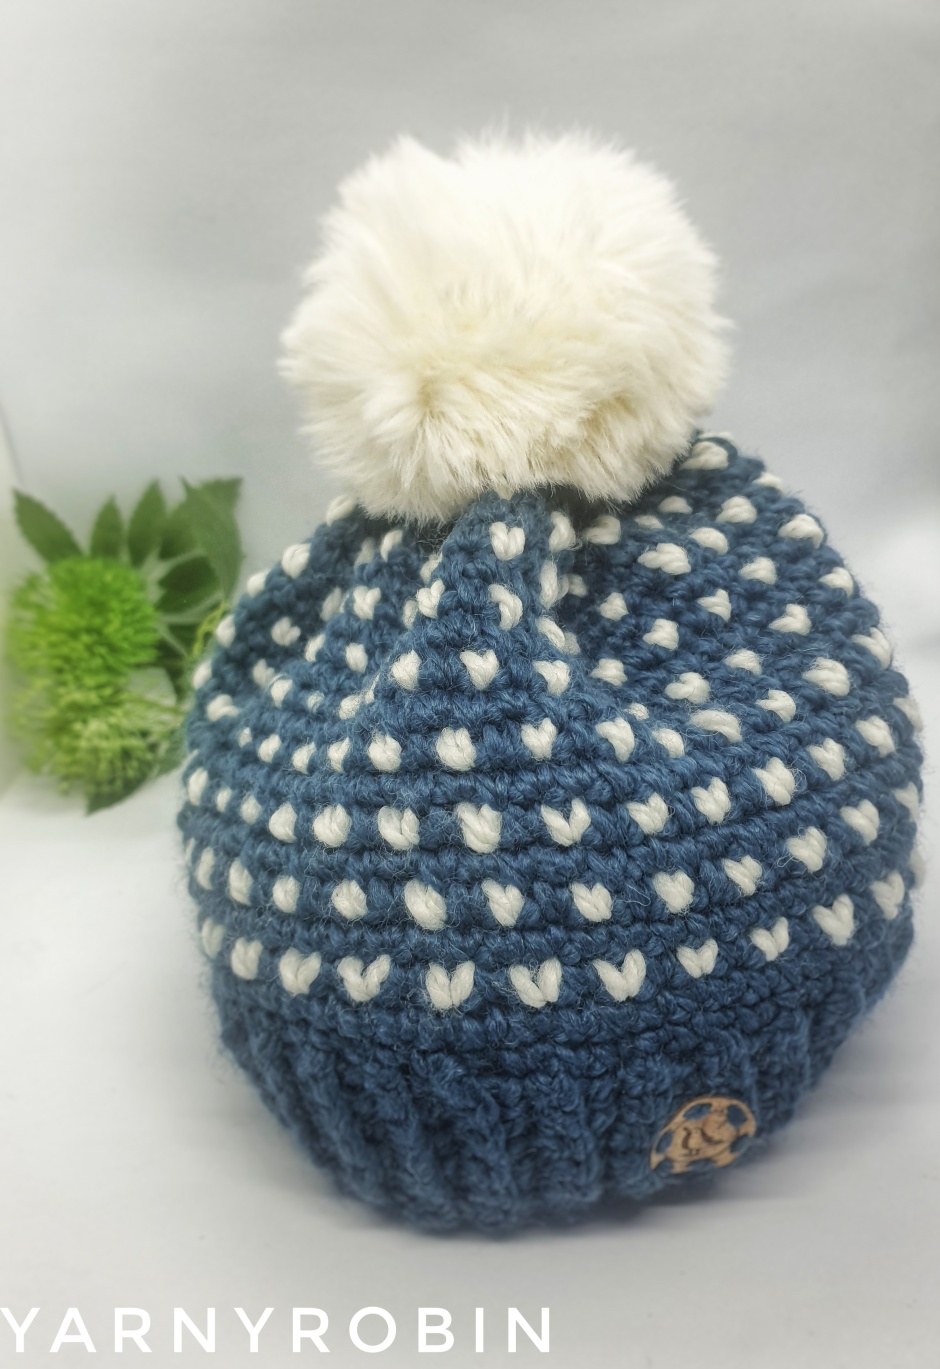
This is a super cute and quick make, so perfect to hook if you have an upcoming craft fair or if you wanted to make in time for Valentines Day as a treat for yourself or as a Galentine’s gift for your Bestie! The pattern is only available in adult size at the moment, hopefully I can carve out some more time to grade it for other sizes.
I get lots of questions about where I get my labels for my hats…the answer is Etsy! My labels are cork labels made from 100% sustainable material that is vegan. There are lots of custom sellers, so if you are looking for some labels or tags go and check them out.
The pattern is suitable for beginners and just uses a double crochet stitch (single crochet stitch), and some decrease stitches. It is important not to have your tension very tight or the teeny, tiny hearts become pinched. I used Stylecraft Softie which is a chunky yarn blend 20% wool 80%acrylic. I did try with some other chunky yarn, but I got the best results with the Softie, it just gives a subtle amount of drape which feels lovely to wear.
You can also purchase a printable PDF of this pattern which is available in both UK and US crochet terms over in my Etsy shop for less than a cup of coffee which you can access just here
Yarn – chunky / bulky see further below for recommended yarns.
20% superwash wool 80% acrylic blend
Adult – approx. 95g
Main colour – approx..80g
Accent colour approx. 15g
Size Guide.
Adult – to fit head circ. 22” / 55.8cms
Measurements are approximate and I advise you measure the intended head wherever possible. This beanie allows for a 2” / 5cm negative ease (the amount of stretch)
Stitch Abbreviations.
Ch – chain
Slst – slip stitch
Dc – double crochet
Hs – Heart stitch
Dec – decrease
BLO – work st into the back loop only (see photo at back of pattern)
Dc: Insert hook into chain or under both loops of stitch, yarn over and pull through so there are 2 loops on hook, yarn over again and pull through both loops on hook.
Hs: Insert hook under both loops of stitch, in accent colour – yarn over and pull through so there are 2 loops on hook (1st loop in main colour, 2nd loop in accent colour), in main colour – yarn over again and pull through both loops on hook to complete st. See top tip below! See Pic 1 – 4
Dec: decrease st worked over 2 stitches: insert hook under both loops of stitch, yarn over and pull through so there are 2 loops on your hook, insert hook into next st, yarn over and pull through so there are 3 loops on your hook, yarn over and pull through all 3 loops.
Top Tip:
When working the heart stitch and you yarn over and pull through in accent colour, pull loop up a little higher than you would for a regular dc stitch as this helps to keep the heart lying flat instead of pulled too tight.
Pattern Notes.
This pattern is written using UK crochet terminology and the stitch abbreviations can be found below.
Ch1 does not count as a stitch throughout the pattern unless otherwise stated. Repeats are marked by asterisks *.
The hat is worked by making the ribbed brim and joining one end to the other to form a circle. The main body of the hat is then worked in rounds.
When working Rounds 3 and 5 and subsequent repeats carry non-working yarn along the round (see pic 5)
When working rounds 4 and 6 and subsequent repeats drop accent colour yarn and pick up again on next round
Top Tip:
When working a dc in round above heart st, insert hook into side of heart as shown in Pic 6 as this will make it easier.
Yarn Suggestions.
Stylecraft Softie chunky is the recommended yarn for the pattern, but here are some similar substitutes…
King Cole Timeless Chunky
King Cole Big Value Baby Soft Chunky
King Cole Shadow Chunky
Red Heart Gemstone
Bernat Wavelength
Gauge
It is very important to check your gauge to ensure your beanie will fit.
To do this make a gauge swatch in the yarn you will be using for the body of the hat. If this matches the gauge, you’re good to go! If your swatch is too big, try using a smaller hook to obtain correct gauge. If your swatch is too small, try using a larger hook to obtain correct gauge.
Using chunky / bulky yarn swatch 11dc x 14 rows = 4” x4” (10cm x 10cm)
Please do not modify, resell, publish in part or in full, or share this pattern or photo’s as your own.
You may sell finished items made from this pattern, I hope it becomes a hot item for you; but please credit, with a link, that the item is made using @yarnyrobin pattern.
Please also tag your makes on your social using #miniheartbeanie @yarnyrobin because I love to see what you make!
In main colour
Row 1: Ch8, dc in 2nd ch from hook and in each ch along, turn do not ch1 (7dc)
Row 2 – 62: IN BLO dc in each st across, turn do not ch1 (7dc)
Slst row 62 to beginning row to form a circle. Turn brim inside out so the seam is on the inside. We will now be working in rounds around the brim of the hat.
Working with right side facing you in main colour
Round 1: ch1, 64dc evenly around top of brim – 2dc in first and last st then aim to place a dc at the top of each rib, join with a slst to 1st dc (64dc)
Round 2: ch1, dc in each st around, join with a slst to 1st dc (64dc)
Round 3: ch1, dc in same st, hs * dc, hs * repeat around, last st is a hs, slst to top 1st dc (32dc / 32hs)
Round 4: repeat round 2
Round 5: ch1, hs in same st, dc * hs, dc * repeat around, last st is a dc, slst to top of 1st hs (32hs / 32 dc)
Round 6: repeat round 2
Repeat Rounds 3 – 6: 2 more times(total of 8 rounds)
Round 15: repeat round 3
Round 16: repeat round 2
Round 17: repeat round 5
Round 18: ch1,dc in same st,decrease * dc,decrease * in each st around, skip last st, slst into 1st dc (21dc / 21dec)
Round 19: ch1,dc in same st,decrease * dc,decrease * in each st around, st, slst into 1st dc (14dc / 14dec)
Round 20: ch1,decrease in each st around, skip last st (13dec)
Hat measures 8.5” from brim to crown
Fasten off cutting yarn leaving a long tail approx. 20cms from hat. Thread darning needle and weave in and out of the top loops of last round. Pull the end tight to gather and secure with a few stitches. Weave in any loose ends. Now add your pom (see end of pattern for details)
Add pom
Add a faux fur pom to complete the look. Or alternatively make your own pom. I added a Trimits pompom as they tie into the hat easily, which makes them really easy to remove for when you want to launder your beanie.
If you are making your own pom you have a couple of options. You could use a pom pom maker however, I favour making my pompoms using the method my Grandma taught me; using 2 pieces of cardboard. I like my pompoms to be really full and lush and so I wrap each pompom with a minimum of 3 layers of yarn. My card circles have an outer diameter of approx. 4.5” / 11cms.
TOP TIP: If making your own poms leave long tails when you tie your pompoms off as it will make attaching them to your hat much easier. If your pompoms are in a different colour to your hat, tie your pompoms off with the main colour of the hat as it makes weaving in the ends much neater.
REMEMBER: IF MAKING YOUR OWN POM YOU WILL NEED MORE YARN THAN STATED IN THIS PATTERN.
You can also purchase a printable PDF of this pattern which is available in both UK and US crochet terms over in my Etsy shop for less than a cup of coffee which you can access just here
This is what I have been working on, a brand new beanie design using beautiful squishy alpine stitches. These beautiful front post stitches make this beanie textured and perfect for an ombre colour fade design. However I have also made this beanie in a solid colour block as well as a self striping yarn…and they look great.
I have written the pattern for sizes, 0 – 3 months through to adult, so this beanie can become a real family favourite! I have also written this pattern in both UK and US crochet terminology, so no more pesky converting during making.
I am hoping to slowly work through my portfolio of patterns and get a US version of them written, so watch this space. The pattern is currently with my testers, so I’m on tenterhooks waiting to see how they get on. I have a couple of spots still available if you fancy testing this pattern. You will receive a fully edited version once complete and another of my patterns that you can choose. Let me know in the comments if you do…I would love to have you on board.
Why not subscribe to my brand new email list…where you will receive occasional emails with crochet inspiration, free crochet patterns and exclusive discount codes.
Processing…
Success! You're on the list.
Whoops! There was an error and we couldn't process your subscription. Please reload the page and try again.
Don’t judge me…but I went as far as the living room. We watched TV, I crocheted of course, drank a few glasses of bubbles, ate good food and fell asleep…only to be woken 5 minutes before midnight to watch the fireworks on the TV from London. Not so exciting, but Mr R had the lurgy, so it suited us this year, especially as the grown up Robins were out celebrating with their tribes.
Have you set your plans? Your resolutions? Let me know what they are if you are happy to share…you may inspire me! I have set some plans here at the Nest, you may be pleased to know. I have lots of pattern ideas as well as lots of plans to share free patterns and tutorials with you.
I am also starting an email list and will periodically send exclusive coupon sale codes and free patterns. If you fancy some crochet goodness in your inbox, then I would love to have you onboard. You can subscribe just here and I promise not to spam you!
Processing…
Success! You're on the list.
Whoops! There was an error and we couldn't process your subscription. Please reload the page and try again.
I am currently writing a new pattern for a bottom up beanie, which is a completely new way to make beanies for me. I’m just doing the grading, so it can be made for all the family. Here’s a sneak peek…
I have treated myself to some new yarn too, so I will show you that as soon as I take some photos. But for now, I will leave you with some crochet highlights from last year.
It’s been a while since I gave you a free pattern and I really wanted to share something with you in time for Christmas…I’m not sure I’ve entirely reached my goal as it is already Christmas Eve! Anyway better late than never and the really good news is this takes under an hour to make, so if your stuck for that last minute gift, this is perfect
This striking, seasonal cup cosy features textured popcorn stitches and embroidered snowflake finished with a little bit of sparkle.
You will need:
a small amount of chunky yarn. I used Stylecraft Softies stone washed in Denim and cream.
5mm hook,
darning needle to weave in the ends.
Beads x 17
Glue gun to attach beads or you could sew them into position.
Pattern Notes:
Abbreviations used UK terminology (American terminology in brackets)
At the end of each round join with a slst and ch1. Ch 1 does not count as a st throughout pattern
Repeats are marked by *
To prevent your starting chain from twisting ch 5, remove hook from active loop and insert through 1st ch made
Stitches:
st – stitch
slst – slip stitch
ch – chain
dc – double crochet (sc -single crochet)
Dc2tog – decrease / Sc2tog – decrease (US)
Dc: Insert hook into chain or under both loops of stitch, yarn over and pull through so there are 2 loops on hook, yarn over again and pull through both loops on hook.
PC: Popcorn st –5dc in same st, pull up active loop on your hook and remove hook, insert hook in 1st dc (just count back 5dc), catch the active loop of the 5th dc, draw the active loop through 1st dc
Dc2tog – decrease st worked over 2 stitches: insert hook under both loops of stitch, yarn over and pull through so there are 2 loops on your hook, insert hook into next st, yarn over and pull through so there are 3 loops on your hook, yarn over and pull through all 3 loops.
Let’s go!
Ch30 (or adjust chain to fit your cup, just keep ch a multiple of 2)
Join with a slst to form a ring
Round 1: dc in 1st st and in each st around (30dc)
Round 2: dc in 1st st and in each st around (30dc)
Round 3: repeat round 2
Round 4: dc in the next 10sts, *PC, dc* to end of row
Round 5: dc in 1st st and in each st around (30dc)
Round 6, 8 & 10: repeat Round 4
Round 7, 9 & 11: repeat Round 5
Round 12: repeat Round 5
Round 13: dc2tog, dc in each st around (29dc)
Round 14: dc2tog, dc in each st around (28dc)
Round 15: dc in 1st st and in each st around (28dc)
Weave in any loose ends.
In accent colour yarn, hand embroider a simple snowflake. Embroider a simple cross and then add a diagonal cross. Now add a ‘v’ to the end of each point. Weave in any loose ends. Add a bead to each point around the snowflake and one in the centre. Beads can be hand sewn for security or glued into position with a hot glue gun!
I haven’t got much spare time at the moment, but I wanted to give you all a little Christmas present to say thank you for stopping by and supporting me over the last year…I really appreciate every one of you that reads my posts, likes my posts or leaves me a comment, so I thought a little free Christmas crochet pattern would be the perfect gift for you.