If you are new to these parts and are thinking…great! last minute homemade Christmas present then you may be disappointed, BUT you are very welcome here though and I may suggest how to cheat at the end, which might just get you out of that last minute hole.
I have been really very disciplined and I have been gently shaking the gin each week and more importantly (and amazingly) I have not drunk any…if I did it would have been purely for quality control purposes!!!
So today was the day to open and taste and Oh Joy…it is absolutely gorgeous, the type of sticky, sweet alcoholic gorgeous that one would expect when drinking a damson gin…the type that warms you from the inside.
With a little bit of help from my brewing genius brother I sterilised my newly purchased gin bottles and began to fill them up.
Brewers sterilising fluid…Sterilised bottles ready to fill…x5 lovely bottles of Damson Gin
With the addition of a cute little cork heart they are going to make a lovely Christmas stocking filler don’t you think?
detail added with a sharpie…a perfect stocking filler…or tipple for Santa!
Ok, so I said I would help you out of that last minute hole. You could buy some bottles, sterilise them, add purchased alcoholic beverage and add a cute little label, but only if you promise to be more organised next year and make your own!!!
Humph!!…did you hear that…or is it just my tinnitus again? I think it was the sound of me falling onto the sofa from a parallel universe; where the last few weeks have spun by in a blur and may have possibly been the fastest few weeks in history.
A fleeting glimpse of the super moon…
I was hoping to have posted this weekend about the second tea cosy in the Grandma Collection, but that may well be next week end now…so sorry. It would have happened, but I think that in exiting the parallel universe I left my little pencil case of hooks as I can’t seem to find them…most distressing.
There has been quite a bit of Christmas hooking going on, but that will have to remain under wraps for now, enough to say I am in love with the pattern and can’t wait to share it with you all.
So, whilst I acclimatise back into the earthly realm, I will leave you with a little snap shot of the last few weeks…
Autumn is slipping into winterbut glorious colour can still be foundand if you know where to look you can still find cosmos…The boys are still being boys…getting balls stuck up trees…I do love them so…
taboggoning at the snowdome was pretty awesome also…A sneek peek of some of the lovlinesss in store for the second tea cosy in the Grandma Collection….
Oh ok then, just a very quick look at some of the Christmas hooking…
I have been so looking forward to writing this post; you see I have been on the most amazing adventure. However, this post should really come with a warning, so here it is…
This post will make you fall in love; quite a bold claim I realise, so it might be advisable to get yourself a cuppa (or a glass of something bubbly!) depending on what hour of the day it is that you are reading this…and if you are sitting reading this and you are in England then oh my, I take no responsibility!
So warning done, now for the adventure.
A road trip
It started a month or so a go when the lovely Mr. R booked an anniversary trip of a different kind (don’t worry, this is ‘U’ rated honestly!). So on Saturday, after counting down the days, we got up early with the boys and headed on a short road trip. Destination…
To say I was excited was an understatement, it took every ounce of control I had not to burst through the gates looking insane. You will be pleased to know that I think I managed to appear fairly normal!
We were greeted and welcomed into the most amazing farm house by Trish, Zoe and Helen
We were made to feel so welcome and were provided with as much coffee, tea and squash as we desired. The girls allowed us to relax and take in the view as they chatted and answered all of our questions that we could think of about alpacas; whilst Pip and Tavish the farm dogs snuggled up to us for a bit of fuss.
After a laid back cup of coffee or two we pulled on our boots and headed outside to be greeted by these lot
Right to left
Teddy, Zeus, Tex, Arnie and Brownlee…
all adorable and all ours for the next two and half hours, well not quite, I think Trish had sussed that I was verging on gaagaa over them!!
Arnie chose me to be his walking buddy, he led the pack and was well behaved; gentle and funny. His top lip got all jittery when he stopped to have a scratch.
Inquisitive and cautious he constantly surveyed the path ahead, peering his neck around corners to check it was safe to continue; his ears a constant twitch.
We wandered and explored and all the time Trish and the girls guided and chatted and generally put us at ease. The countryside was just glorious…(Mr R. had ordered the sunshine) and walking with these beautiful creatures filled me with an incredible peace.
We paused for a long while next to a babbling stream, drank more juice and paddled, whilst these guys watched us. We had time to take photo’s too
and Yarny and Arnie bonded a little more…
(Did you know that alpacas have the most delicious smell; a bit like popcorn).
Eventually we wound our way back through orchards and fields back to the homestead, where I tried to put Arnie in the car without Trish noticing. Alas, this did not work and I had to settle for one more photoshoot in the glorious sunshine.
Before we were treated to more luxurious hospitality, in the form of mince pies and hot cross buns…we had a little chuckle at the clash of Easter and Christmas nibbles, I don’t think I have ever come across that combination before.
At the end of this unique experience,
I felt like I had partaken in a little peice of heaven and I can’t wait til I can return to Temevale alpacas to get up close and personal again with these adorable creatures.
I think that we are starting to get a rhythm here at the nest…finally. New job, full time, school, homework, housework and Saturdays. Oh how I love Saturdays.
This morning started early with a park run and new personal bests for us all
I have a love, hate, love relationship with running. I love the idea, I hate the running bit then love the buzz after a run; that lasts for the whole day.
Saturday is always better when yarn is delivered too.
I know exactly what to hook with this ‘new to me’ yarn and I am eager to see how it hooks up as it is ridiculously soft and the colours are divine.
Rather than complete any PHD’s recently it seems I’ve added to the list…
I had a yearning to do a little more broomstick crochet, but had forgotten how to start and finish each row.
but a little hooky play during lunchtimes this week has it all sorted
I think I may make some fingerless mitts, with this yarn now I’ve got the broomstick down.
And of course the next tea cosy in the Grandma collection is being designed, if only in my mind at the moment!
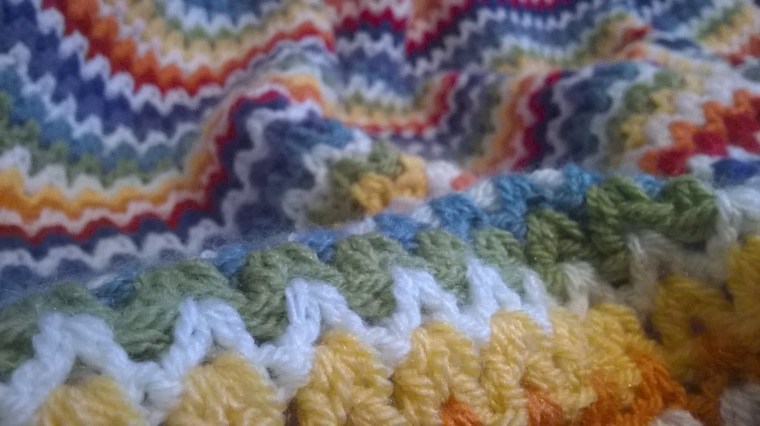
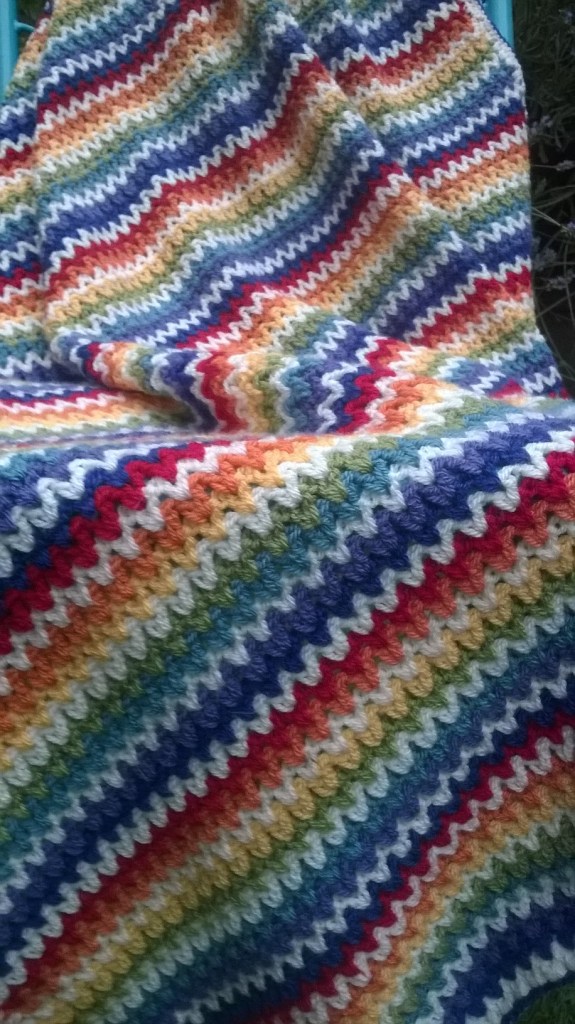
Thank you for your lovely comments about my latest blanket off the hook…the ‘Very V’ blanket.
It really is very simple to hook, so I thought I would put together a little tutorial, as I have not done one for a while and because I have some rare time off on my own. The tutorial can be found below. You can also check out my latest free pattern The Angelece baby blanket by clicking on this link.
So, clearly this is not an original pattern. I say that from the offset because of copyright and all of that. Let’s be honest…the humble ‘v stitch’ has been around for years. But this is my tutorial in case you want to have a crack for yourself and you have never done a ‘v stitch’ and you are a visual kinda gal or guy.
Processing…
Success! You're on the list.
Whoops! There was an error and we couldn't process your subscription. Please reload the page and try again.
Here we go!
Final measurements: 132cms x 120cms / 52″ x47″
I used Stylecraft special dk , for it’s durability, softness and price! The colorway I used:
Lipstick x 1 ball
Meadow x1 ball
Saffron x 1 ball
Violet x 1 ball
Spice x 1 ball
Lobelia x 1 ball
Storm blue x 1 ball
Cream x 3 balls
You will also need a 4mm hook and a darning needle to weave in those ends!
Of course if you are using different yarn then you may need to use the recommended hook size for your chosen yarn; and of course you can alter the finished size by hooking more or less chains to start.
Your hooking tension (we are all different) may also mean you need more or less chains to start with.
Lets start, are you ready?
Abbreviations used are below and are English terminology.
Ch = chain stitch
Chs = chains
Tr = treble stitch (double crochet in US terminology!)
St = stitch
Slst = slip stitch
Sp = space
Pattern order I used:
Row 1: Cream
Row 2: Lobelia
Row 3: Violet
Row 4: Cream
Row 5: Storm blue
Row 6: Meadow
Row 7: Cream
Row 8: Saffron
Row 9: Spice
Row 10: Cream
Row 11: Lipstick
Row 12: Indigo
Row 13: Cream
Row 14: Violet
Row 15: Storm blue
Row 16: Cream
Row 17: Meadow
Row 18: Saffron
Row 19: Cream
Row 20: Spice
Row 21: Lipstick
Row 22: Cream
NB/ the first and last row form the edging for the top and bottom of the blanket so use the colour you wish to edge the blanket in, for row 1.
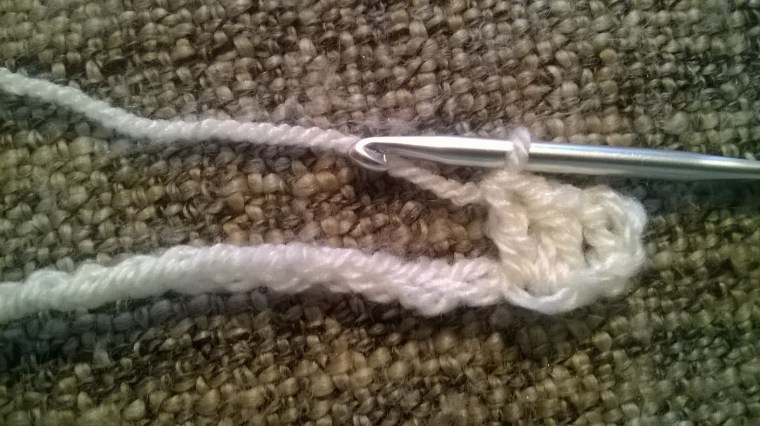
Chain 175 in cream
(This gave me about a 1m 15cm /42″ length of Ch. But any odd number of Chs will work to suit the size blanket you are wishing to hook!).
2tr in 5th ch from hook,
miss a ch, 2tr in next ch
miss a ch, 2tr in next ch
*miss a ch, 2tr in next ch*
Repeat * – * across the row.
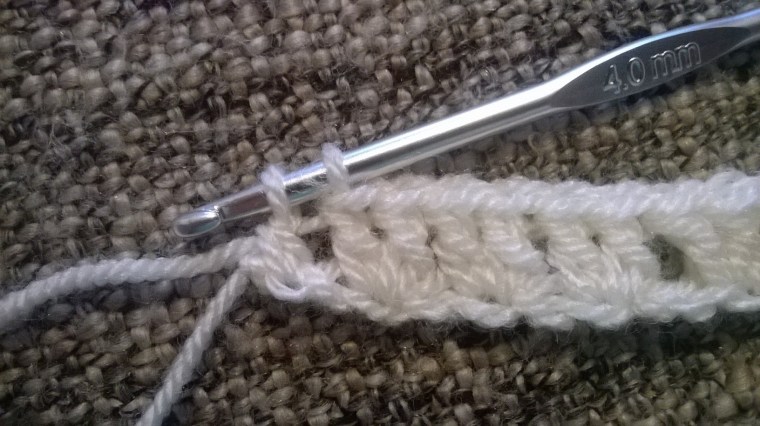
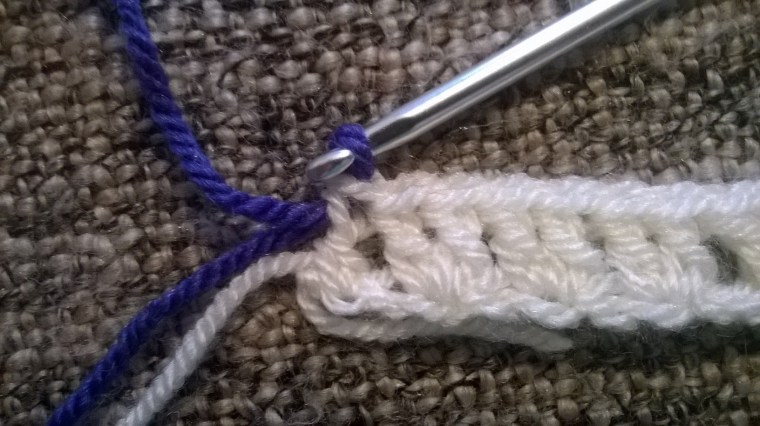
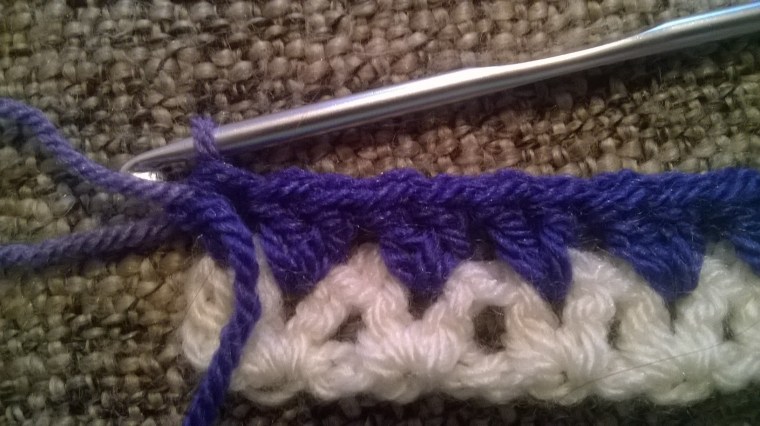
Finishing with 1tr in last ch. Change colour. As shown below, I change colour by completing half of the process for the last tr (ie/ leave two loops on the hook). Complete last part of tr in new colour as shown.
I find this makes colour changes more secure. These ends should be tied to secure further. Top tip! leave the ends long (approx. 10cms) so that weaving in is easier.
Turn. Ch3 (counts as 1tr)
2tr in the middle of set of tr’s of previous row
Continue along the row.
finishing with 1tr in top of 3rd ch on previous row.
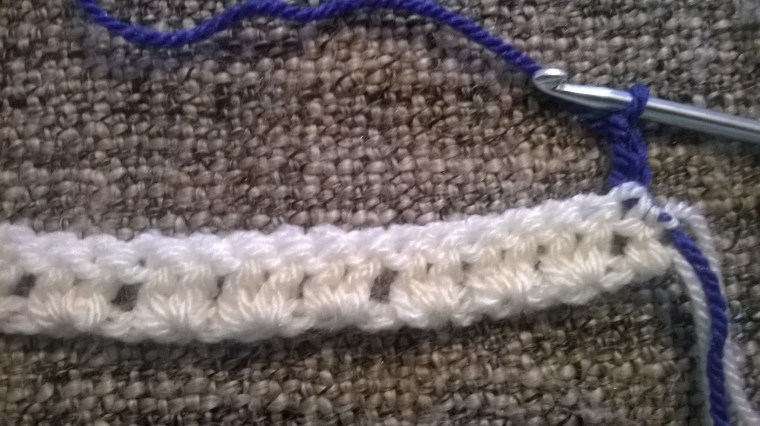
Change colour. Turn.
And that’s it!
Top Tip!! Weave in the ends every few rows.
Repeat rows 1-22 x5 times.
Then repeat rows 1 – 13 to finish body of blanket. And if you did not adhere to the top tip above…now is the time to weave in those ends!
I’ve gone all minimalistic for the edging because the blanket itself is simply stunning in this colourway and I did not feel like it needed something fussy to detract from its beauty.
This is what I did.
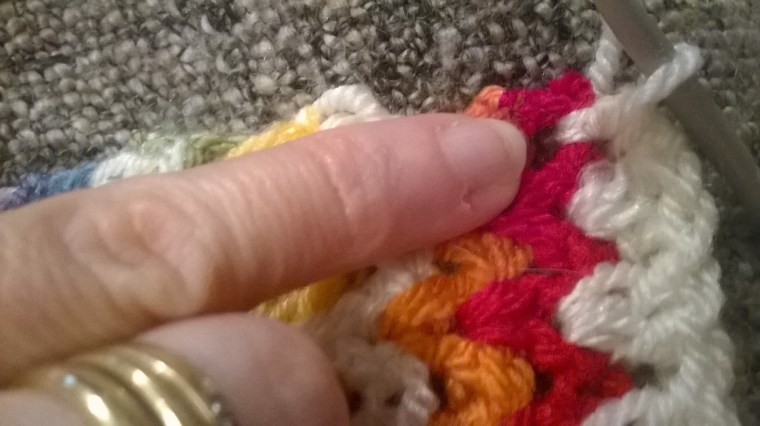
The first and last row (in cream if you have been following this colourway) form the edging for the top and bottom of this blanket. In cream / your chosen edging colour join in the space at the bottom right of your blanket as shown.
Ch 3 and slst into the top st of the first tr/ch3 of 1st row.
Ch1, 2tr in same sp
2tr in next sp (the sp is the gap between the side of the first sts of each row), 2tr in next sp.
Continue along the edge until you come to the top corner. 2tr in last sp, ch 1, 1tr in same sp.
Then slst into the top st of the first tr/ch3 of last row as shown. Fasten off. Repeat for the other side of the blanket.
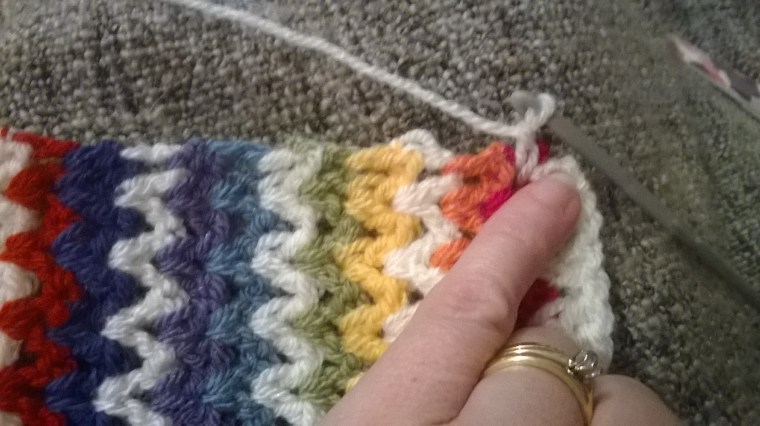
Finally, in Lobelia (or your chosen colour) join in any st of edge with a slst.
Slst in each st around edge of blanket. Fasten off and weave in loose ends. And that is it, you should now have one of these to snuggle under…or reluctantly gift.
Well done if you got this far.
I really hope you have found this tutorial easy to follow. I welcome feedback, so let me know how you got on and if you want to share your picture of your finished make you can in the comment section below.
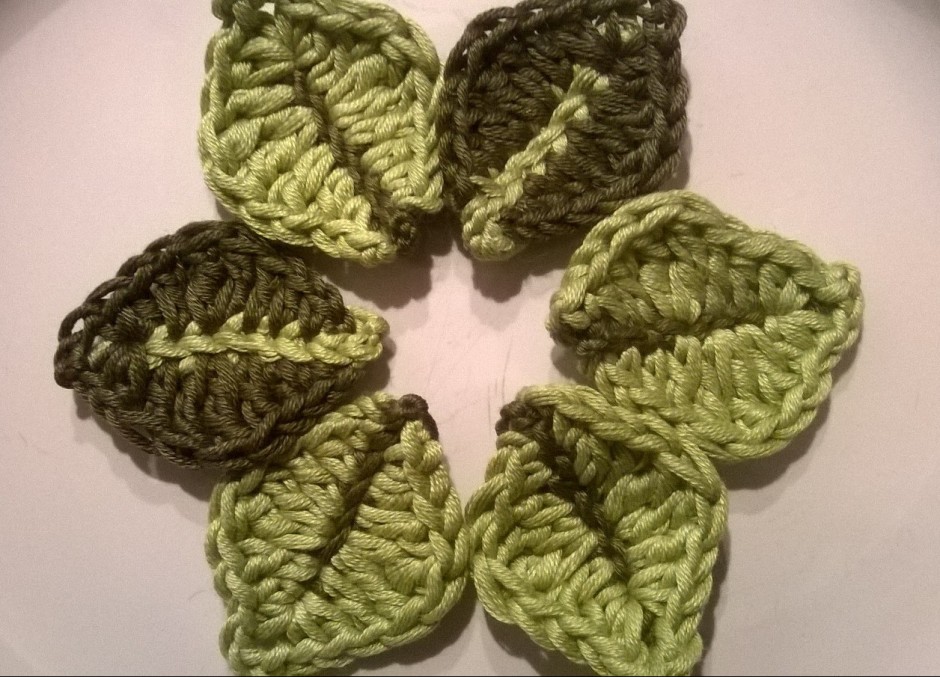
‘A yarny little leaf’ designed by Nicola Florence @ayarnyrobin.wordpress.com….February 2016
On a very wet afternoon, just the other day, I began to hook up some little leaves. Simple I thought, no pattern required.
After a couple of tweaks here and there, this is what my trusty hook had produced. I think they are rather sweet, so I thought I would share this little leaf pattern with you.
Little Leaf Pattern.
I used drops cotton dk and a 3.5mm hook. All instructions are using English terminology.
Slst – slip stitch
st – stitch
ch – chain
dc – double crochet
htr – half treble
tr – treble
dtr – double treble
blo – back loop only
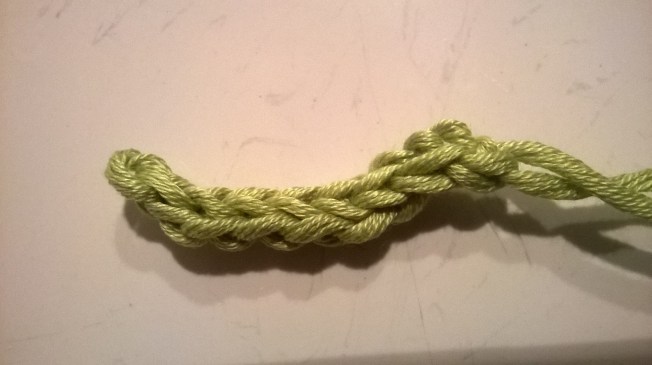
Central Vein
Ch8, slst into 2nd ch from hook, then slst into each remaining 6ch and fasten off.
Leaf Body
Join chosen colour thread to 1st st at bottom of leaf vein. Ch1, dc in next st, htr in next st, tr in next st, 2dtr in next st, tr in next st, htr in next st, dc in same st, ch3(you should now be at the top of the vein).
You now need to reverse the pattern down the other side of the leaf. This time working in the back loops only.
So, dc in next st, htr in same st.
tr in next st, 2dtr in next st, tr in next st, htr in next st, dc in next st, slst in next st. Fasten off to finish and weave in ends.
Happy little leaf hooking
xxxxx
‘A yarny little leaf’ designed by Nicola Florence @ ayarnyrobin.wordpress.com….February 2016.
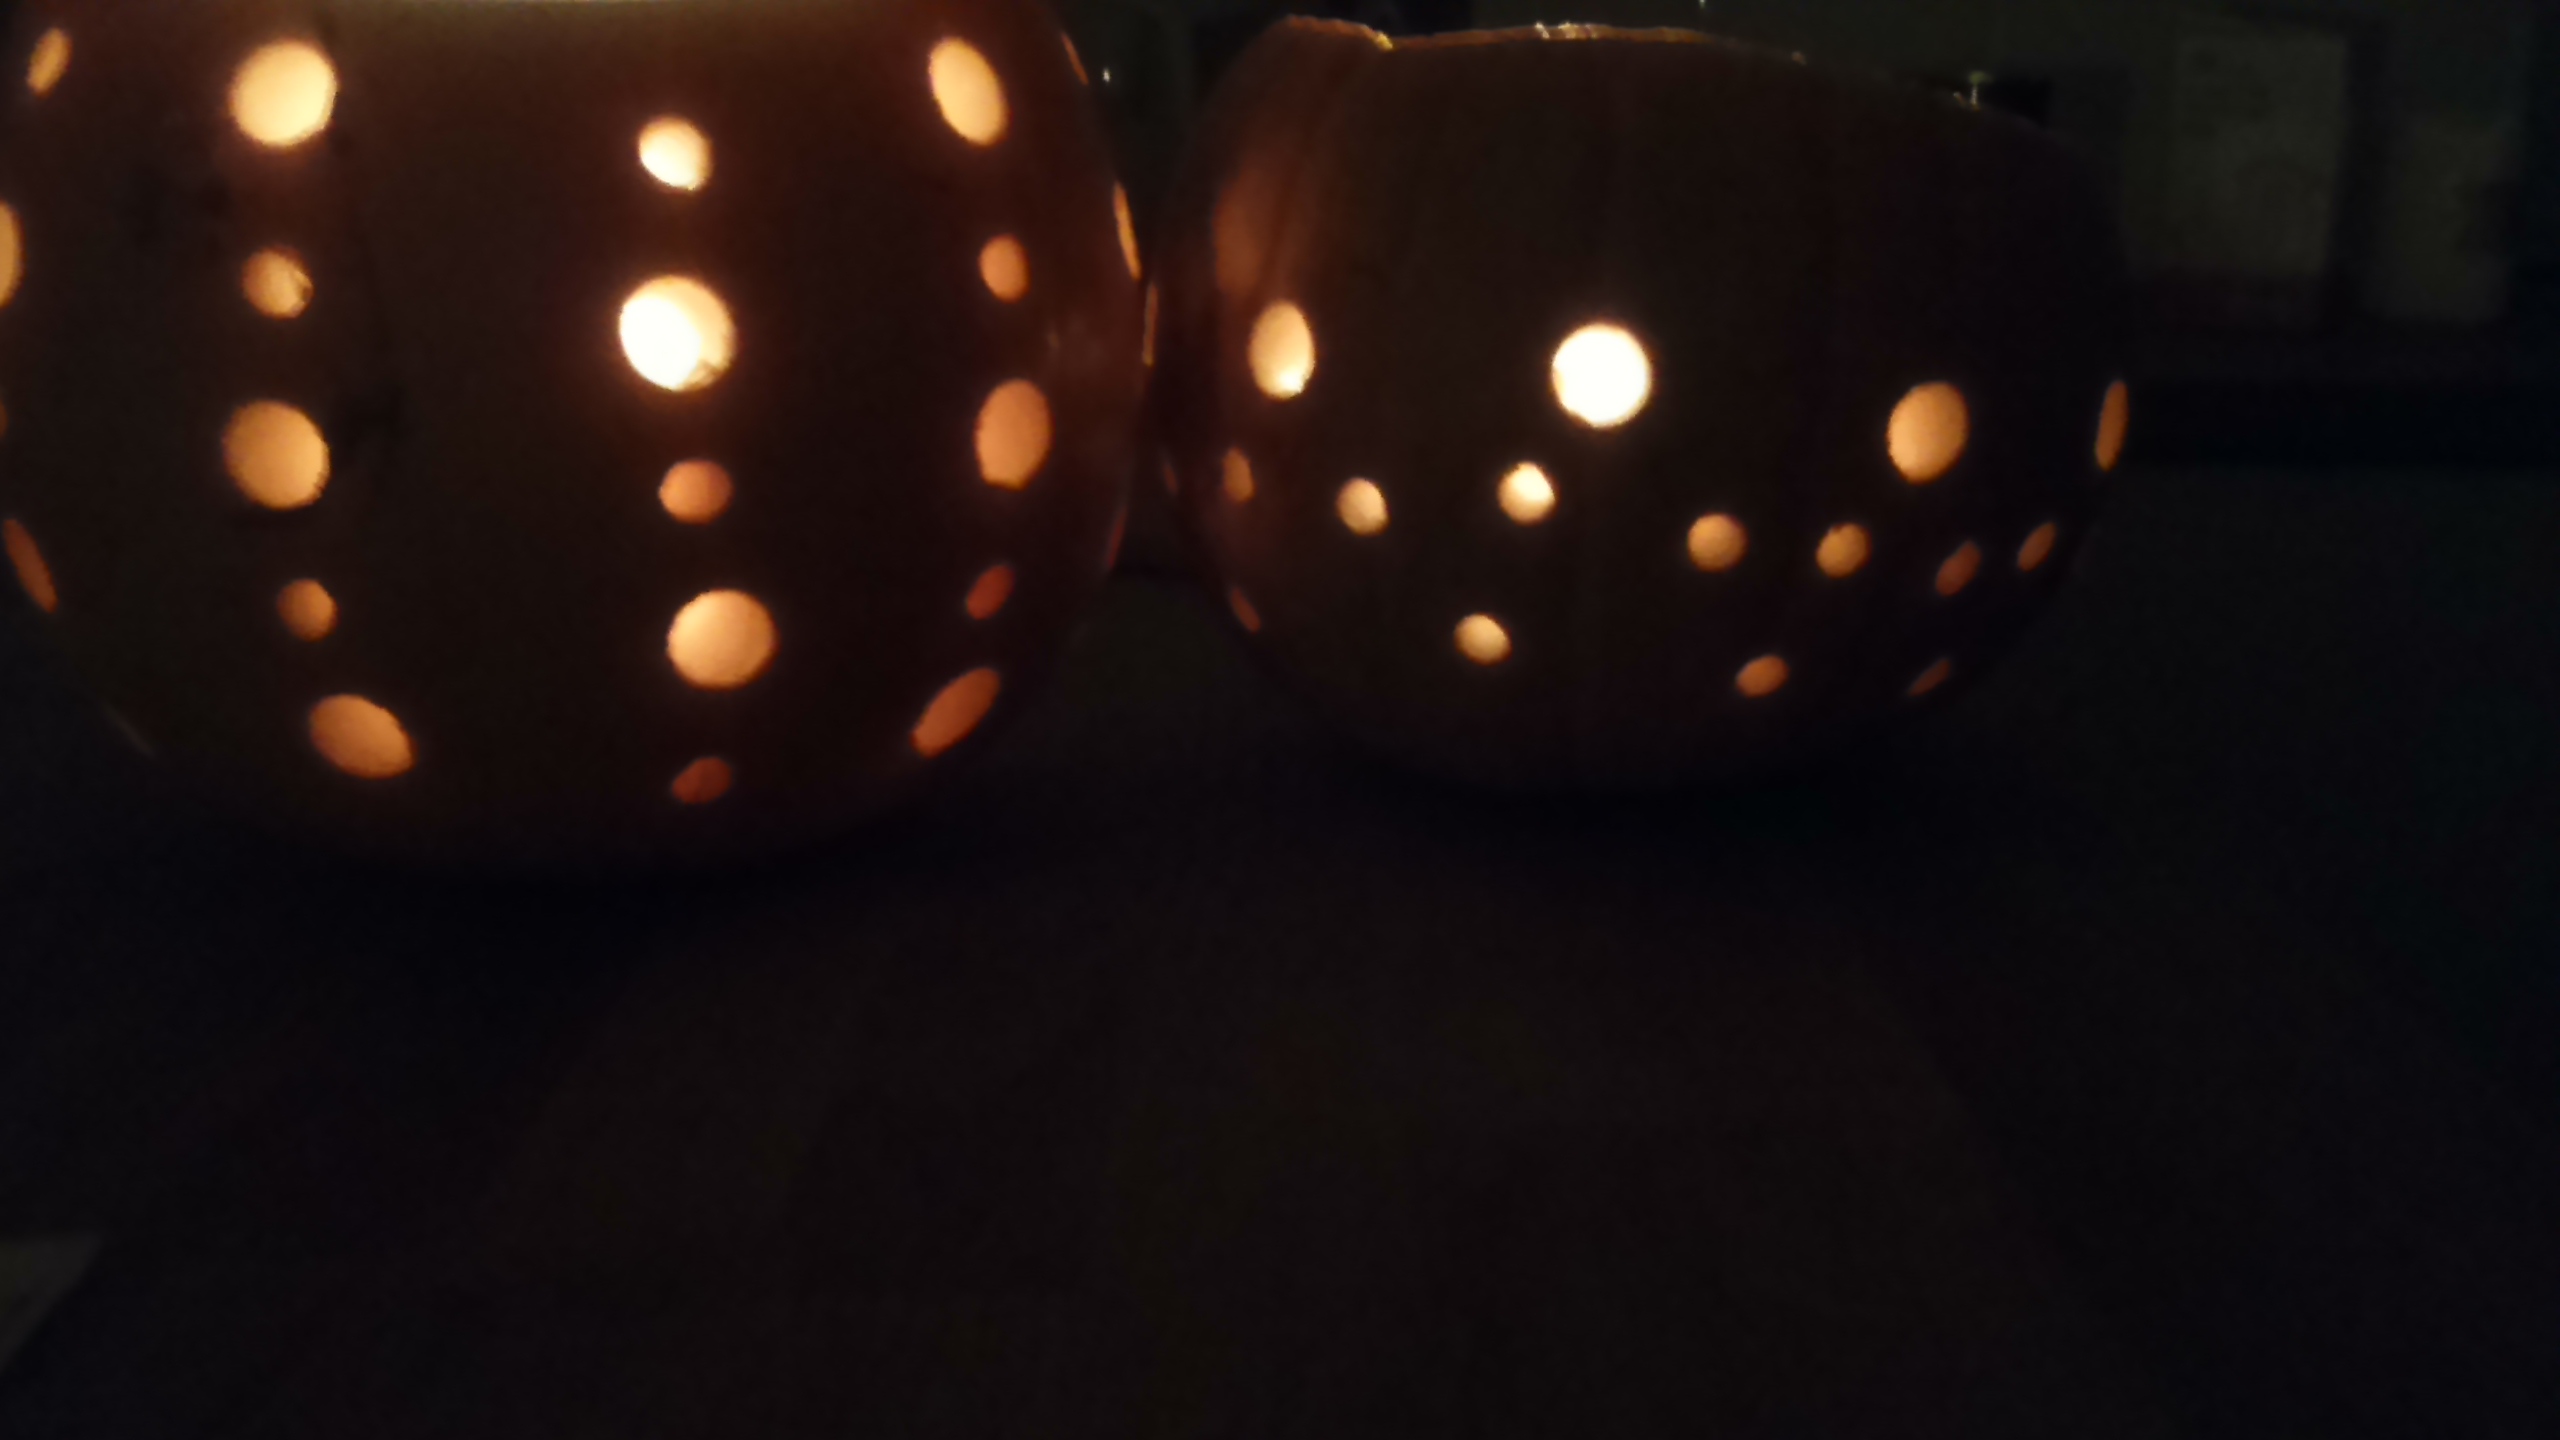
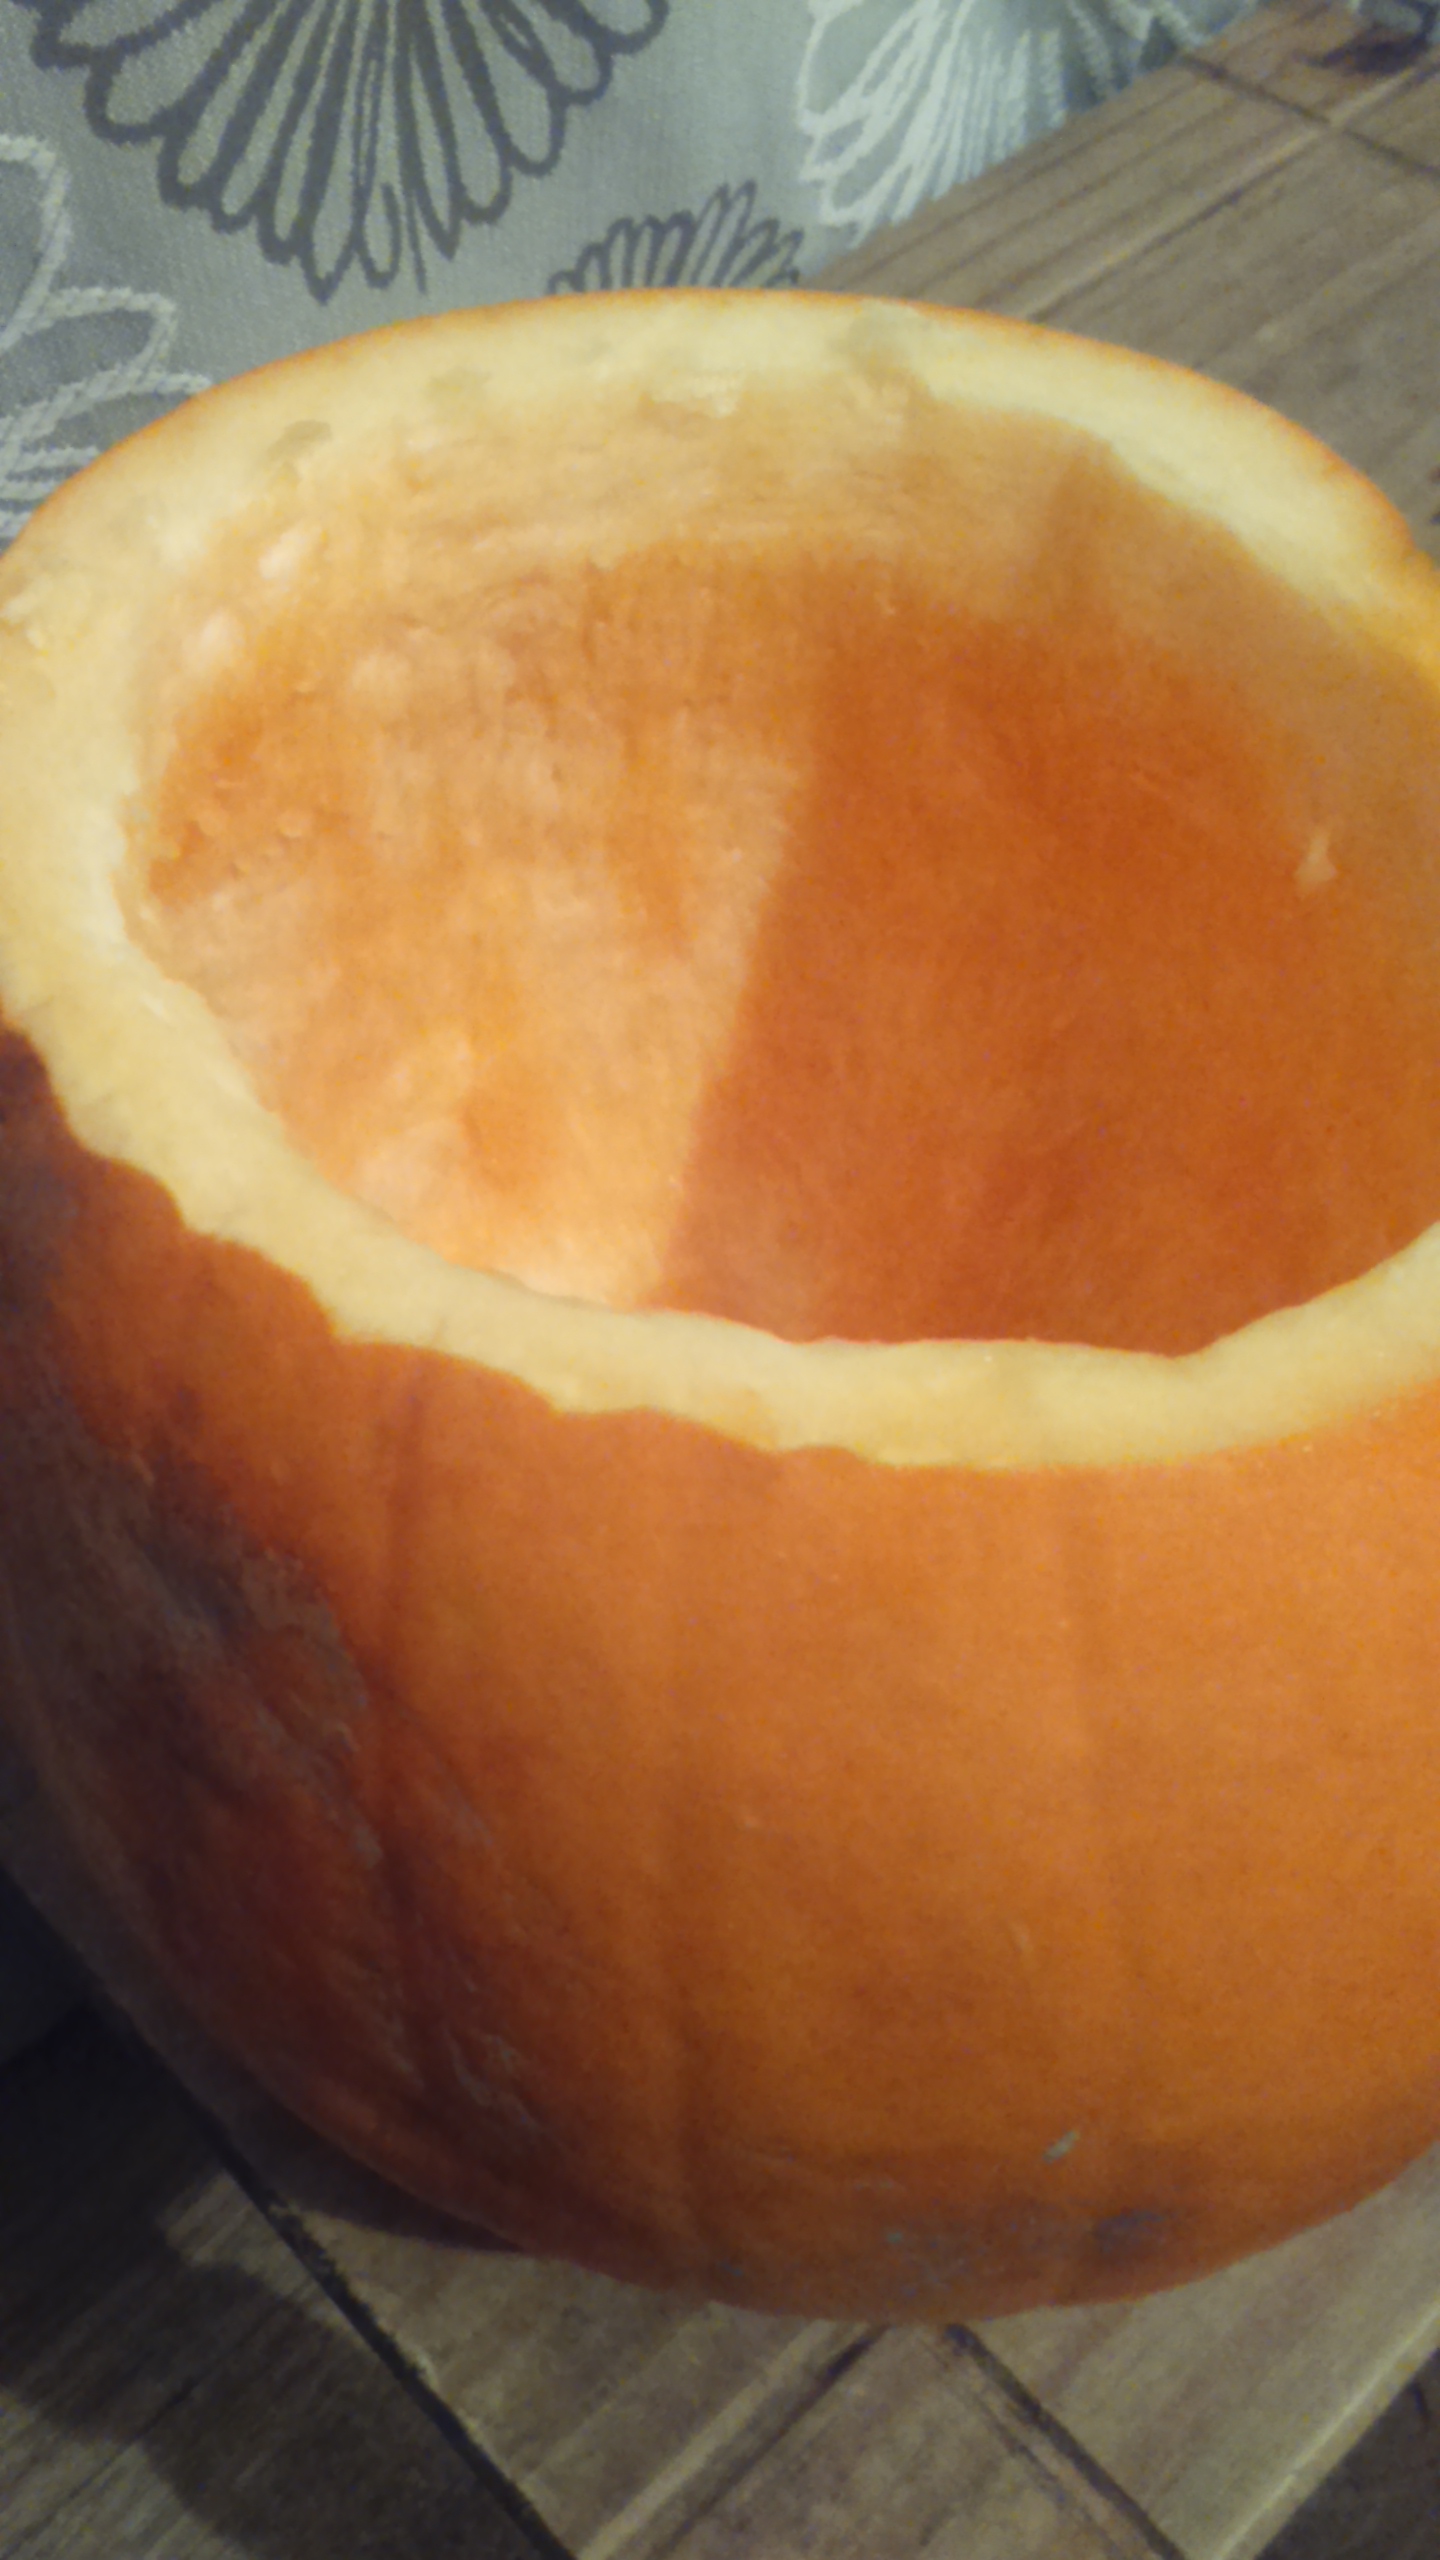
Oh, my delight in these pretty pumpkins. Whilst we do not celebrate 31st October, halloween in the Robins nest, we do celebrate light in this beautiful, busy and sometimes dark world. As you know I love autumn, and pumpkins certainly contain light and autumnal(ness) in abundance.
I also love spending time with friends and that is exactly what is happening here tonight. We are having some very dear friends over to mark the very significant occasion of our homes transition from ‘no space to have anyone around’ to ‘being able to say come on over for supper’ a transition which has taken many years.
the chickens enjoyed a pumpkin feast
So with a three bean chilli and a hearty beef chilli planned for later, accompanied by a bottle or two of red, these pretty pumpkins will help to create the perfect atmosphere for chatter and laughter late into the night.


 2tr in next sp (the sp is the gap between the side of the first sts of each row), 2tr in next sp.
 Continue along the edge until you come to the top corner. 2tr in last sp, ch 1, 1tr in same sp.