Autumn is creeping in and I can feel the joy rising in me. I adore the Autumn and all of her treasures; it awakens my soul and wraps me with comfort.
I know not everyone feels this way…Mr R mourns the Summer, but I am celebrating her arrival.
A great deal has gone on here at the nest over the Summer months and there is still much more to achieve. New windows and doors have been fitted, outdoor adventures have taken place, three weddings have been witnessed and celebrated (we still have two more to come), decorating has commenced, and children have been coming and going and then coming back again only to go off once more it seems!
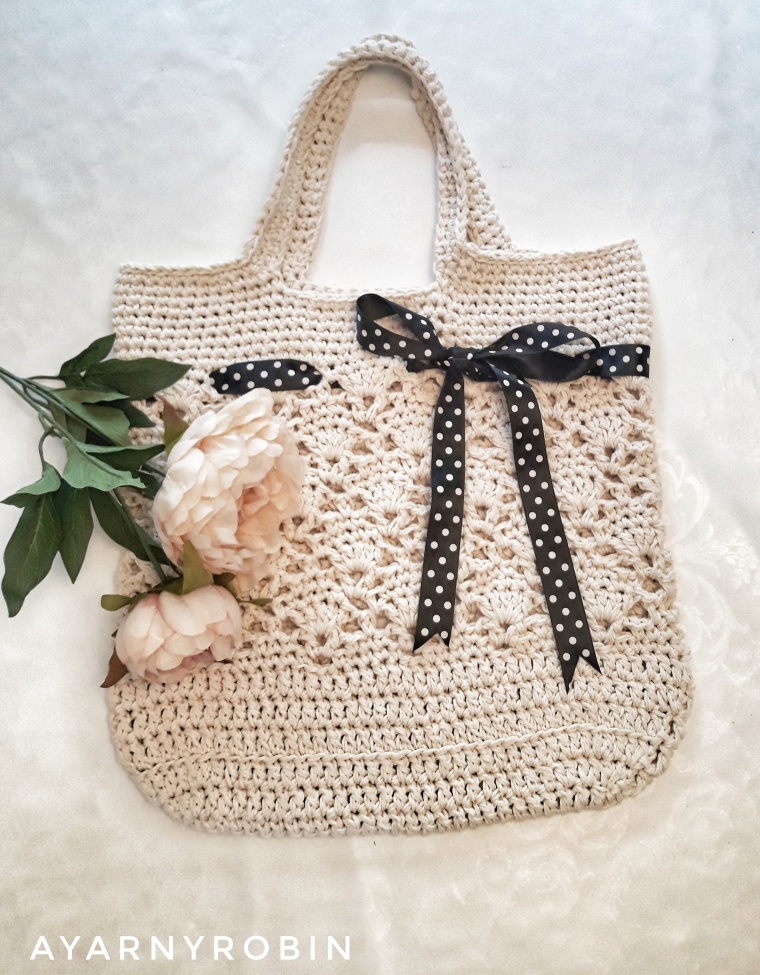
I have taken great delight in my crochet time, which has been a little bitty. I wanted to share this Vintage Market Tote with you…pattern details and links can be found at the bottom of this post. I made it for my Mama’s birthday and it hooked up quickly.
The pattern is free and I found it to be well written with clear, concise instruction. I altered the length of the handle by about 20 stitches, making the straps a little longer, but that was just preference.
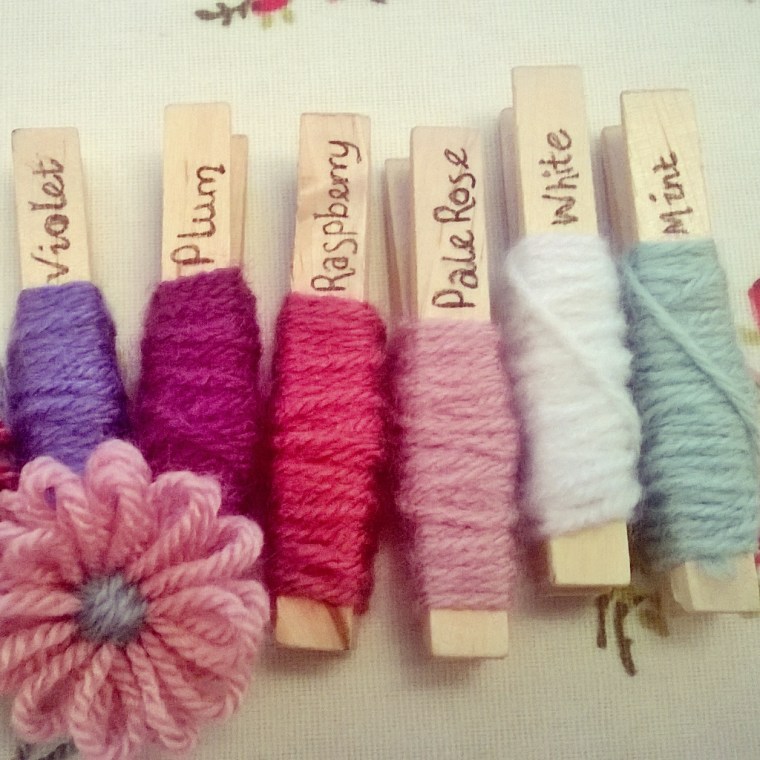
I used a lovely aran weight cotton blend yarn by The Women’s Institute, which flowed from my 5.5mm hook with ease. I crocheted using x2 strands to make my tote more sturdy, which meant I used just over 300g of yarn and finished with a chic black and white spot ribbon.
I will definitely return to this pattern…and my Mama loved it!
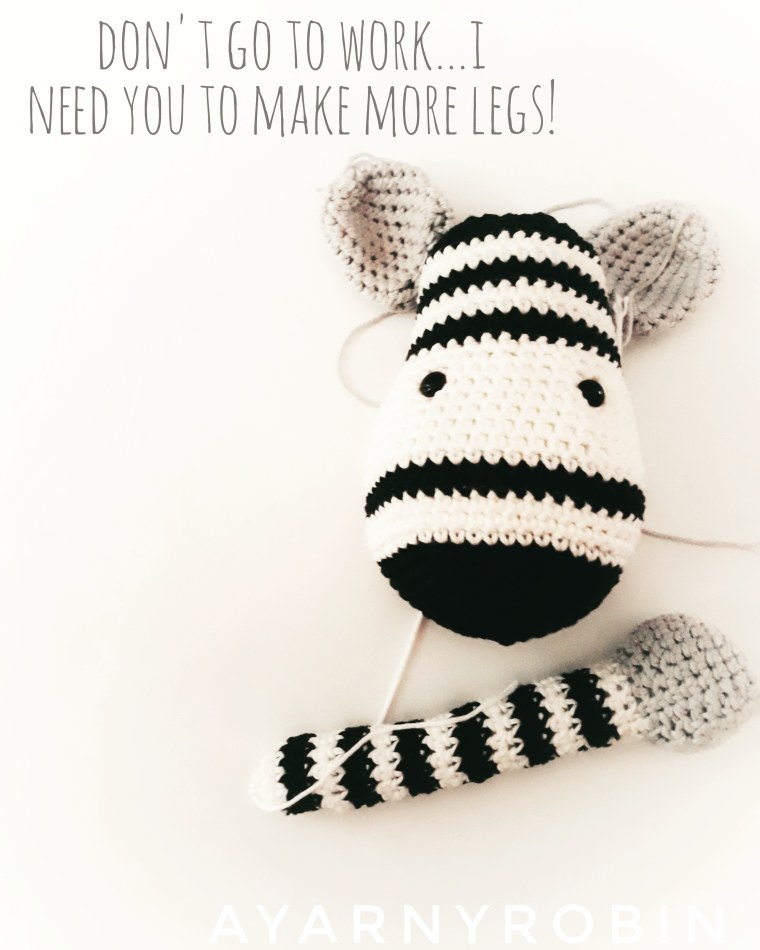
I’ve been wanting to introduce this rather charming crochet zebra to you for a couple of weeks now, but I have been working overtime (urgh!!!).
This is Abe…isn’t he just a dude? I started hooking him a little while ago…my first foray into the world of amigurumi and most definitely not my last.
I really struggled to put him down, he was such a joy on my hook. I absolutely loved every paintbox cotton stitch. I have made a lot of mistakes and he certainly has taught me a lot and for this reason he is mine to keep…I am a bit like a 4 year old child at the moment, moving him from room to room so he is with me!!!
I think the hardest part for me was sewing him together…Not only was it a bit like a zebra horror show, he proved to be a little tricky.
To begin with I sewed his ears to his nose…I was extremely frustrated at this point and so I do not have the photo to show you. It was late in the evening and his ears were the first things I joined together for him. I was feeling rather chuft with myself and I didn’t make the sickening discovery until just before bedtime. I lay there trying to go to sleep, but it was no good. I had to get up and perform some late night intricate facial surgery. It was silly o’ clock when I finally got back into bed, but worth the midnight oil not to wake up to such a silly mistake.
If you look closely at that arm and you have a trained eye you will notice that it is actually inside out…another lesson learnt.
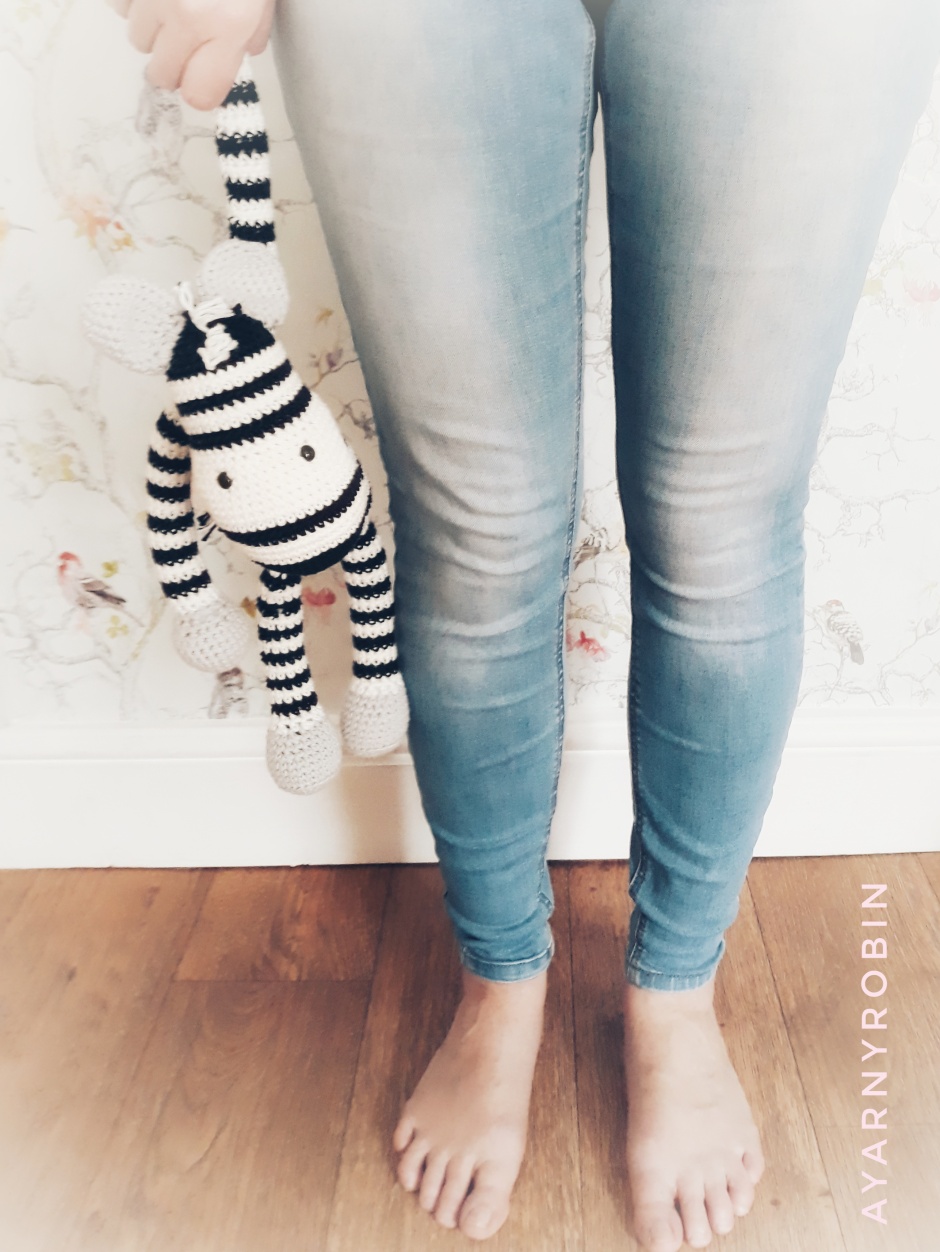
But I just love his cute little face and his stripy pyjamas.
His limbs have just the right amount of dangle.
Once he came to life it wasn’t long before his character began to shine through…posing zebra alert!
All in all I love this dude and I have found a suprising new love in amigurumi (crochet toys)… You can find the free pattern details at the bottom of this post.
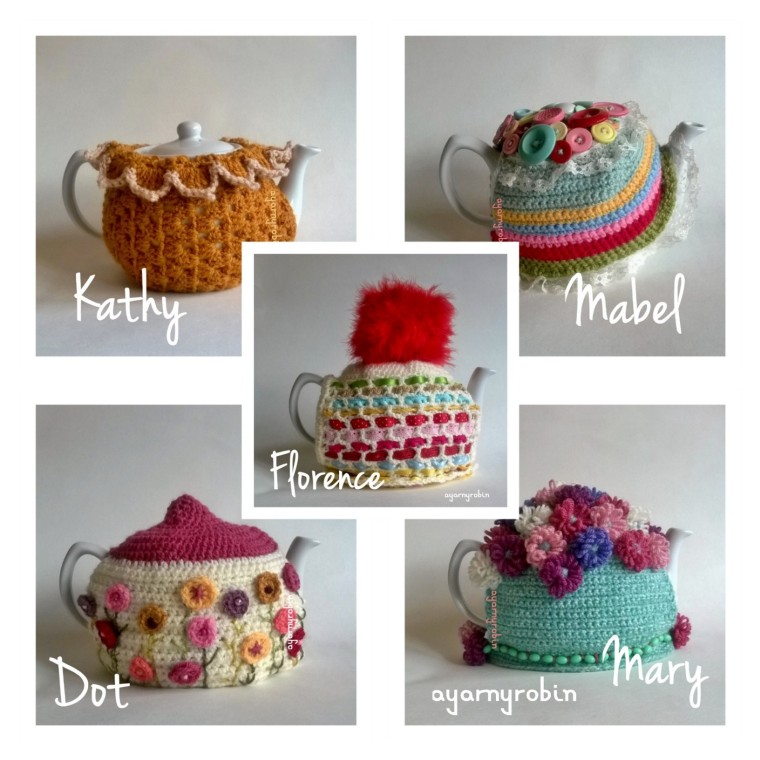
The ‘Florence cosy’ will add a large dose of fun to your teapot with a fluffy oversized pompom and woven ribbons.
and the ‘Kathy cosy’ offers understated off the shoulder glamour in traditional granny stitch style.
Each patterns is free and comes with a photo tutorial. They are easy to hook and make great weekend projects; which makes them the perfect gift for tea lovers.
Which one is your favourite?
I hope you will have fun hooking these great tea cosies.
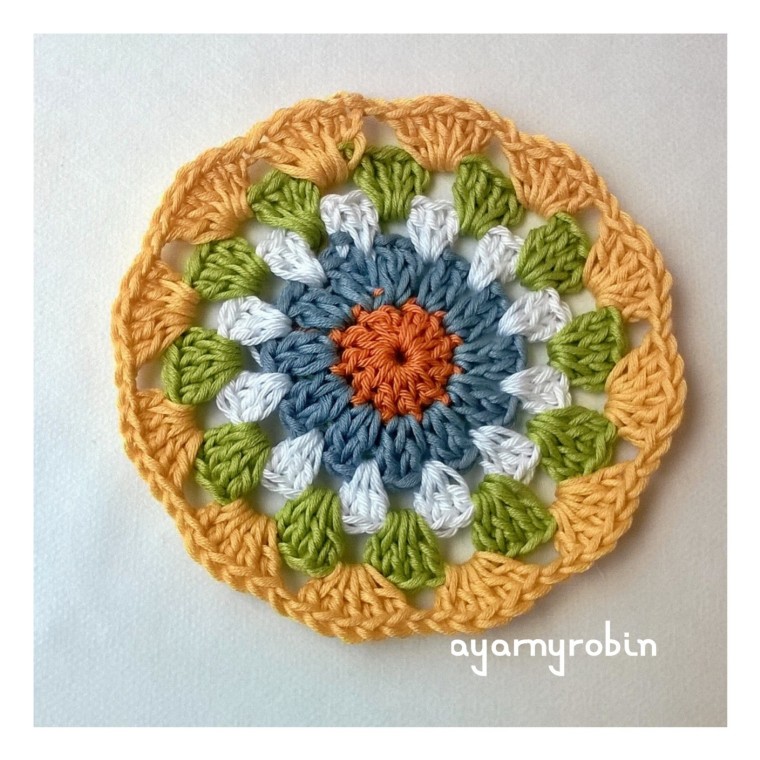
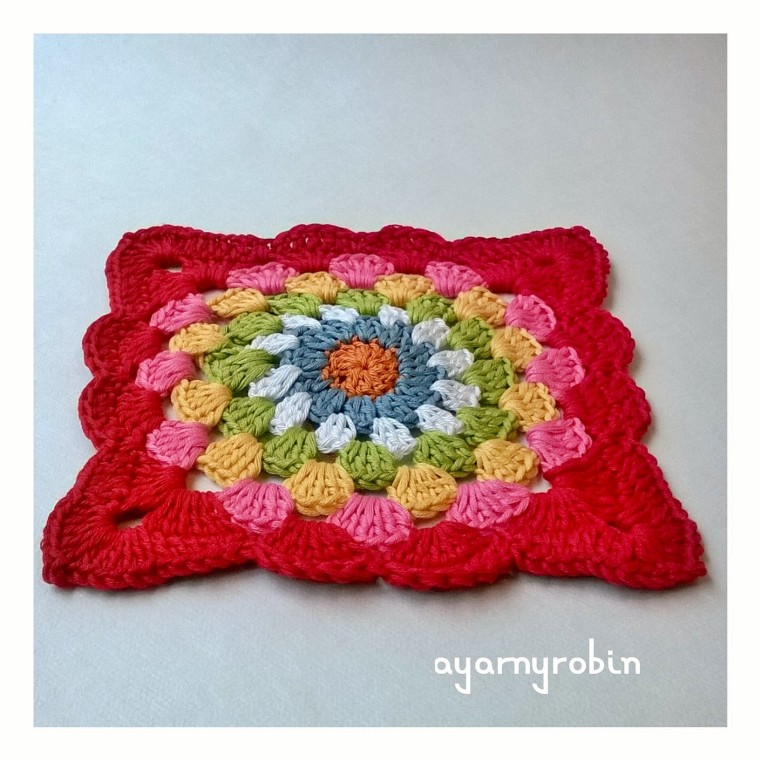
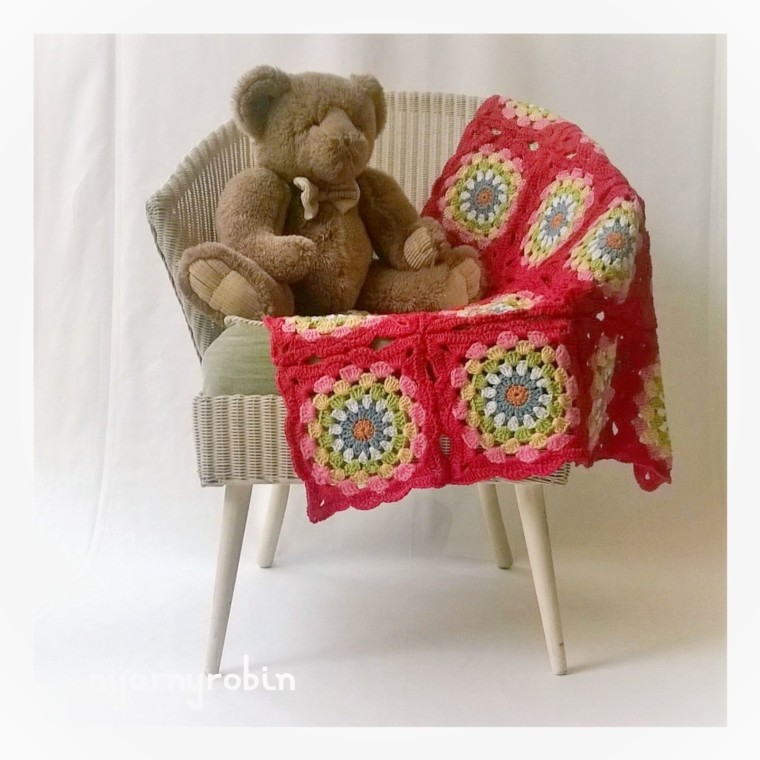
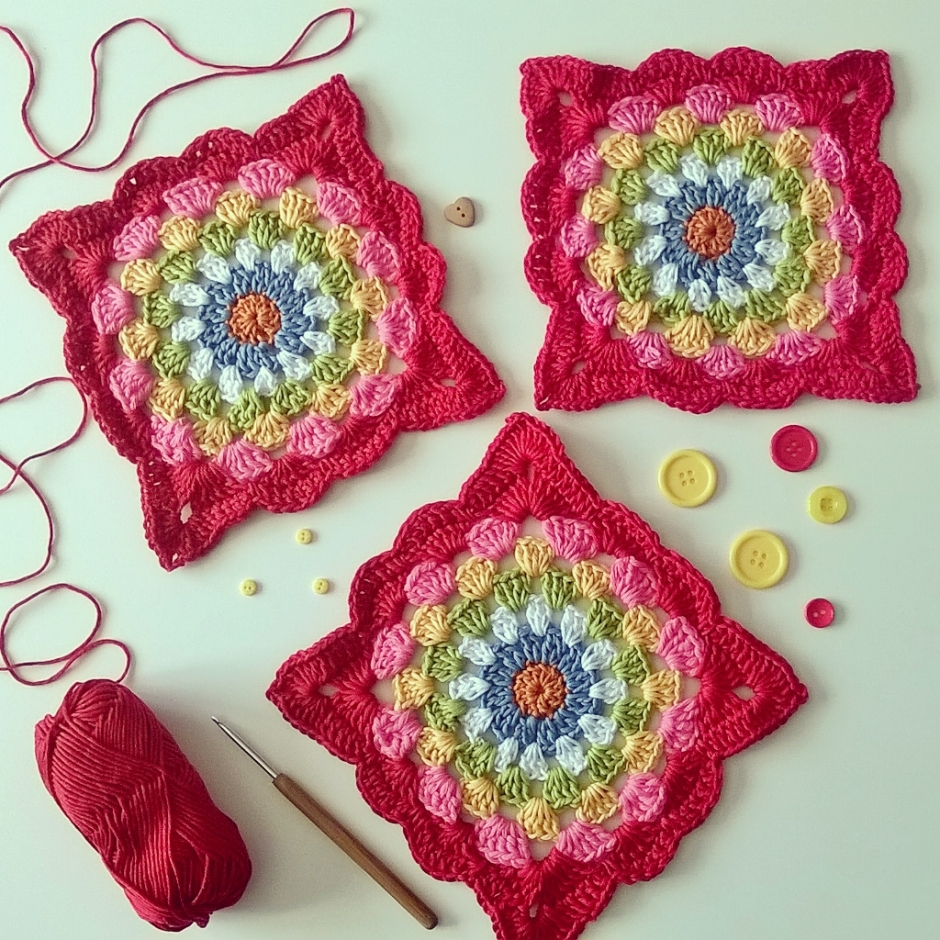
I am so thrilled to be able to introduce the Sunshine Jelly Baby blanket to you.
This delightful crochet blanket is vibrant and fun to hook and the pattern is available, complete with a photo tutorial just below. Made from Drops Muskat cotton, it measures 74cms x 74cms or 29″ x 29″…the perfect pram blanket size, of course you can make the blanket bigger by adding more squares if you wish. You can also check out my latest free baby blanket pattern…The Angelece Baby Blanket by clicking this link. This delicious blanket is made using the Robins Nest square which I designed a few years ago and if you are a regular here you will know that I have recently updated this pattern. When I firstdesigned this square I always intended to make a baby blanket…I guess somethings just take a while to come to pass.
As always I’m using English crochet terminology. Ch – chain Slst – slip stitch dc – double crochet tr – treble crochet
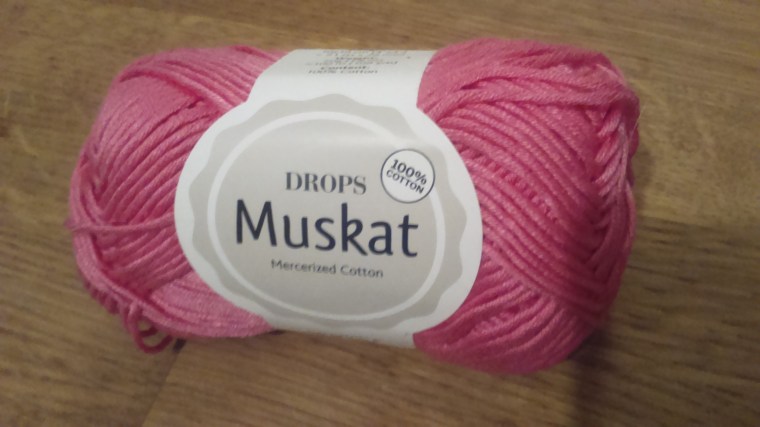
ch3 – counts as a treble unless otherwise stated. I’m using drops muskat cotton.
and I’m using the colours and quantities listed below red – 100g old pink – 80g white – 50g vanilla yellow – 65g dark orange -20g
sky blue – 35g
apple green – 50g
and a 4mm crochet hook and a 3.5mm crochet hook
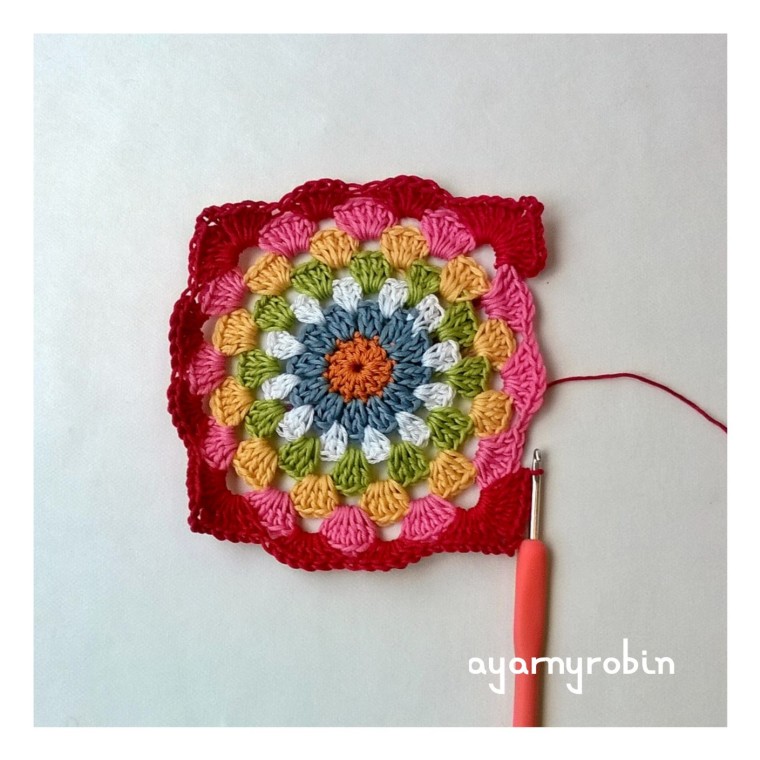
Each lovely yarny square measures 7″ x 7″ or 18cm x 18cm once blocked.
You will need to make 16 squares to make this blanket arranged
4 x 4…
of course you can make more squares if you wish to make a larger version.
So here goes…
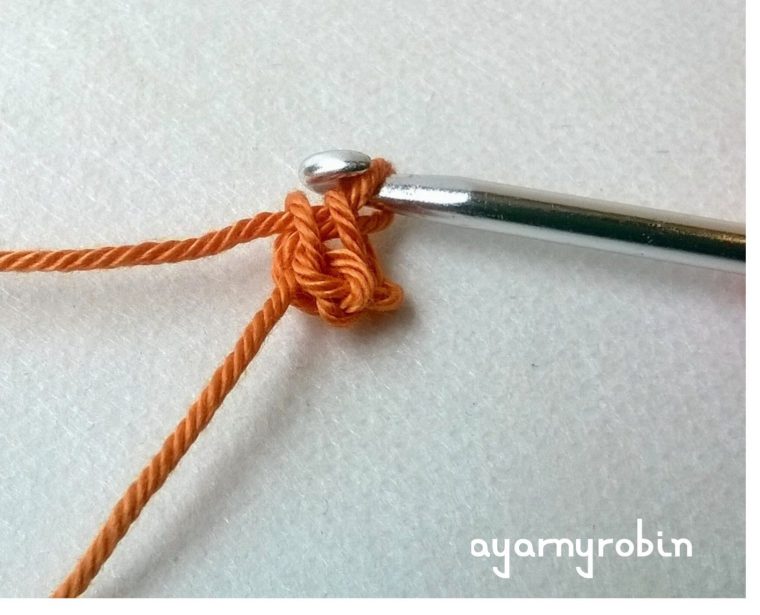
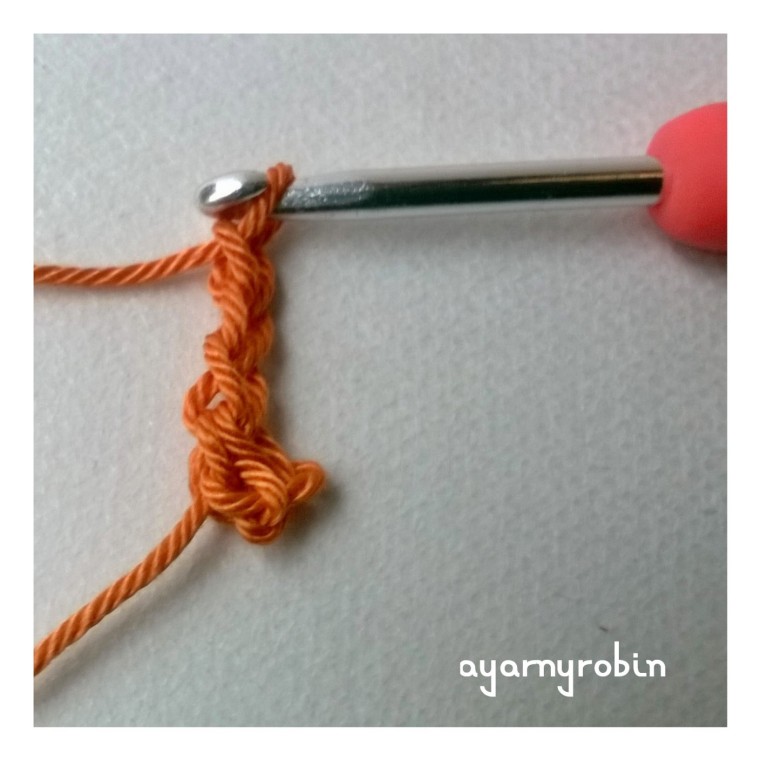
with a 4mmhook ch2, join with ss to form a tiny ring (you could make a magic circle instead if you prefer)
Row 1: ch3,
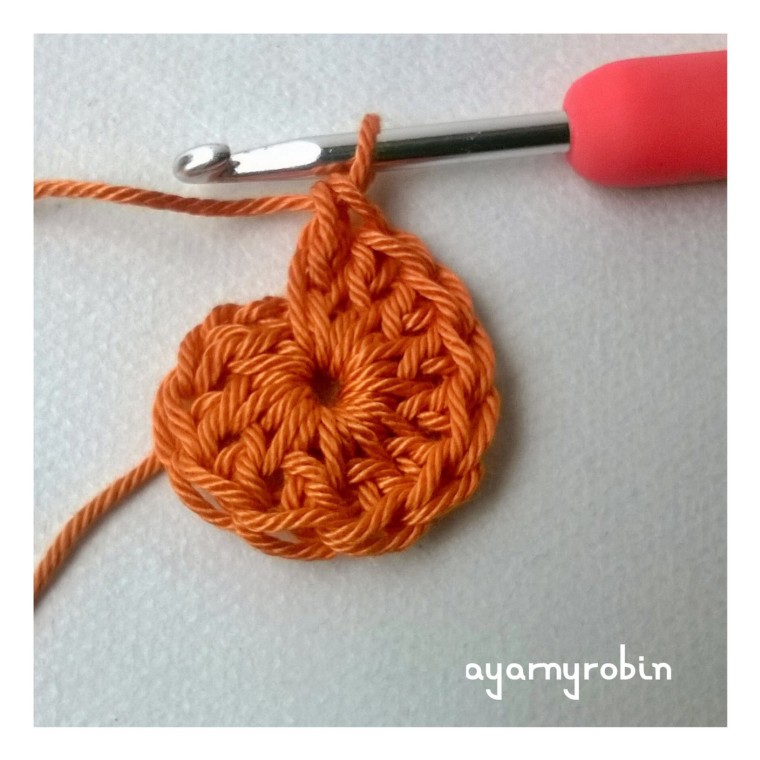
11tr into ring,
join blue yarn and slst into 3rd ch
(12tr in total).
Row 2: ch3,
1tr in same space, ch1
2tr in next st, ch1
*2tr in next st, ch1*, repeat * * x10 times,
join white yarn and slst into 3rd ch
(12 clusters of 2tr and 12 ch spaces).
Row 3: ch3,
*3tr in next ch space*,
repeat * * x10 times, 2 tr in next ch space,
join with slst in top of ch3 and fasten off.
(12 clusters of 3tr).
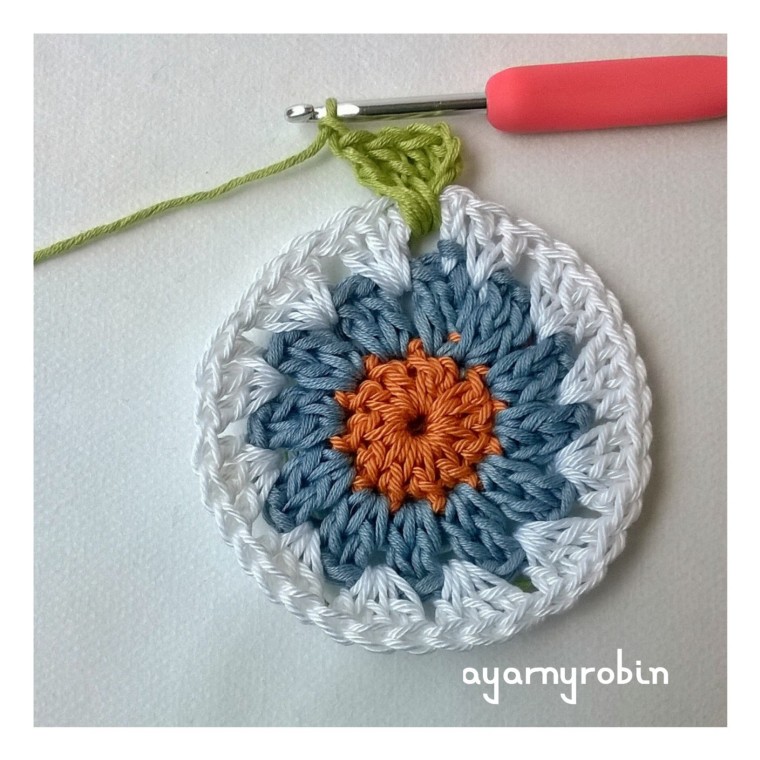
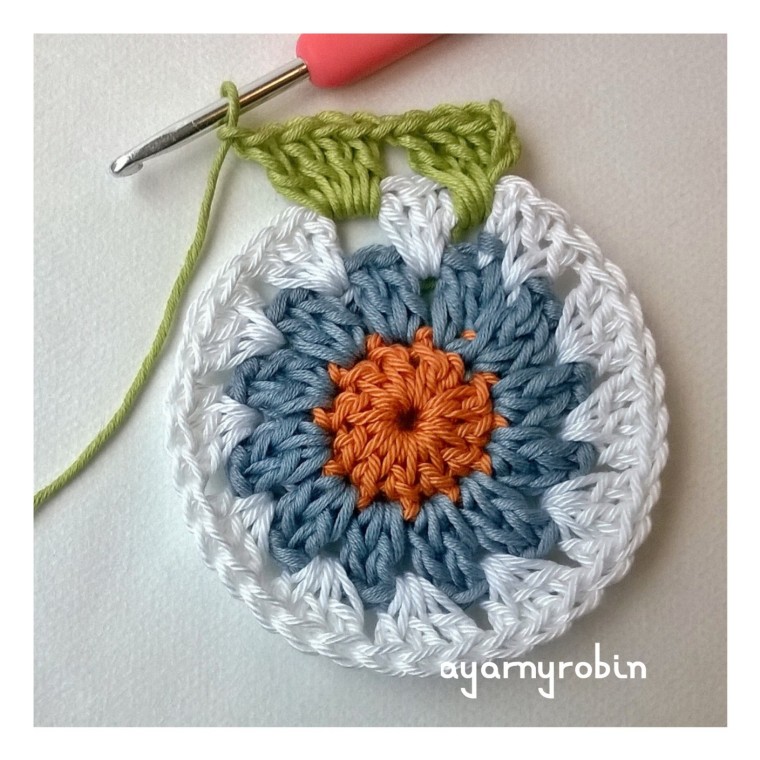
Row 4: join green yarn in between any cluster of 3tr of previous round and ch3,
3tr in same sp, ch1
*4tr in between next cluster of 3tr, ch1*,
repeat * * x10 times, join with slst in ch3 and fasten off. (12 clusters of 4tr and 12 ch spaces)
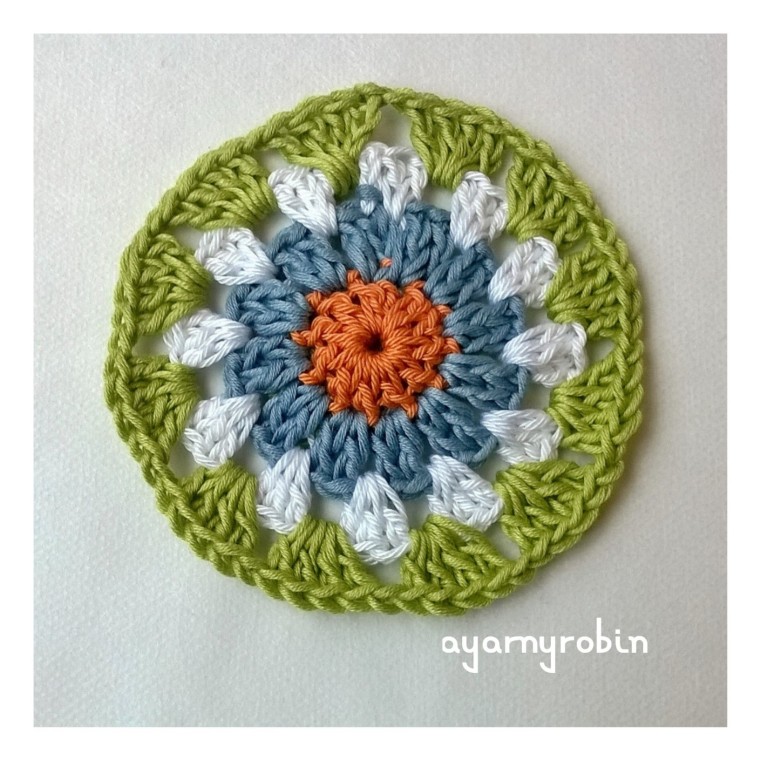
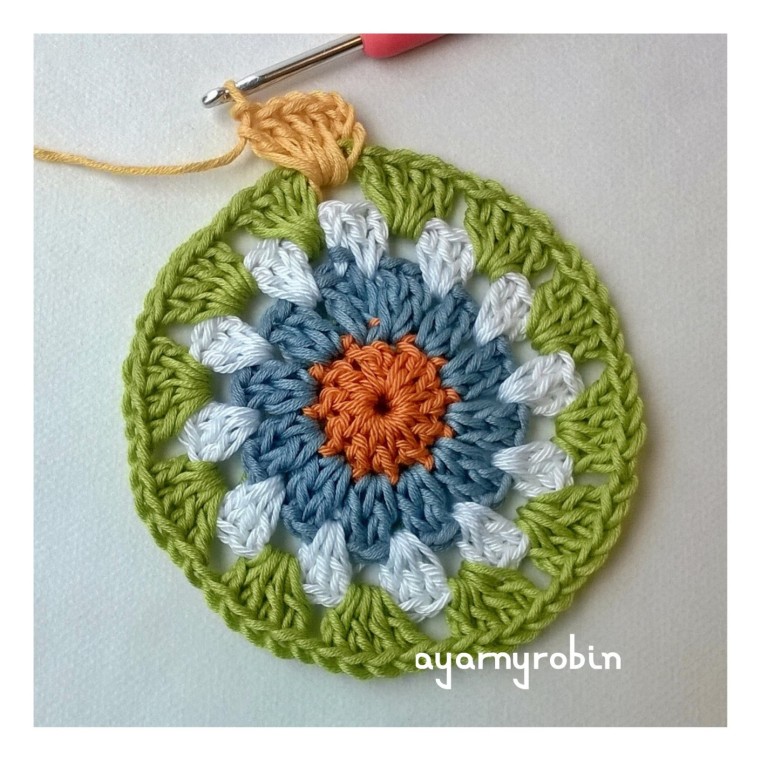
Row 5: join yellow yarn in any ch space and ch3, 4tr in same sp, ch1
*5tr in next ch space, ch1*, repeat * * x10 times, join with slst in ch3 and fasten off. (12 clusters of 5tr and 12 ch spaces)
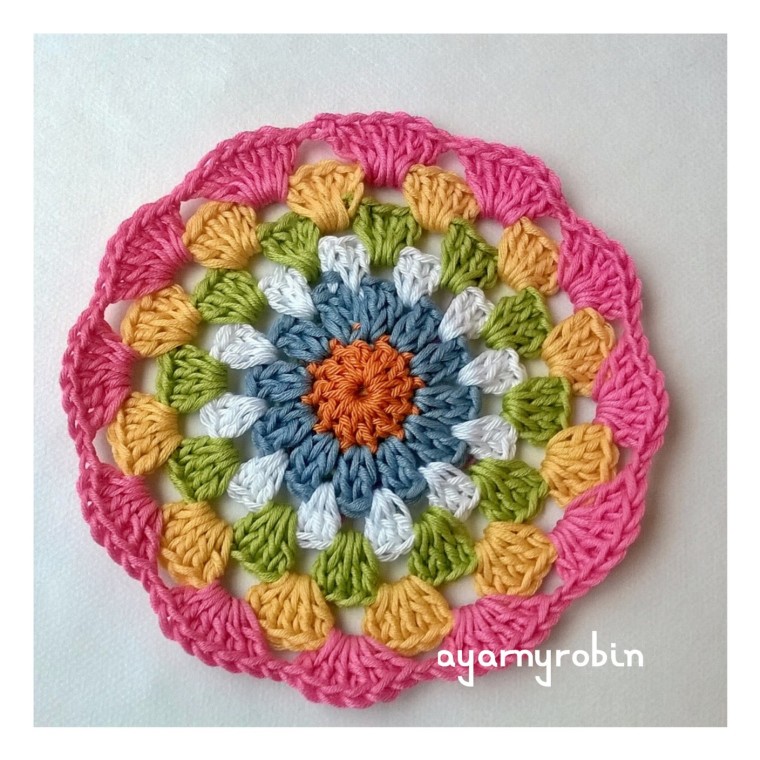
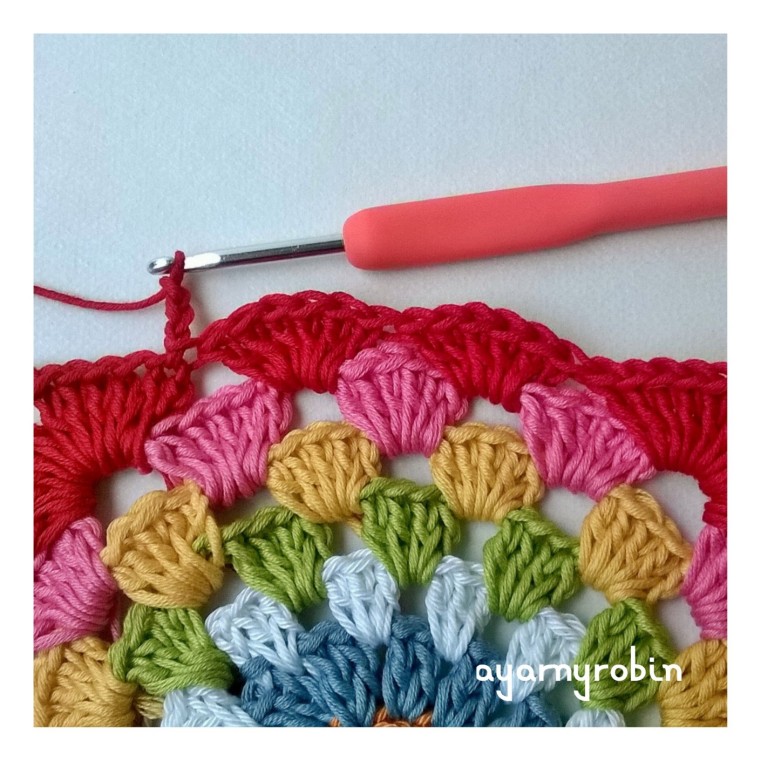
Row 6: join pink yarn to any ch space and ch3, 5tr in same sp, ch1, *6tr in next ch space, ch1*, repeat * * x10 times, join with ss in ch3 and fasten off. (12 clusters of 6tr and 12 ch spaces)
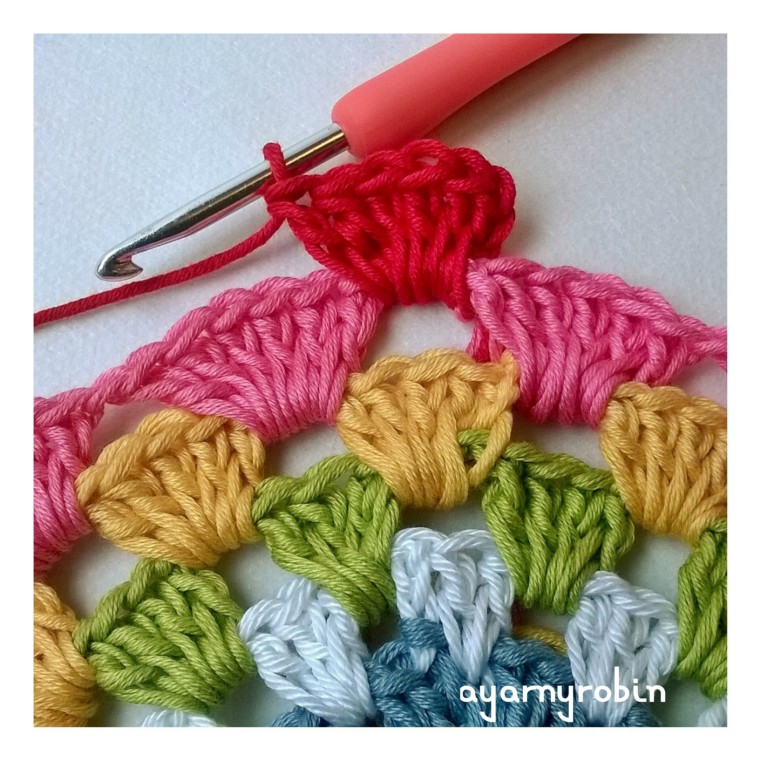
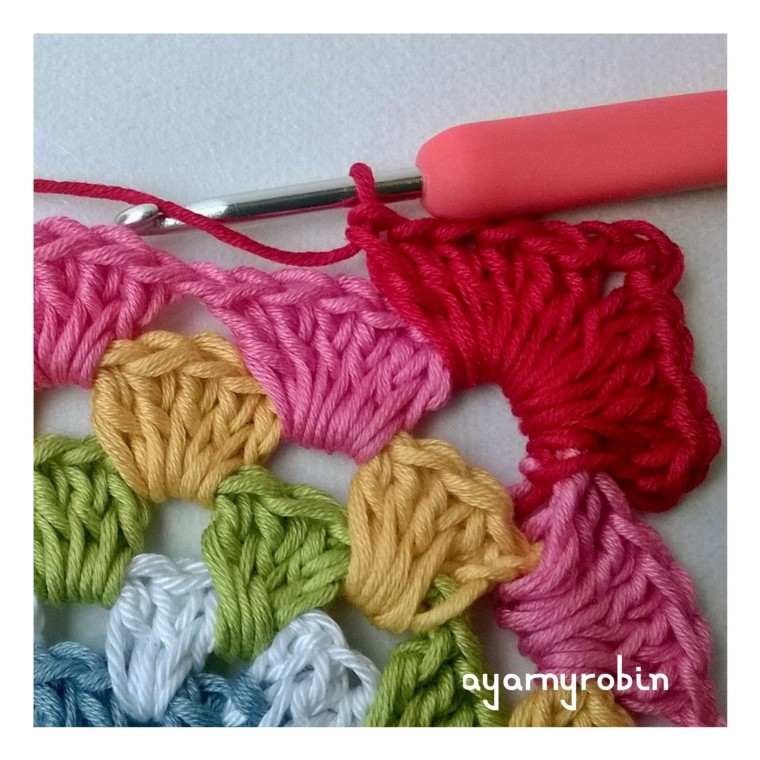
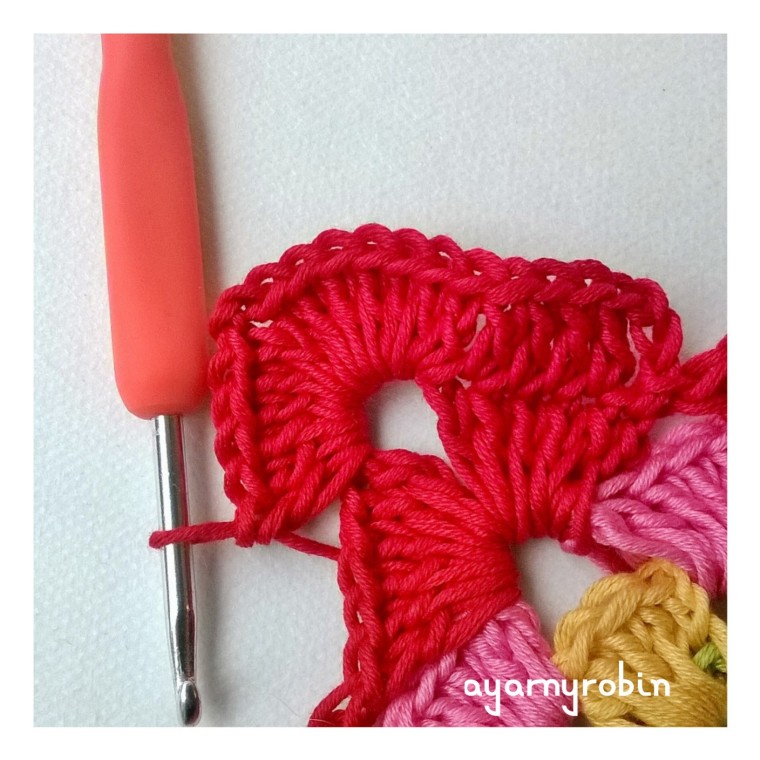
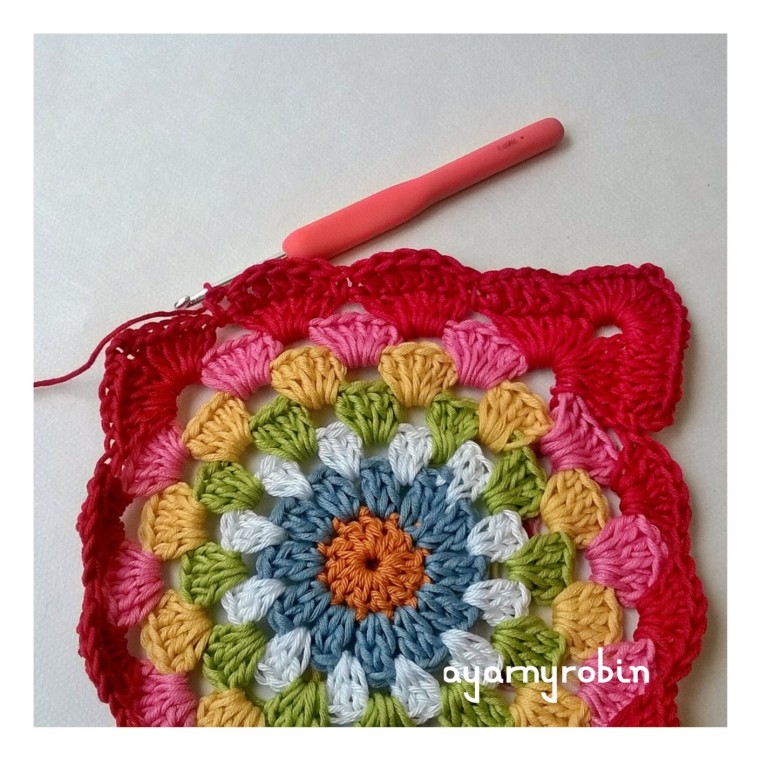
Row 7: join red yarn in any ch space, ch3, 5tr in same space,
ch3,
6tr in same space (corner made),
*6tr in next ch space, 6tr in next ch space,
6tr in next space, ch3, 6tr in same space* (2nd corner made) repeat * * x2 times
6tr in next space, 6tr in next space, join with slst in beginning ch3. Do not fasten off.
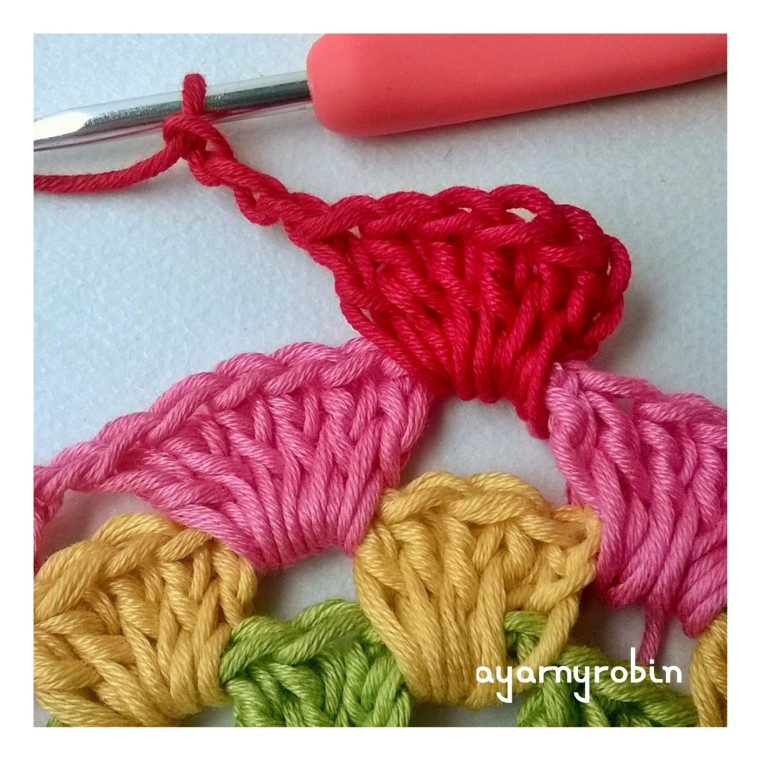
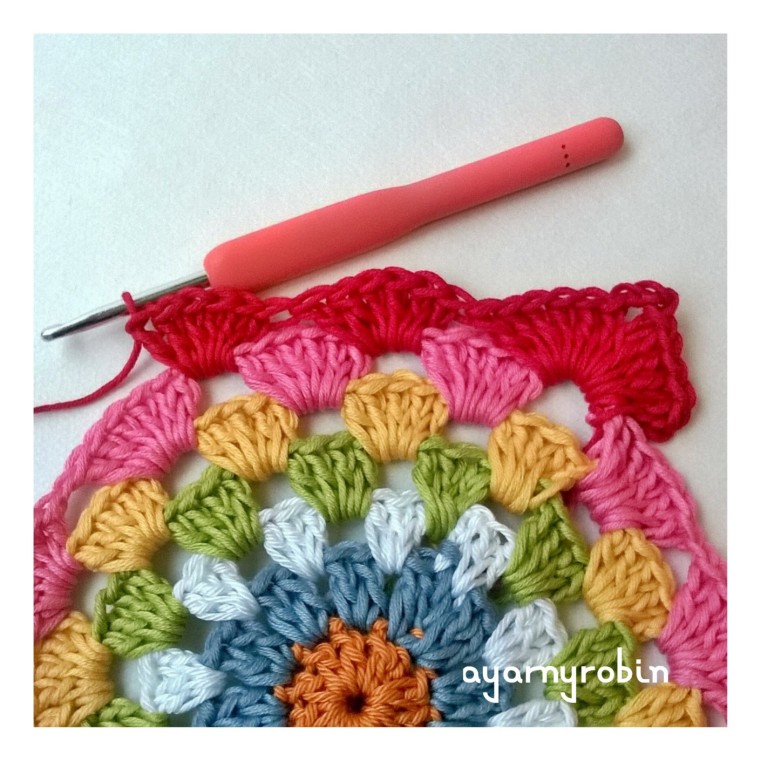
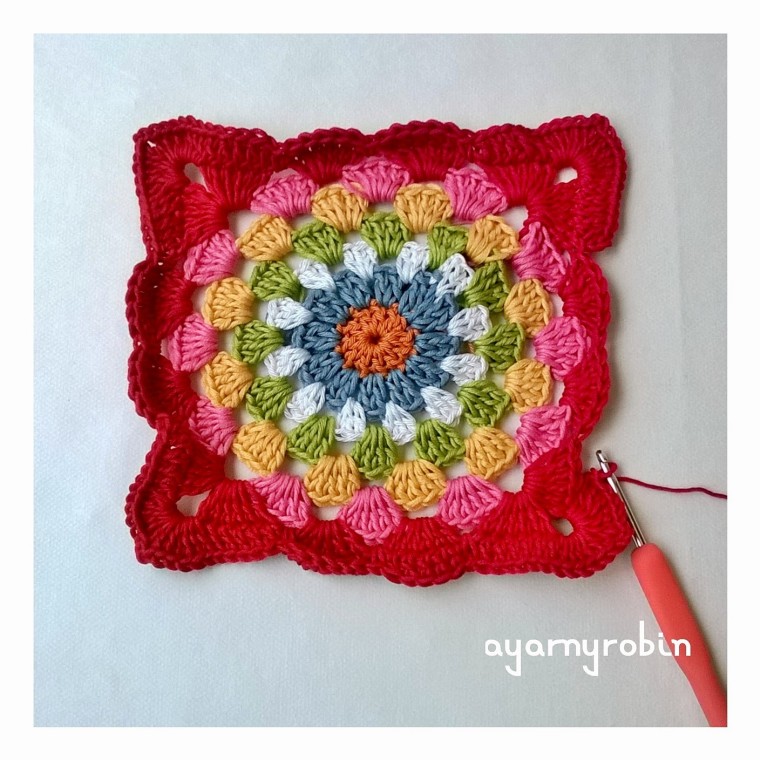
Row 8: ch3,
1tr in next 5sts,
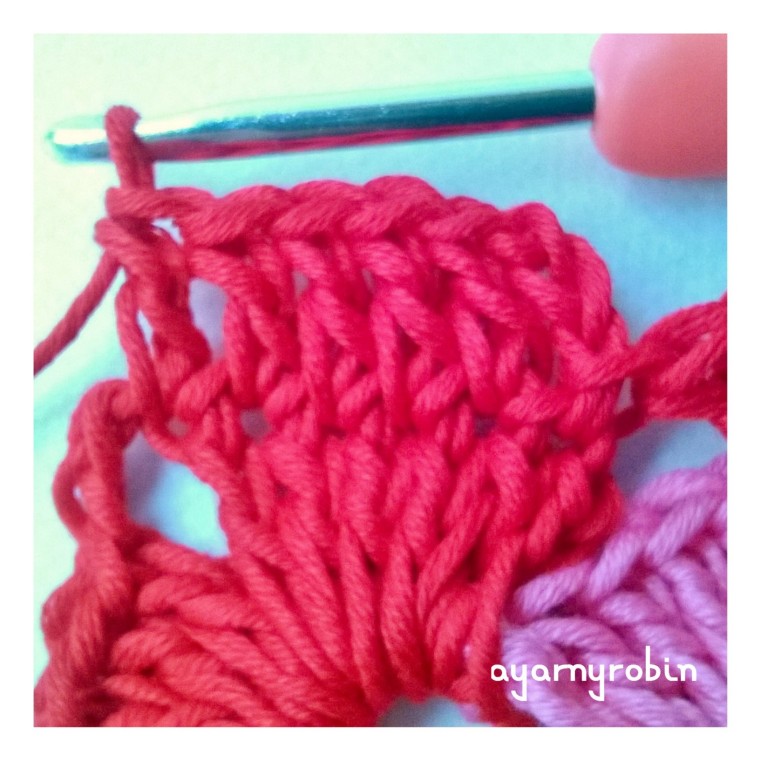
*6tr in ch3 sp, ch2, 6tr in same space (corner made),
*1tr in next 5sts,
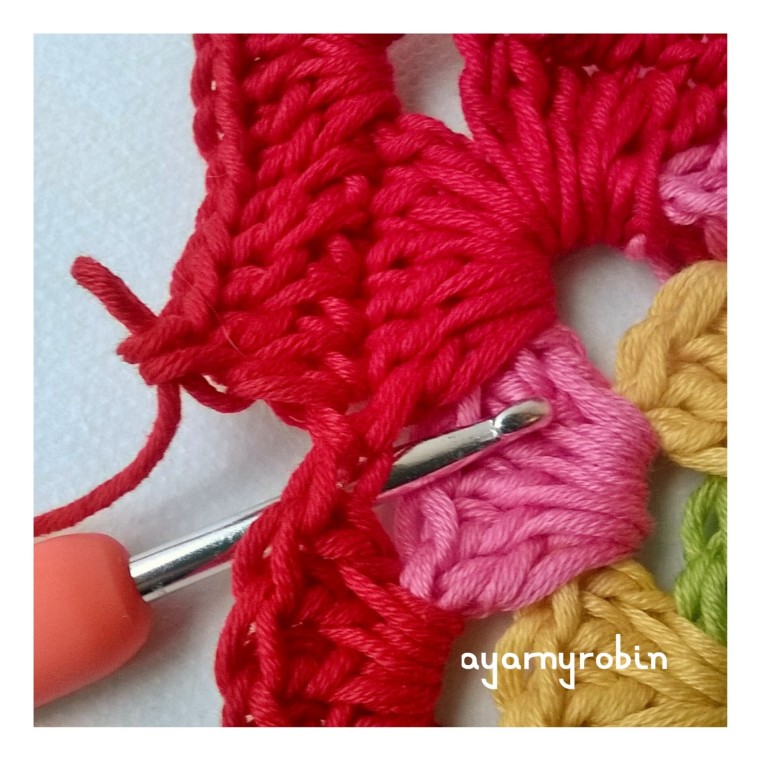
dc UNDER next stitch (indicated by the hook)
1tr in next 5sts, dc under next stitch, 1tr in next 5sts, dc under next stitch
1tr in next 6sts, 6tr in ch sp, ch 2, 6tr in same space*
repeat * * x2times
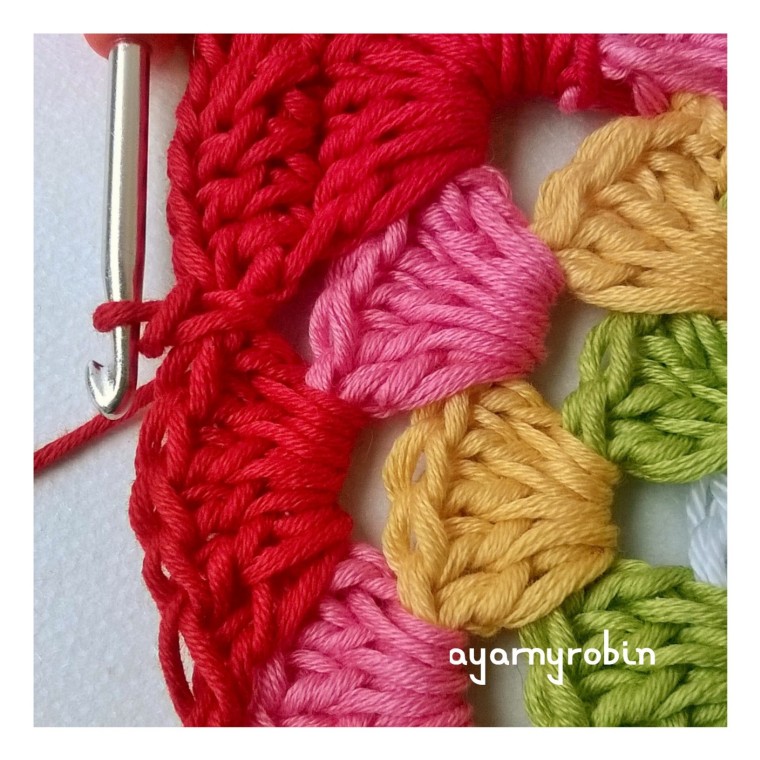
1tr in next 5sts, dc under next stitch, 1tr in next 5 sts, dc under next stitch, 1tr in next 5 sts, dc under next stitch, slst to beginning 3rd ch to finish. Weave in ends.
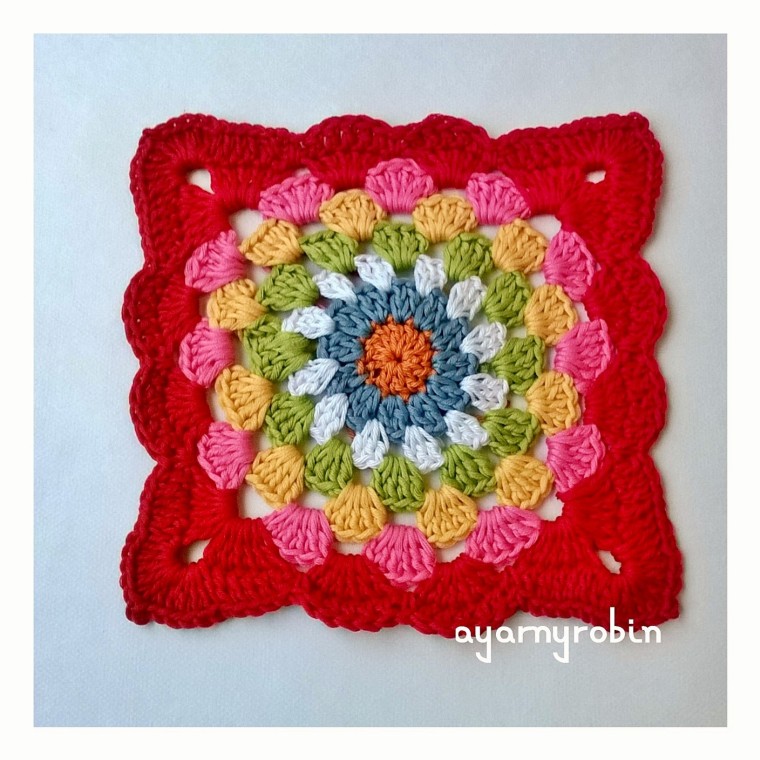
Blocking:
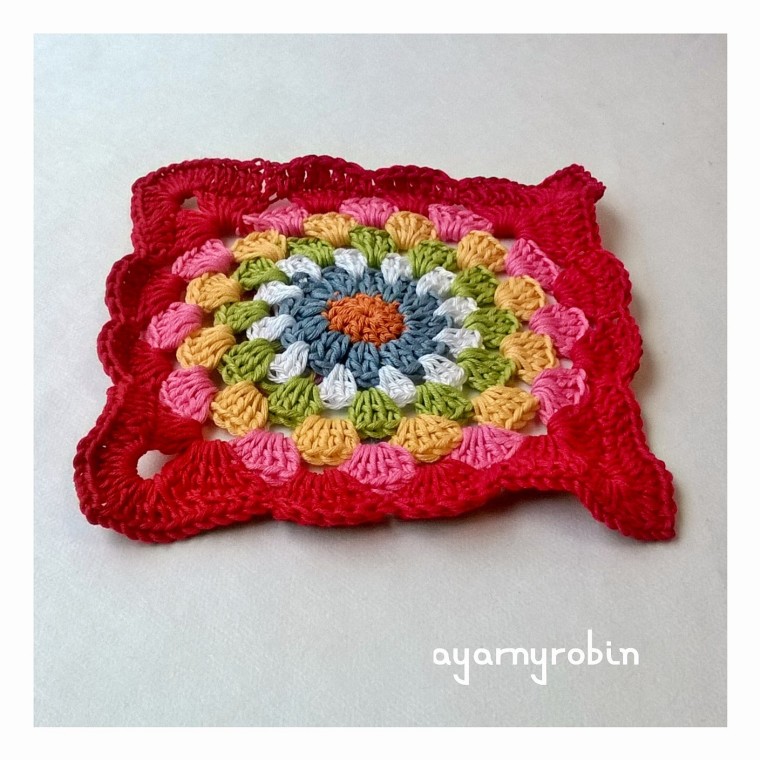
A word on blocking: Before blocking…
Your square will be wibbly. After blocking…
Your square will lie flat and will look much better. Blocking is really worth the extra effort and isn’t difficult or expensive to do. I just pinned this square to my ironing board so that it measured 7″ by 7″ and hovered my iron just above the square and blasted it with steam. Allow to cool before unpinning and store carefully. Alternatively, you could pin the square to the required measurements to a towel or a pin board, spritz with water and allow to dry.
Joining:
I have used a simple and easy slip stitch to join these squares. I have chosen this join for two reasons. The first reason is that it is secure and does not add anything to the squares, allowing them to showcase themselves.
The second reason is it uses the least amount of yarn and also creates less ends to weave in.
So to join the squares start by placing 2 squares with the right side to the right side…ie/ the wrong side of each square will be facing outwards.
Note that this join requires you to place slip stitches in the top of the stitches along the edge of the square and you should go under both loops of each stitch.
Some stitches will require you to slip stitch in both stitches of each square, these stitches should be the corresponding stitches for each square. Some stitches will require you to slip stitch in the top square only. This is because the squares are only joined to each other at each corner and in the middle of each scallop.
Join yarn in 2nd ch of any corner space and with a 3.5mm hook slst,
in both squares slst in the next 6sts,
in top square only slst in next 6 sts (tr), slst in next st (dc), slst in next st (1st tr of scallop),
*in both squares slst in next 3 sts (2nd, 3rd &4th st of scallop),
in top square only slst in next 3sts (tr,dc,tr)*
repeat * – *
in top square only slst in next 5sts,
in both squares slst in next 6 sts, miss chst, slst into 2nd ch of corner space.
Repeat this process for each side of the square which requires joining. You will not need to cut your yarn at the end of each side joined as you can continue round by adding another square. I started joining in the middle of the blanket. You will have to join in a new corner space for some of the joins, but the process remains the same.
I would love to see your makes and you can share on social media by using the following hashtags
#ayarnyrobin #yarnyrobin @yarnyrobin
This pattern to include the photos are the property of Nicola Florence @ayarnyrobin. You can’t modify, resell or share this pattern. You can sell finished items made from it, but please mention that the item is made using AYARNYROBIN pattern.
I have updated this lovely pattern and have re shot the tutorial photos, so they are clearer. I have also updated this pattern on ravelry too so you can save for later if you want to.
Hope you enjoy!
As always I’m using English crochet terminology. Ch – chain Slst – slip stitch dc – double crochet tr – treble crochet
ch3 – counts as a treble unless otherwise stated. I’m using drops muskat cotton
and I’m using the colours listed below, you will see you only need a very small quantity of yarn. red – 16g old pink – 5g white – 3g vanilla yellow – 4g dark orange -1g
sky blue – 2g apple green – 3g and a 4mm crochet hook.
This lovely yarny square measures 7″ x 7″ or 18cm x 18cm once blocked.
So here goes… ch2, join with ss to form a tiny ring (you could make a magic circle instead if you prefer)
Row 1: ch3,
11tr into ring,
join blue yarn and slst into 3rd ch (12tr in total).
Row 2: ch3,
1tr in same space, ch1
2tr in next st, ch1
*2tr in next st, ch1*, repeat * * x10 times, join white yarn and slst into 3rd ch (12 clusters of 2tr and 12 ch spaces).
Row 3: ch3,
*3tr in next ch space*,
repeat * * x10 times, 2 tr in next ch space,
join with slst in top of ch3 and fasten off. (12 clusters of 3tr). Row 4: join green yarn in between any cluster of 3tr of previous round and ch3, 3tr in same sp, ch1
*4tr in between next cluster of 3tr, ch1*,
repeat * * x10 times, join with slst in ch3 and fasten off. (12 clusters of 4tr and 12 ch spaces)
Row 5: join yellow yarn in any ch space and ch3, 4tr in same sp, ch1
*5tr in next ch space, ch1*, repeat * * x10 times, join with slst in ch3 and fasten off. (12 clusters of 5tr and 12 ch spaces)
Row 6: join pink yarn to any ch space and ch3, 5tr in same sp, ch1, *6tr in next ch space, ch1*, repeat * * x10 times, join with ss in ch3 and fasten off. (12 clusters of 6tr and 12 ch spaces)
Row 7: join red yarn in any ch space, ch3, 5tr in same space,
ch3,
6tr in same space (corner made),
*6tr in next ch space, 6tr in next ch space,
6tr in next space, ch3, 6tr in same space* (2nd corner made) repeat * * x2 times
6tr in next space, 6tr in next space, join with slst in beginning ch3. Do not fasten off.
Row 8: ch3,
1tr in next 5sts,
*6tr in ch3 sp, ch2, 6tr in same space (corner made),
*1tr in next 5sts,
dc UNDER next stitch (indicated by the hook)
1tr in next 5sts, dc under next stitch, 1tr in next 5sts, dc under next stitch
1tr in next 6sts, 6tr in ch sp, ch 2, 6tr in same space*
repeat * * x2times
1tr in next 5sts, dc under next stitch, 1tr in next 5 sts, dc under next stitch, 1tr in next 5 sts, dc under next stitch, slst to beginning 3rd ch to finish. Weave in ends.
A word on blocking: Before blocking…
Your square will be wibbly. After blocking…
Your square will lie flat and will look much better. Blocking is really worth the extra effort and isn’t difficult or expensive to do. I just pinned this square to my ironing board so that it measured 7″ by 7″ and hovered my iron just above the square and blasted it with steam. Allow to cool before unpinning and store carefully. Alternatively, you could pin square to the required measurements, to a towel or a pin board, spritz with water and allow to dry. A very versatile yarny square.
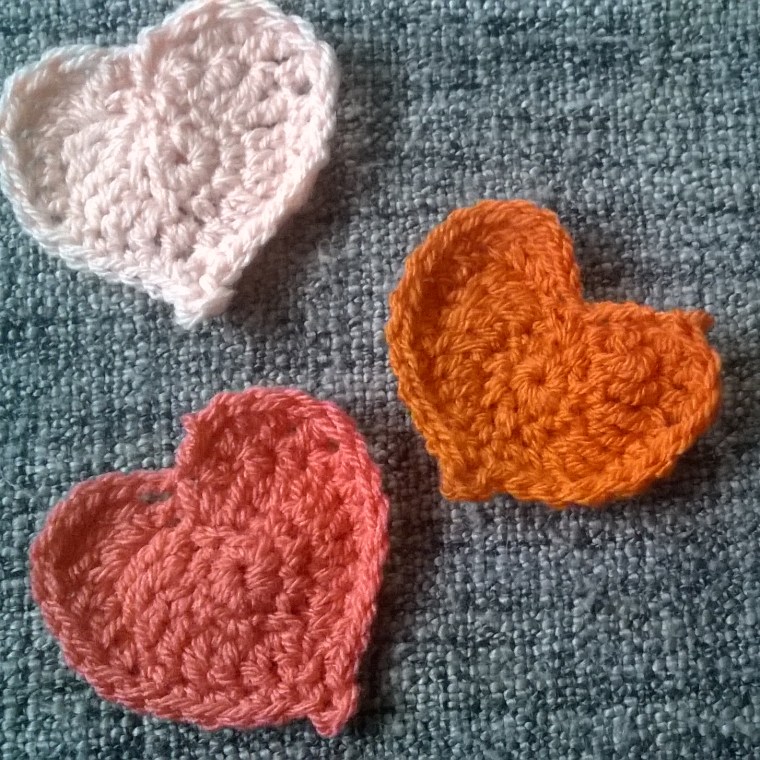
With Valentines day just around the corner I thought I would post the pattern for ‘a yarny little heart’ that I published a little while back.
This is a super quick make and would make a cute Valentine bunting or embellishment. The pattern is free and just here and there is a photo tutorial too.
I’m so, so, soooo super excited to launch this new series here at the nest.
I would like to introduce you to a collection of beautiful tea cosies over the course of the next few months, named ‘The Grandma Collection’. Each one dedicated to the inspirational women in my life.
The patterns will of course be crocheted, but will also include other mixed media embellishment, making these cosies the perfect companion for your teapot….and as always the patterns will be free.
If you have been following me on Instagram then you will have seen some sneak peeks…
The Grandma Mary tea cosy… coming later this week. I really hope you will enjoy this series with me.
xxxxx
Since this post was written there are now four stunning Tea Cosies available in this series…the links to each can be found below.


 Autumn is creeping in and I can feel the joy rising in me. I adore the Autumn and all of her treasures; it awakens my soul and wraps me with comfort.

 I will definitely return to this pattern…and my Mama loved it!


 join blue yarn and slst into 3rd ch
 Row 2: ch3,
 1tr in same space, ch1
 2tr in next st, ch1
 *2tr in next st, ch1*, repeat * * x10 times,
 Row 3: ch3,
 *3tr in next ch space*,
 repeat * * x10 times, 2 tr in next ch space,
 join with slst in top of ch3 and fasten off.


 join blue yarn and slst into 3rd ch
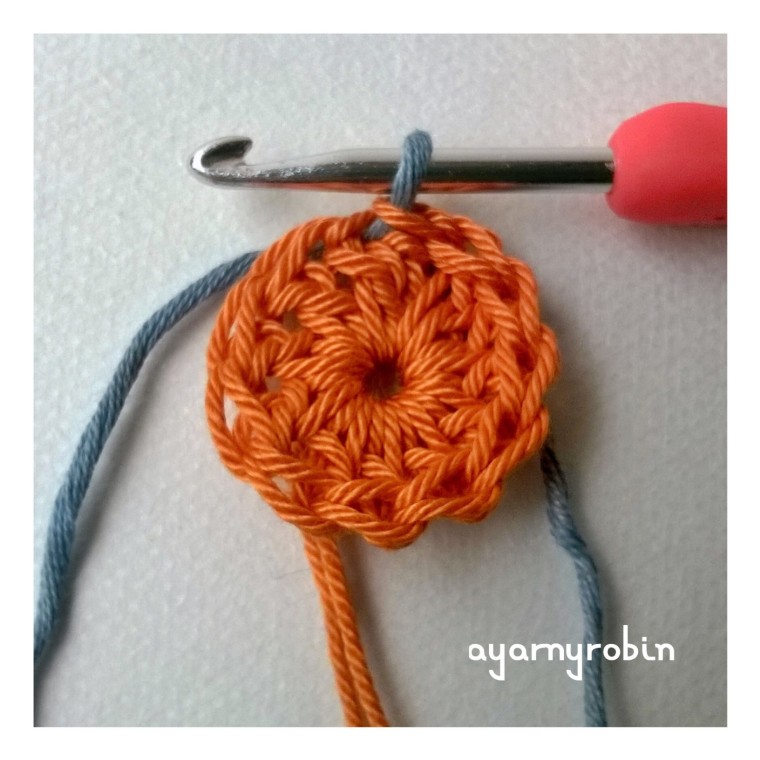 Row 2: ch3,
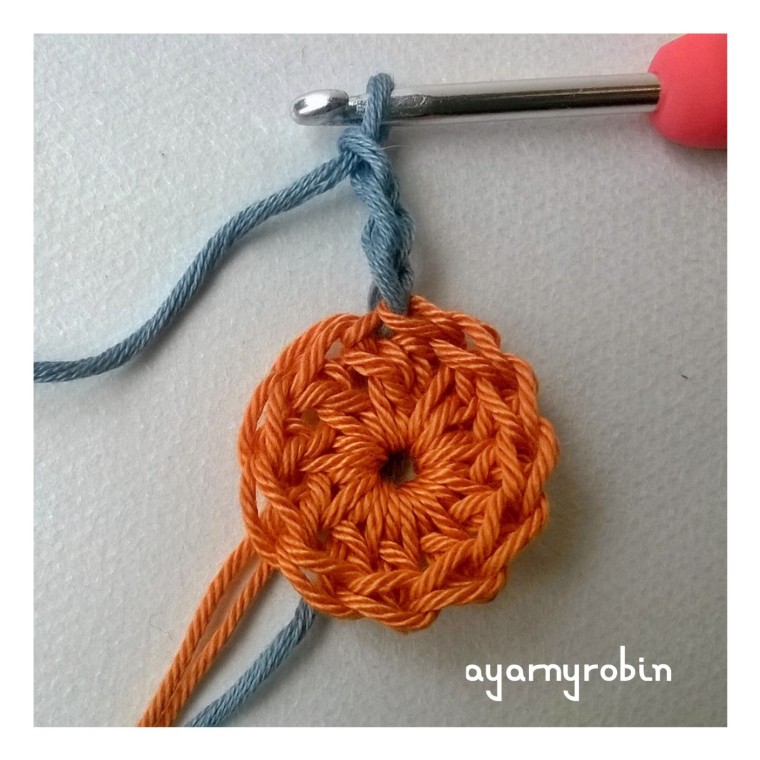 1tr in same space, ch1
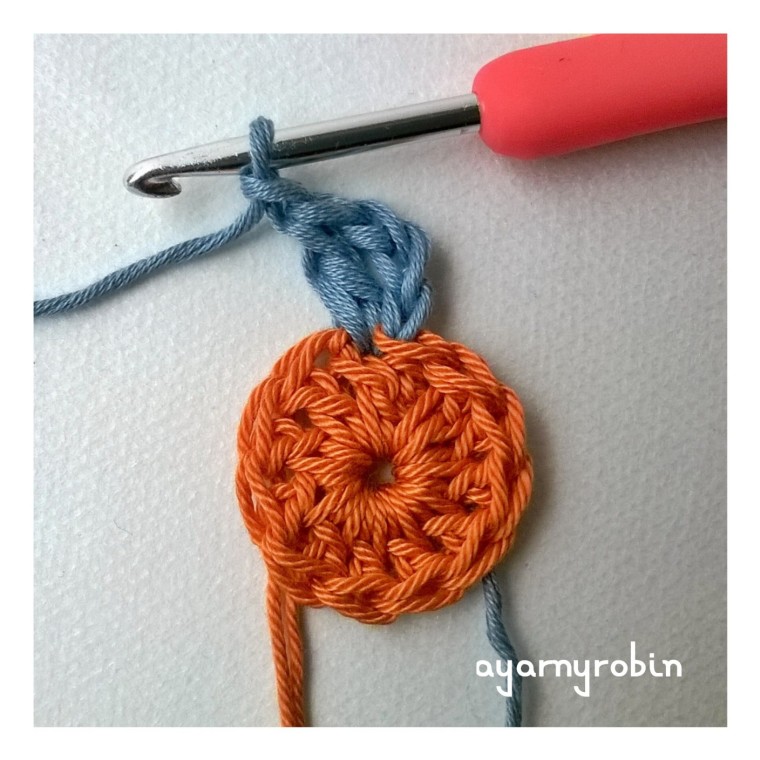 2tr in next st, ch1
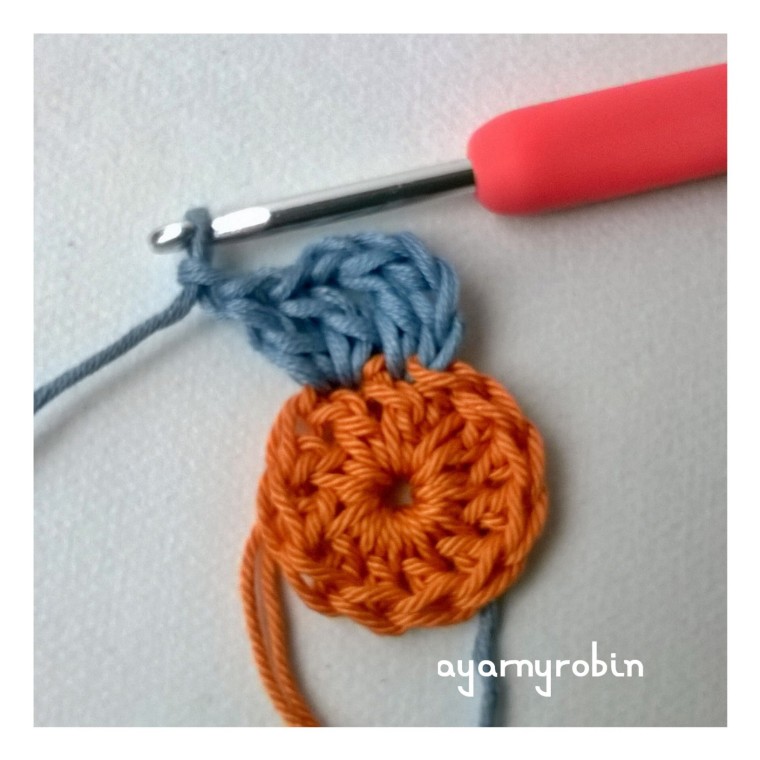 *2tr in next st, ch1*, repeat * * x10 times,
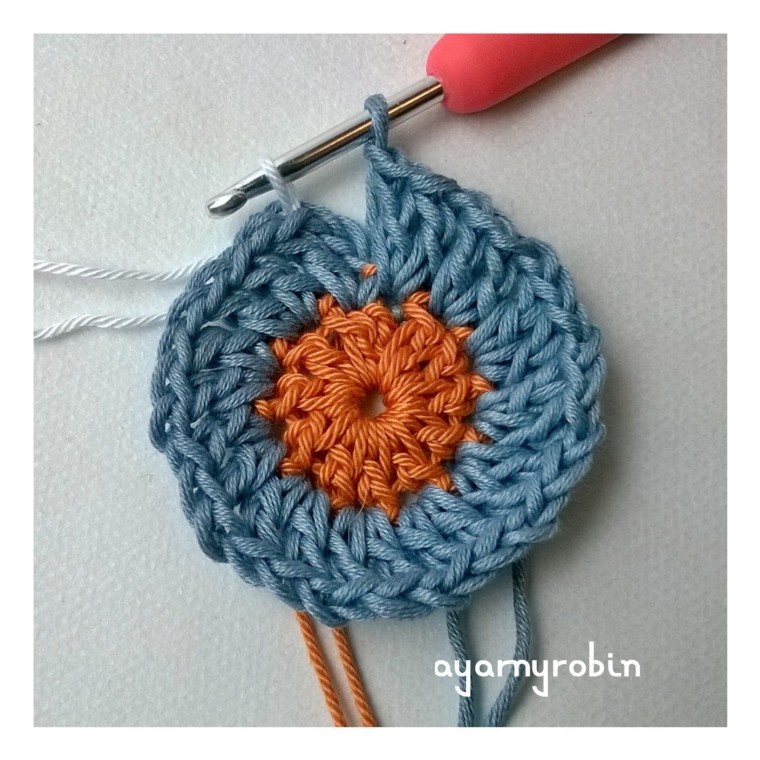 Row 3: ch3,
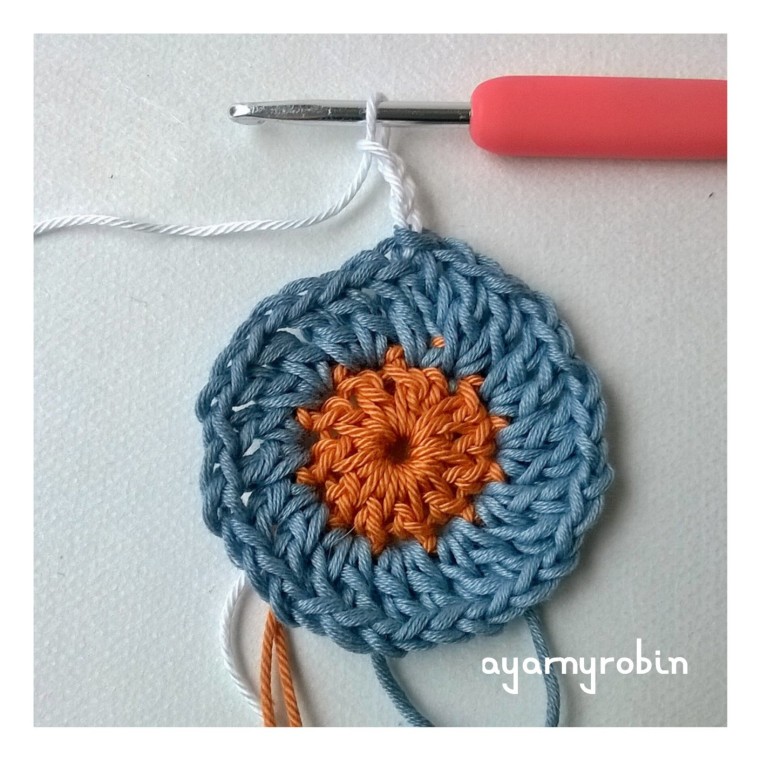 *3tr in next ch space*,
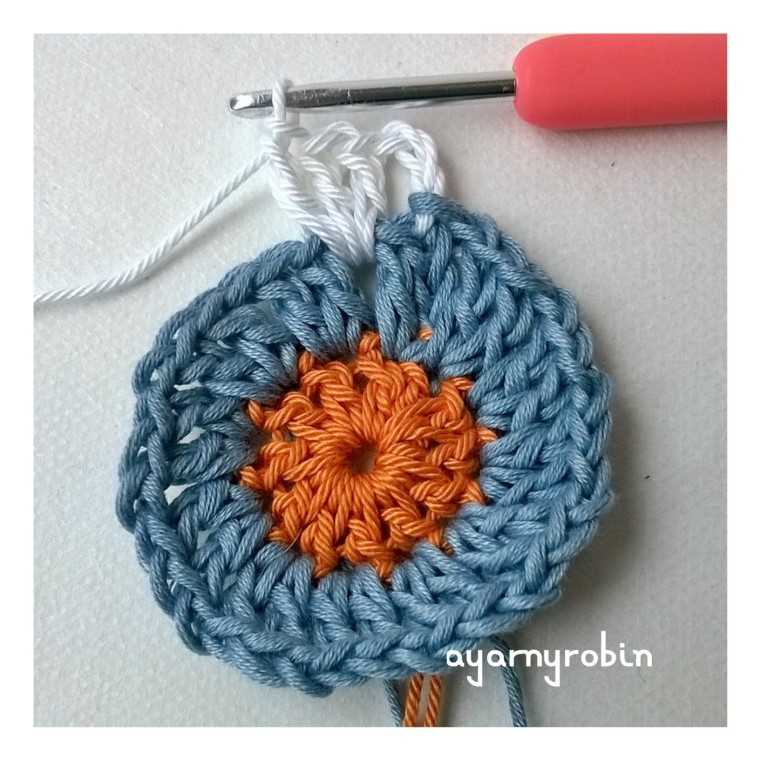 repeat * * x10 times, 2 tr in next ch space,
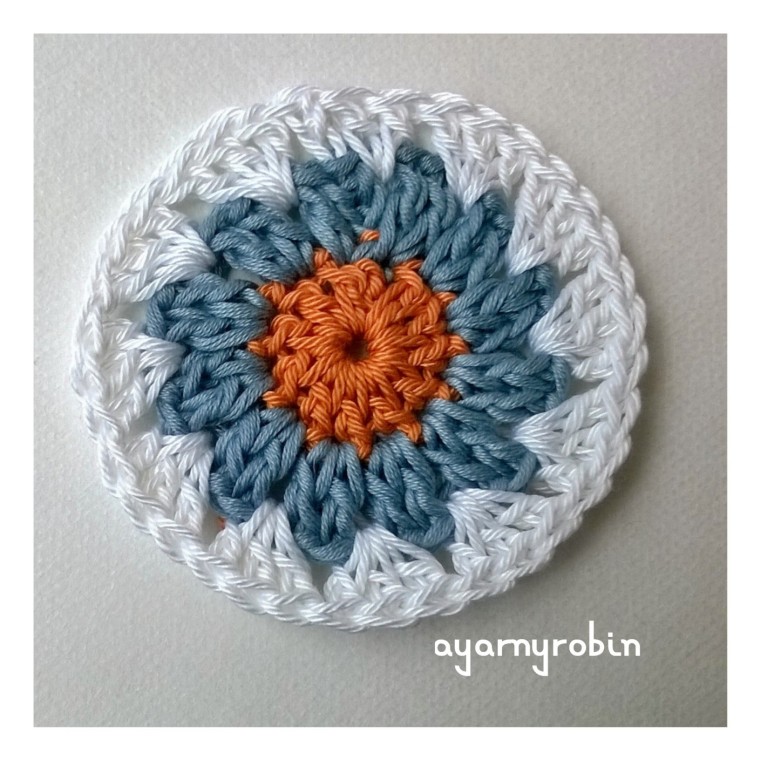 join with slst in top of ch3 and fasten off.