I thought you might like another little update on the slow CAL (crochet a long) I’m participating in which is being hosted by the lovely Eleanora over at coastal crochet. You can also find lots of other amazing blankets and makers participating in this CAL across social media by searching #seasidestashbustingblanket.
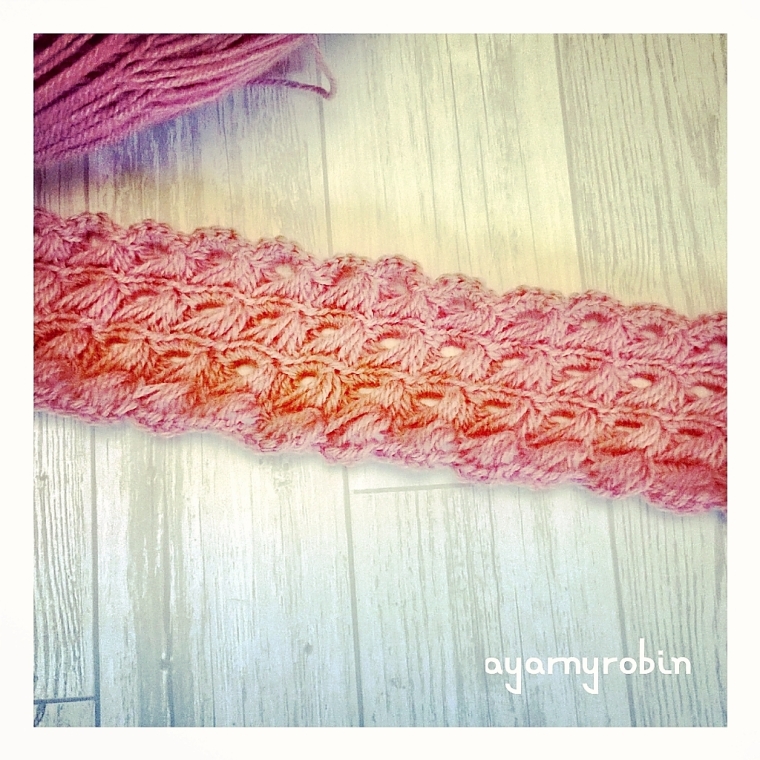
But let me show you weeks 9 – 12. I have enjoyed these weeks so much, hooking out and about in town
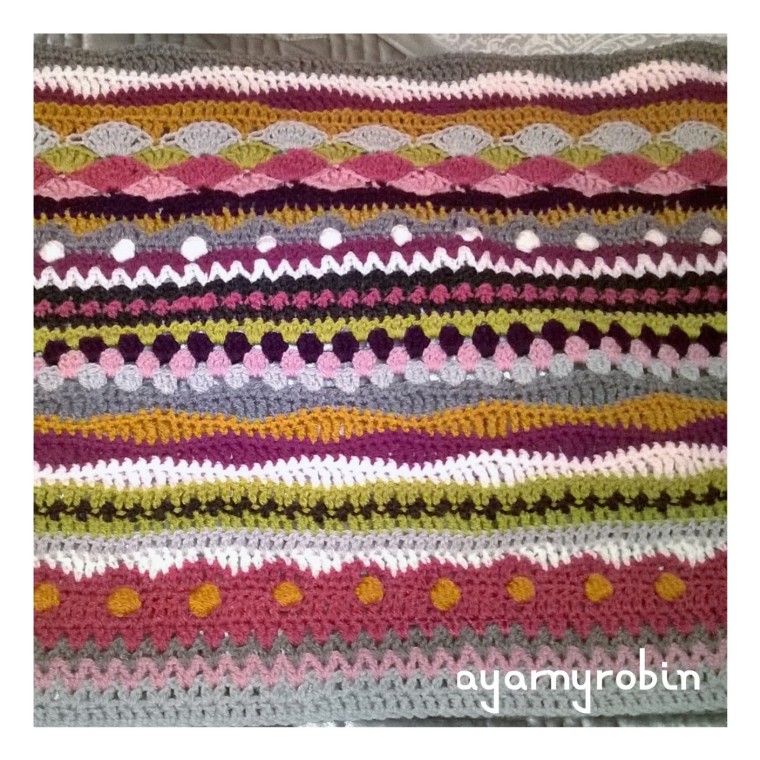
The blanket is certainly growing larger and no longer resembles a scarf…in fact it is way past scarf stage now and is handy for keeping my lap warm whilst I hook away.
I think this will be the last close up picture where the whole of the blanket will fit into frame.
I’m still ploughing through my stash too, so this makes me doubly thrilled with this blanket. I find I am really looking forward to every Monday and Friday when the next rows are released. I love the surprise of not knowing what the next set of rows will be.
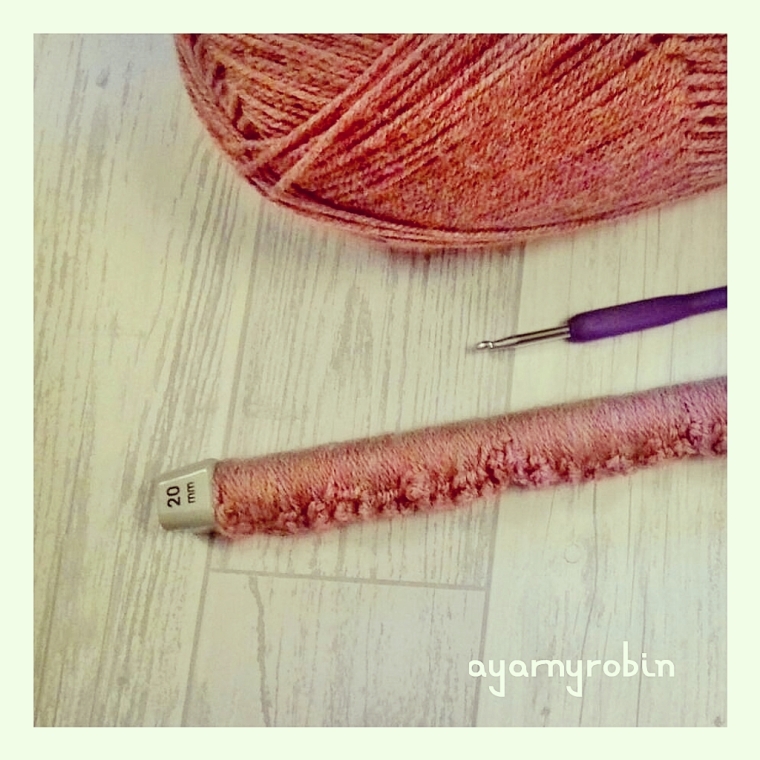
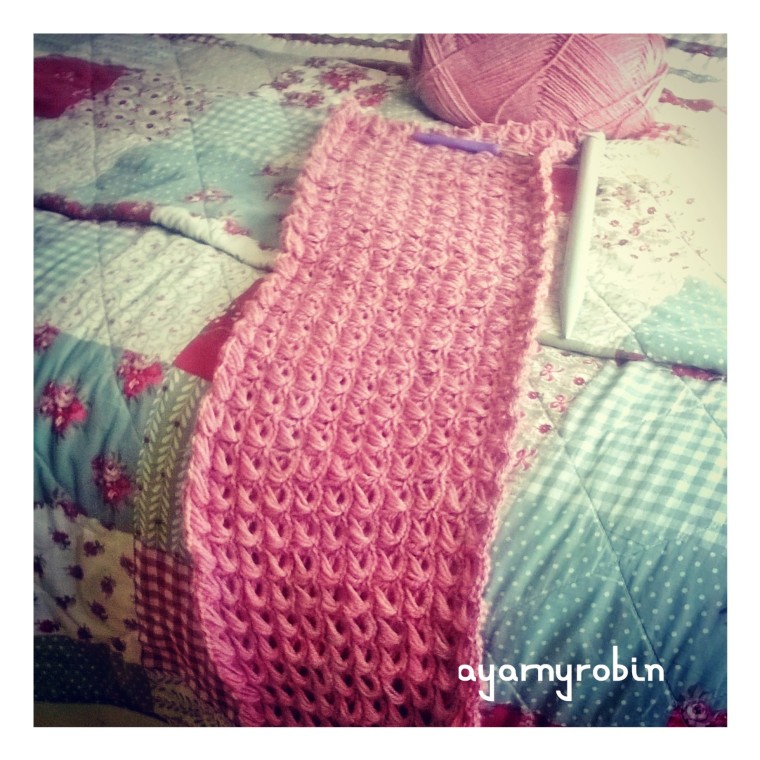
I have a small confession for which I hold my temporary insomnia completely responsible. I have started yet another crochet blanket. But, in my defence it is a gorgeous broomstick crochet, and in a beautiful wild rose blush and it’s for my new bedroom.
So, that’s ok.
It is!…just look at it on a chunky size 22 needle.
It has been my weekend love and has been a welcome distraction from the snow and freezing temperatures; and it grows quickly too.
This blanket is so pretty and feminine and uses a very old stitch. Traditionally, hooked over a broomstick handle, hence the name. It is a little undignified, sat with a huge needle between your legs whilst you anchor the stitches over that size 22!!
Not really one to take to the coffee shop if you catch my drift!
So that is three blankets on the hook now…my seaside stashbusting blanket is all up to date, you can check it out just here and my Charming Harbour blanket is making steady progress too.
I have also been really enjoying the ‘yarn – a – long’ series which has been running each Sunday through March. There is still time to join in with the chatter, last Sundays is just here.
Enjoy the rest of your week whatever you have planned.
I thought you might like a little update on the slow CAL (crochet a long) I am participating in which is being hosted by coastal crochet…details of weeks 1 – 4 are just here. You may have seen it across social media with the #seasidestashbustingblanket.
mixed stitches…
There are several things I am enjoying about this CAL. The first of which is the pace. Eleonara, is releasing just four rows a week; two on a Monday and two on a Friday and so it feels very relaxed.
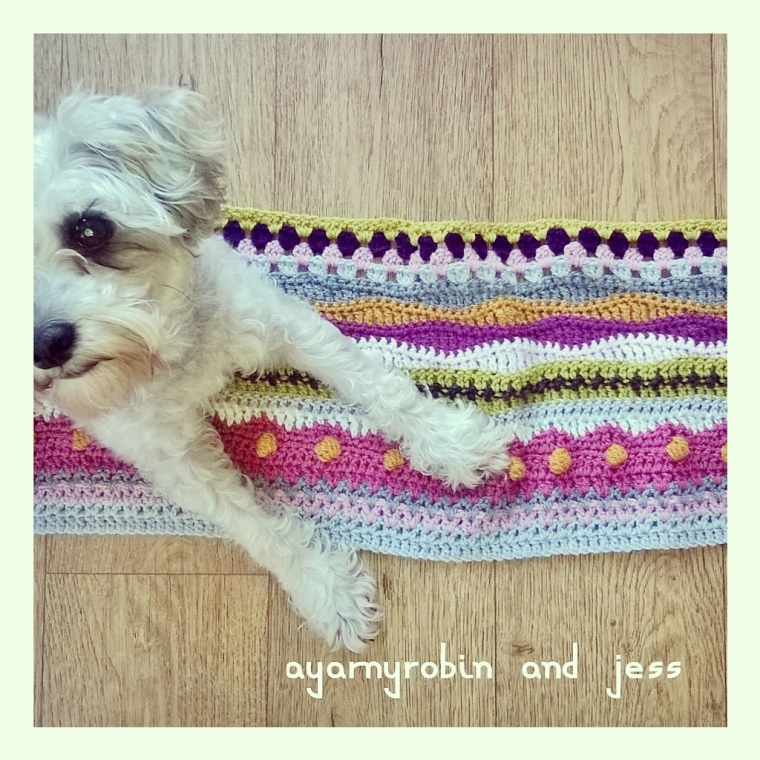
as approved by little Jess
The second little gem is that I am busting my stash! The CAL’s focus is using up what you already have and so this blanket is being made entirely from stash. I have a lot of stash, not as much as some, but too much to be just lying idle. I feel like I am achieving something very positive using up my hoard and turning my treasure into usable wealth.
The third pleasure is the online community element of this CAL. I have met and chatted with so many talented ladies and gentleman and have been inspired and encouraged. It never ceases to amaze me how folk can hook the same pattern and yet the different colour choices make it look so different.
Creativity…I just love it!
week 8
Eleonora, has called it her seaside blanket because she lives by the sea and takes her inspiration from her surroundings and therefore that is reflected in her colour choices. It made me smile when she introduced pink into her blanket… stating she new she would have to as it was in her stash. Eleonora, likened it to strawberry icecream on the beach, which I liked a lot.
It got me thinking about the colours in my blanket and what they reminded me of and after some thought I think they remind me of a stormy sunset.
So I am going to call this my Stormy Sunset blanket…what do you think?
This is the fifth tea cosy in the Grandma collection, and is quite simply delightful. The use of traditional granny stitches means that this pattern can be hooked within an evening. Ideal for that last minute handmade present. This cosy is sweetly uncomplicated and will cloak any tea pot with elegance.
Dedicated to the inspiration that is ‘Nanna Kathy’
The pattern makes a tea cosy that fits a standard 6 cup teapot.
You will also need a darning needle, pin or stitch marker and a pair of scissors.
Stitches used in this pattern refer to English terminology, however a conversion to US terminology is provided in brackets below.
Ch – chain stitch
slst – slip stitch
dc – double crochet (single crochet)
htr– half treble crochet (half double crochet)
tr – treble crochet (double crochet)
dtr – double treble crochet (treble crochet)
You will also need:
a 5mm crochet hook for main body of teapot and a
4mm hook to complete picot edging trim.
Ok, here we go…
Using the gold yarn and 5mm hook, Ch 20
To adjust cosy size, the starting chain should be equivalent to the height from the base of teapot to the top of the body of the teapot or to put it another way, to the start of lid. If adjusting the starting chain it must be a multiple of 3+2.
*********************
Row 1: dc in 2nd ch from hook, dc in each st along, ch3, turn (ch3 counts as tr) (19dc in total).
Row 2: 2tr in same space as ch3, *miss 2 sts, 3tr in next st (granny cluster)*
repeat * – * til end of row, ch3 (counts as tr) turn.
(x7 granny clusters / x6 spaces).
Row 3: miss 1st granny cluster, 3tr in space before next granny cluster, *miss granny cluster, 3tr in space before next granny cluster* Repeat * – * to last space, miss 2 sts, 1tr in last st of row, Ch3 (counts as tr), turn.
(20sts = x6 granny clusters / 7 spaces / 1tr on each end of row).
Rows 4: 2tr in same space as ch 3, *miss granny cluster, 3tr in space before next granny cluster* Repeat * – * to end. Ch3 (counts as tr), turn. ( 21sts = x7 granny clusters / x6 spaces).
Row 5: – 17: Repeat rows 3 and 4, but omit turning ch on row 17.
Row 18: turn, ch1 (does not count as st)dc in same space, dc in each st across, ch3 (counts as tr), turn.
(20sts).
Now to make the spout hole!
Row 19: 2tr in same space as ch 3, miss 2sts, 3tr in next st, ch 10, miss next x5 granny clusters / x4 spaces, 3tr in last st.
(20sts).
Row 20: ch1 (does not count as dc), dc into same space, dc in next 2sts, dc in next 10 chain sts, dc in next 6sts, ch3 (counts as tr), turn. (19dc).
Row 21: Repeat Row 2.
Row 22 – 32: Repeat rows 3 and 4 but omit turning ch on row 32.
If adjusting cosy size make sure to finish this section on a row that is the same as row 3 in the pattern ie/ starts and finishes with 1tr.
*********************
Row 33: ch1 (does not count as dc), dc in same space, dc in each st along and fasten off and weave in ends
(20dc).
nb/ top and bottom – x1 granny cluster underneath spout
Noting top and bottom correctly, attach gold yarn to top right side.
Now to complete the petals.
Row 34:ch1 (does not count as dc), dc in same space, dc in each st across – ( the term sts here is used loosely as they are actually the side posts of the trebles and double crochet sts of the previous rounds. It may look a bit ambiguous, but we are aiming to get 36dc across this top edge), turn.
try to space these sts as evenly as you can… its just a case of getting them in!
Row 35: ch1, *miss 2 sts, in next st place dc, htr, tr, 2dtr, in next st place 2dtr, tr, htr, dc*
Repeat * – * to end of row
slst to beginning ch1 to join cosy in a circle.
Side Seam: Place cosy on teapot and mark with a pin across top of handle, slst from top of cosy down to this point (approx. 1.5cms).
Return cosy to the teapot and repeat process, this time marking below the handle. Remove cosy leaving marker in place, continue to slst along one edge (not both) until you reach marker for the bottom of the handle. Now slst both edges together to bottom of cosy, fasten off and weave in all loose ends.
Picot trim: Finally, attach apricot yarn in any beginning dc of petal (ie. dc to the right hand side of petal).
With a 4mm hook, ch1 (counts as dc), dc in next 3sts, dc in next st, ch3, slst into 1st ch (picot made),
dc into same space as previous dc, dc in next 4sts…1st petal edged.
For next petal and for all petals around, dc in next 4sts, dc in next st, ch3, slst into 1st ch, dc in same space as previous dc, dc in next 4sts.
NB/ do not crochet in this space by mistake
Do not crochet in this space by mistake else your picot will not be central!
To finish slst to beginning ch of trim, fasten off and weave in ends.
Now I think it’s time for a brew…don’t you?
xxxxx
I REALLY HOPE YOU HAVE ENJOYED MAKING THIS PATTERN AS MUCH AS I HAVE ENJOYED CREATING IT FOR YOU. IF YOU ARE NOT SURE ABOUT SOMETHING OR NOTICE ANY ERRORS PLEASE SHOUT UP. EQUALLY PLEASE FEEL FREE TO SHARE YOUR Grandma Kathy Tea cosy CREATIONS IN THE COMMENTS BELOW or with the #THEGRANDMACOLLECTION #AYARNYROBIN ON SOCIAL MEDIA…I WOULD LOVE TO SEE THEM!
As if having one large blanket on the go isn’t enough! I have accidentally, well…ok…I spent 2 hours rummaging through my yarn stash, so not accidentally at all…but I couldn’t help but chain the starting chain for this mystery CAL, which is being hosted by the talented Eleonora over at Coastal Crochet.
In my defence I am using only stash and there are only 4 sweet rows of the pattern being released each week…so that’s doable isn’t it?
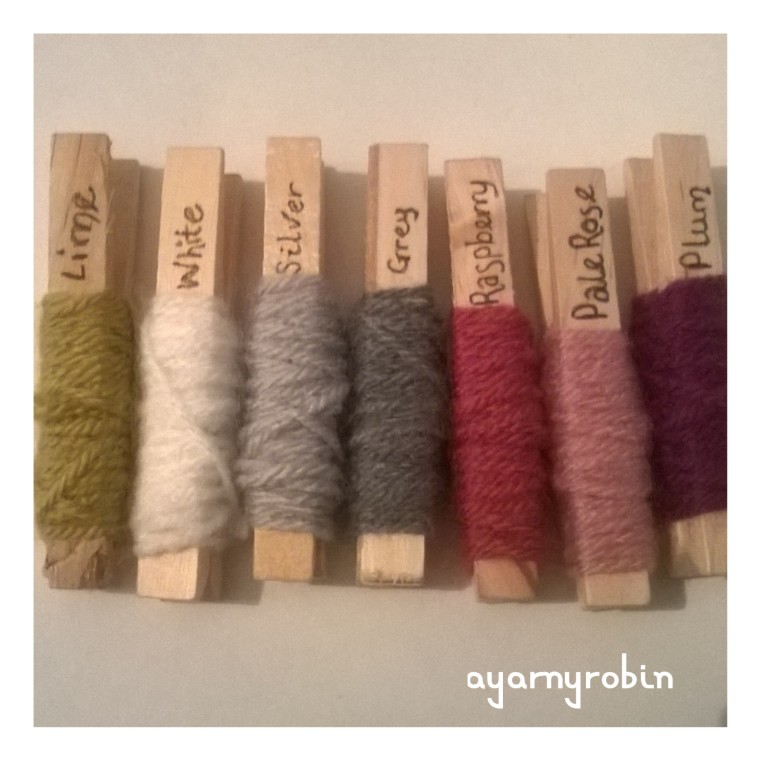
I was a little late to the hook up, starting in week 2, but I am fully caught up and I can’t wait for week 3. The bobbles were fun to hook and I am pleased with the mustard (gold) against the raspberry. The yarn is stylecraft special dk and I’m planning on using these colours.
In addition to these colours I will also be using Graphite (charcoal grey) and Gold and possibly candyfloss pink…I am still undecided about the candyfloss…mmm…we’ll see…What do you think?
I am slightly disgruntled that I have not been able to find my yarn pegs for these missing colours in the picture, but I am unable to look properly because of this…
It really hurt! and I am a big baby!
Yes, It’s all done and it wasn’t very pleasant and I still feel queasy, and I am not a good patient (it must be the nurse in me!) but I am grateful to be this side of it.
I have always wanted to complete a CAL like this but have always been a bit cautious about being able to follow the pattern instructions, but Eleonora’s instructions are written very clearly and she has also made a video tutorial to help out if needed, so I think it will all be gucci.
The blanket is going to be a fair old size when it’s finished in the Autumn. You can checkout other blanketeers in this CAL by using the #seasidestashbustingblanket or #coastalcrochetcal.
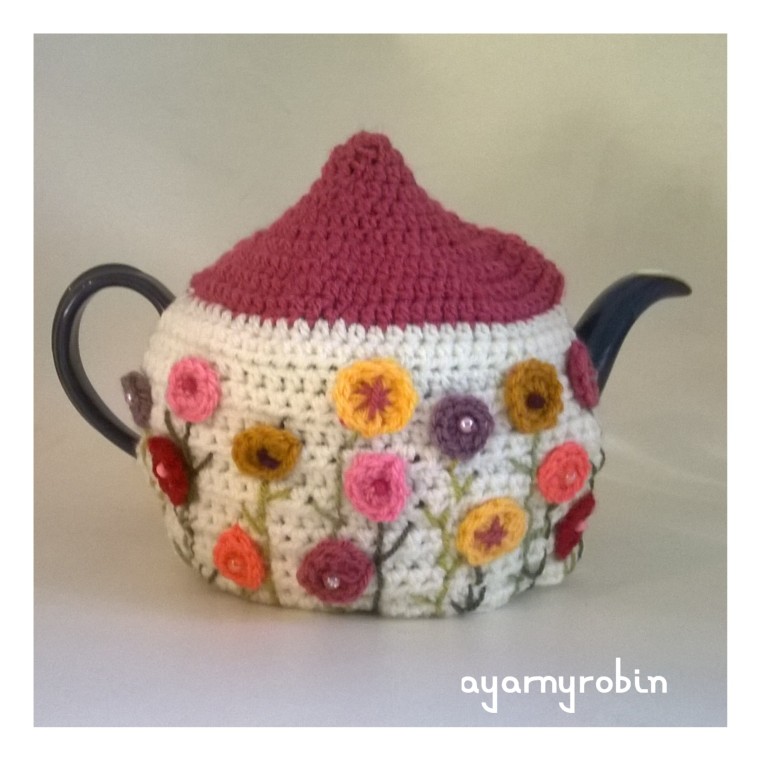
In my haste to release the fourth gorgeous tea cosy of the Grandma Collection…The Grandma Florence tea cosy; I realised that I hadn’t posted the formal introduction. So here it is…
Dedicated to my lovely Momma…Florence.
My Mom: the woman who raised me and who has quietly influenced me throughout my life.
I followed in her duty shoes and trained as a nurse, inspired by memories of her putting on her nurses hat and cape…of course that style of uniform has long since gone…but I wanted to help people just like her.
My Mom has been such a creative influence in my life too, for as long as I can remember she has made stuff. Clothes, flower arrangements, knitting, patchwork quilts…no wonder I have the desire to create and craft.
My Momma has also taught me how to be a Momma to my boys…and if I do half as good as her then I’ll do alright by them! But most of all she is always there and she is kind and that is just what I want to be.
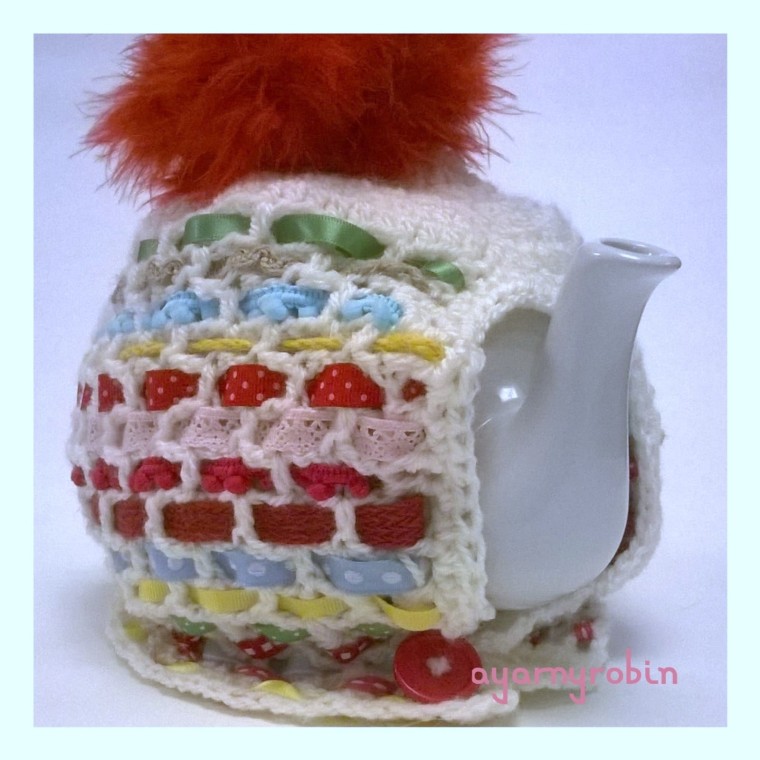
So this is the Grandma Florence tea cosy, a pretty cosy woven with bright ribbons to represent the encouragement, love and inspiration that my Momma has woven throughout my life… Thanks Mom!
xxxxx
So that is the Grandma Florence tea cosy in all of her glory, here is the pattern linky thing which is free and has a photo tutorial also.
This is the fourth tea cosy in the Grandma collection, and is sure to charm. The crochet mesh design means this pattern makes for a very quick hook up. Ideal for beginners using just a half treble crochet stitch, this cosy is abidingly delightful and will trim any tea pot with joy.
Dedicated to the inspiration that is ‘Nanna Florence’ otherwise known as my Mom!
The pattern makes a tea cosy that fits a standard 6 cup teapot.
I used less than 50g of Stylecraftspecial dk yarn in cream. Please note that I have used a different colour yarn in the beginning of the photo tutorial below.
You will also need a darning needle, a selection of 5mm wide ribbon, a 50cm length of fluff, a button, a pair of scissors and x4 stitch markers (or small safety pins or scraps of different colour yarn). The use of a hot glue gun is optional, ribbons can either be glued into position or stitched.
Stitches used in this pattern refer to English terminology, however a conversion to US terminology is provided in brackets.
Ch – chain stitch
slst – slip stitch
dc – double crochet (single crochet)
htr– half treble crochet (half double crochet)
You will also need:
a 4mm crochet hook
Ok, here we go…
Using the cream yarn Ch 4
Join with a slst to form a ring.
Row 1: Ch1 (does not count as a st), 6hdc into ring,
finish with a slst in 1st hdc. (6hdc).
Row 2: Ch1, (does not count as a st) 2hdc in same space, 2hdc in each st around, finish with a slst in 1st hdc. (12hdc).
Row 3: Ch1 (does not count as a st), 2hdc in same space, 1hdc in next st, *2hdc in next st, 1hdc in next st* . Repeat * – * to end, finish with a slst in 1st hdc. (18hdc).
Rows 4: Ch 1 (does not count as a st), 2hdc in same space, 1hdc in next 2 sts, *2hdc in next st, 1hdc in next 2 sts*. Repeat *-* to end, finish with a slst in 1st hdc. (24hdc).
Row 5: Ch1 (does not count as st), 2hdc in same space, 1hdc in next 3 sts, *2hdc in next st, 1hdc in next 3 sts*. Repeat *-* to end, finish with a slst in 1st hdc. (30hdc).
Row 6: Ch 1 (does not count as a st), 2hdc in same space, 1hdc in next 4 sts, *2hdcin next st, 1hdc in next 4 sts*. Repeat *-* to end, finish with a slst in 1st hdc. (36hdc).
Row 7: ch1 ( does not count as a st), 1hdc in same space and in each st around, finish with a slst in 1st hdc. (36hdc).
Row 8: ch1 (does not count as a st), 2hdc in same space andin each st around, finish with a slst in 1st hdc. (72hdc).
Row 9 and 10: Repeat row 7, finish with a slst in 1st hdc. (72hdc).
You should have something that is starting to look a bit like a flying saucer! This is a good point to check your measurements with your intended teapot. Place your hooked disc on top of your teapot. You want the edges of the circle to be approx. 1cm from the handle of the teapot.
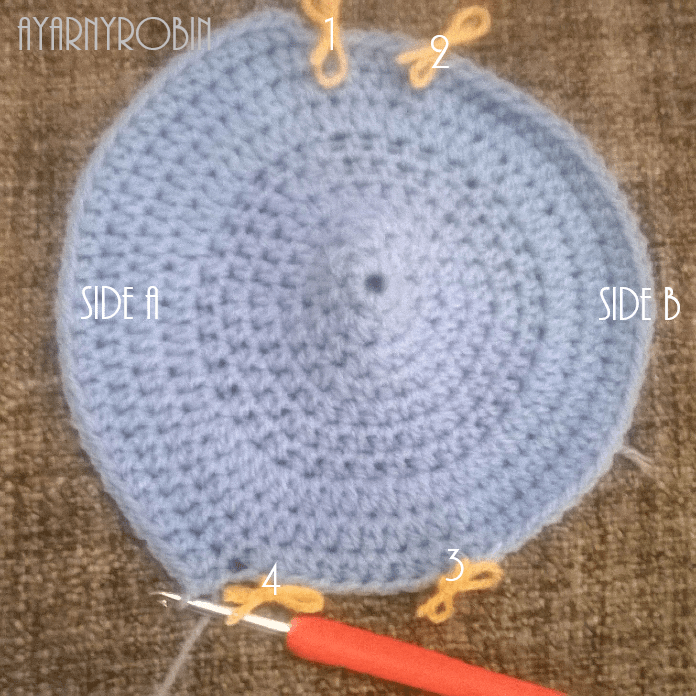
To mark out handle and spout holes, simply take x4 st markers (or cut short pieces of yarn in a different colour as I did) and place/ tie first marker in the st behind where you joined last row.
Counting backwards (or to the right)miss x3 sts and place/tie second marker in next st. This marks out your handle.
From this second marker count backwards (or to the right) 30sts and place 3rd marker in the next st (31st st). Return to the first marker and count forwards 30 sts (or to the left) and place 4th marker in the next st.
You have now marked out the handle and spout positions for your cosy. Marker #1 and #2 indicate the handle space and markers #3 and #4 indicate the spout space.
The next stage of the cosy is to construct the sides. So, for the purposes of the pattern these will be referred to as side A (between marker #1 and #4) and side B between marker #2 and #3).
Side A row 1: In Cream yarn Ch 4 (counts as 1htr and 2ch), miss 2sts *htr in next st, ch2, miss 2sts*
repeat * -* until you reach marker/ tie #4.
NB/ last htr is completed in st marked by marker / tie #4
(x11htr, x10 ch2spaces)
Side A row 2: ch4 (counts as htr and 2 ch) turn work.
Miss 2 sts, *htr in next st, ch2, miss 2 sts*
repeat * – * to end of row, placing last htr in top of ch2.
(x11htr, x10 ch2 spaces).
Side A row 3: We are going to increase the mesh at each end of the row.
Ch 4 ( counts as htr and 2ch, turn work, htr into same st ( increase made), ch2, miss 2sts, *htr in next st, ch2, miss 2 sts*
repeat from * – * til end of row placing htr in ch2 of previous row, ch2, htr in same space (increase made).
(x13htr, x12 ch2 spaces).
Side A row 4: ch 4 (counts as htr and 2ch), turn work, miss 2 sts, *htr in next st, ch2, miss 2sts*
repeat * – * til end of row. (x13htr, x12 ch2 spaces).
Side A row 5 – 15: repeat side A row 4. Fasten off. Side A completed.
Side B: Join cream yarn in st to the left of st marker #2
repeat Side A instructions between markers 2 and 3. Fasten off and sew in all loose ends.
Remove stitch markers.
Place on your teapot to check the fit.
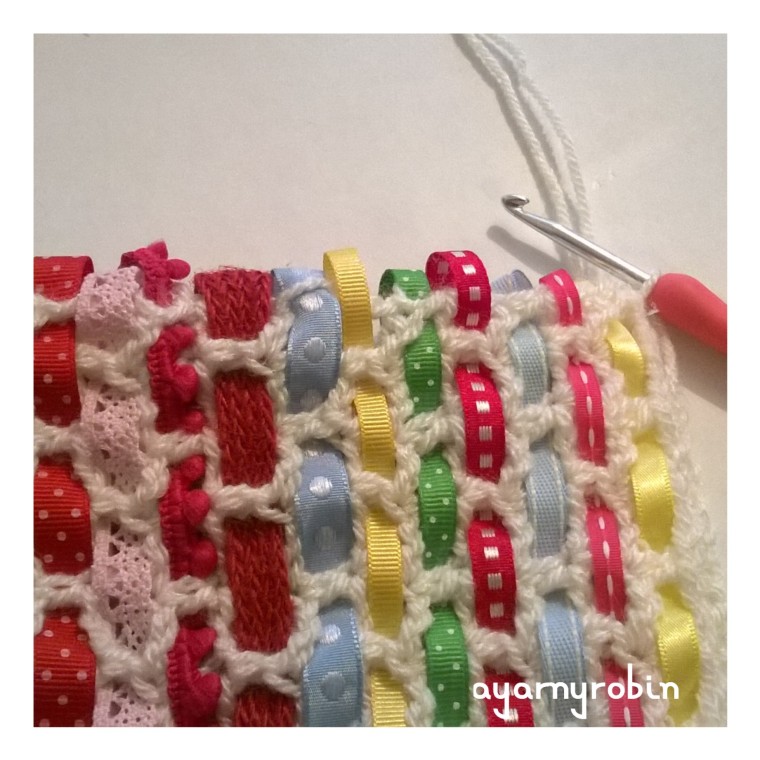
Now for the fun part! Weave the ribbons in and out of the mesh.
weave the ribbons in and out of the mesh…
alternate each row ie, start weaving from under the post on one row and over the post on the next row. NB/ on row 3 you will not need to alternate in order to keep the pattern of covered and exposed posts.
This gives me another idea!!!
Repeat weaving ribbons for both Side A and Side B. Once completed you need to secure the ribbons. I used a hot glue gun to do this but you could just as easily machine sew.
Turn work so that the wrong side is facing upwards and begin by securing the ribbons that end by going behind the post. In the picture below this would be the green ribbon, followed by the blue then the red ribbon. Secure both sides being careful not to pull the ends of the ribbon to tight, you need to allow a little give in the ribbon.
Continue to secure the ribbons in this way. You should now only have ribbons that go over the post left to secure. To do this split the side of the post stitch with your nail and thread through the ribbon. In the photo below the top picture shows the blue ribbon already threaded and the bottom picture shows the red ribbon yet to be threaded with the place for it to be threaded through indicated by the safety pin.
NB/ this can be a bit tricky and may require a wee bit of patience!
Once threaded, secure as before.
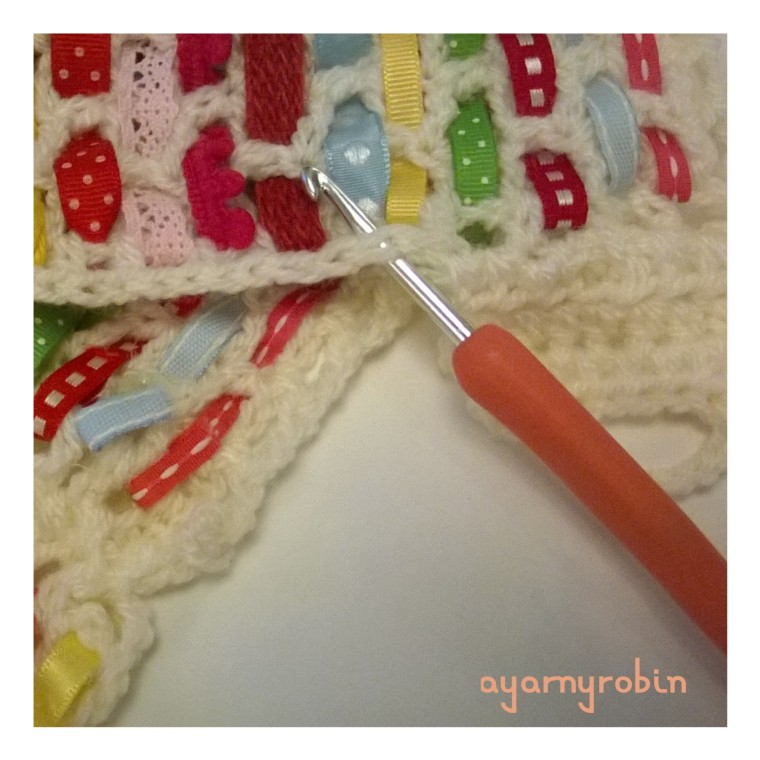
Edging: join cream yarn to the bottom corner (any side).
Ch2 (does not count as a st), htr into same space (to the right side of ribbon), ch1.
NB/The next st is to be placed in between ribbon).
*ch1,htr in between ribbon*
repeat *- * until last ribbon at the top. Don’t worry too much about the ribbon seeming loose at the sides, just keep placing those htr’s between the ribbons! The last htr being placed to the left side of the last ribbon.
Dc in the sts across the lid of the cosy.
Now place htr to right of top ribbon on opposite side,*ch1, htr in between ribbon*.
Repeat * – * to end. Fasten off and weave in ends.
Repeat the whole of the edging process on the other side of the cosy, but do not fasten off as this is where the tab is created..
Tab: To complete the tab ch2 (does not count as st) turn work,
Tab Row 1: *htr in ch sp, htr in next st* repeat * – * x3 more times (8htr in total)
Tab Row 2: ch2 (does not count as a st) turn work, htr in each st along (8htr)
Tab Row 3: repeat Tab Row 2.
Tab Row 4: Turn work, slst in next 2 sts, ch8, miss 4 sts, slst in next 2sts, fasten off and weave in ends.
Attach button centrally on opposite side to tab.
Now to sew handle opening. To do this sew the two edges on opposite side of cosy to tab and button. Sew from bottom up to the 4th or 5th ribbon or until the bottom of your handle.
Finally to neaten the edges around the spout, join cream yarn to st just above the tab.
Ch2, htr in each st around until st just above button, fasten off and weave in ends.
Repeat the process to neaten the edges around the handle, this time joining the cream yarn to any st in the opening for the handle, ch2, htr in each st around, joining with a slst in top of ch2 to finish. Fasten off.
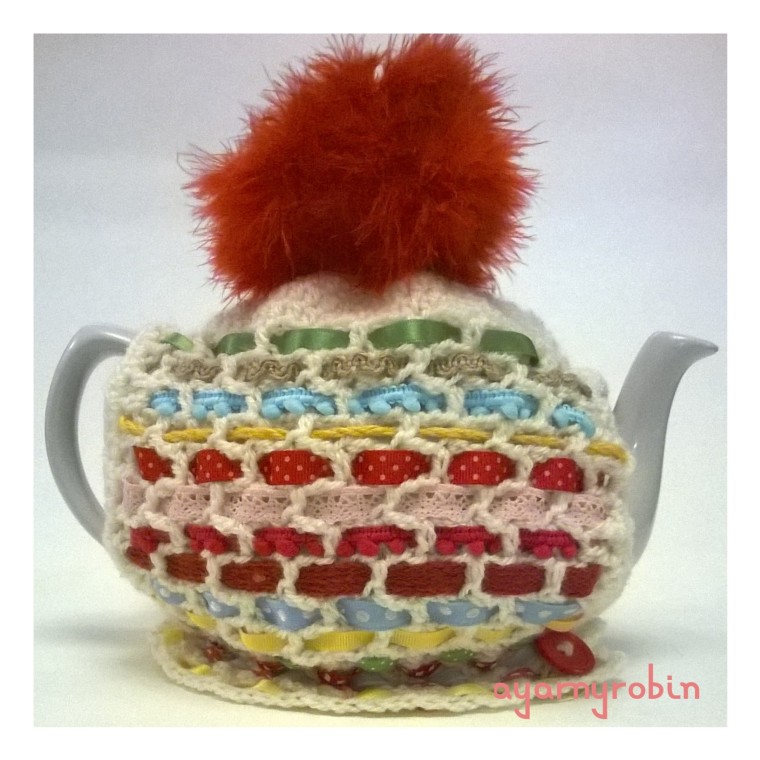
Finally to add the pompom.
Now you could just make a pompom, but I just tied the first part of a bow over and over until I had a fluffy ball.
I threaded some yarn through it and secured it to the top of the tea cosy where it looked rather quite proud.
Et voila! A beautiful tea cosy to warm your brew!
xxxxx
I REALLY HOPE YOU HAVE ENJOYED MAKING THIS PATTERN AS MUCH AS I HAVE ENJOYED CREATING IT FOR YOU. IF YOU ARE NOT SURE ABOUT SOMETHING OR NOTICE ANY ERRORS PLEASE SHOUT UP. EQUALLY PLEASE FEEL FREE TO SHARE YOUR Grandma Florence Tea cosy CREATIONS IN THE COMMENTS BELOW or on social media using the hashtags #ayarnyrobin or @yarnyrobin…I WOULD LOVE TO SEE THEM!
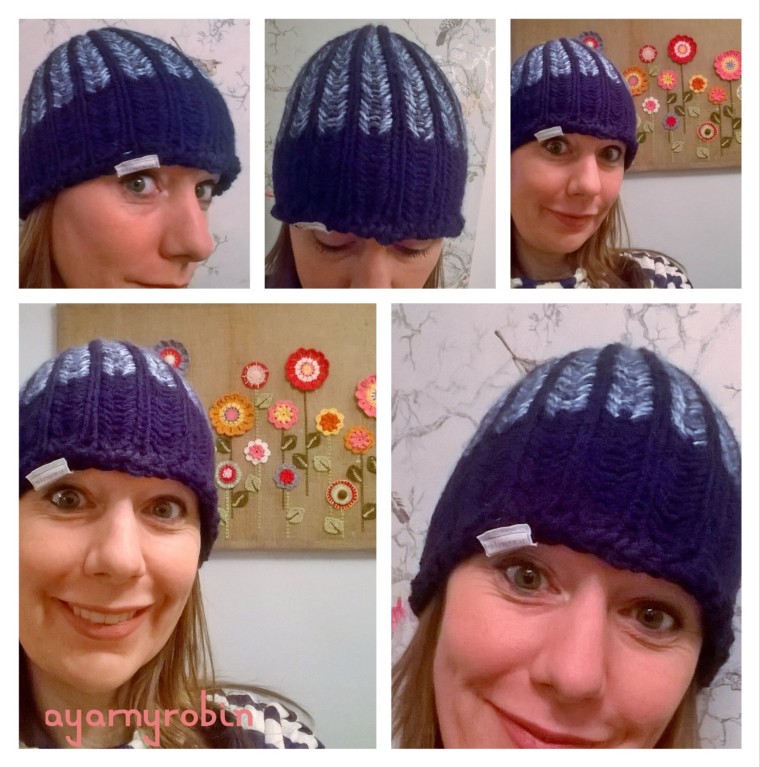
I just wanted to bob in and out quickly to let you know I did it…I got the hat done and this time it fits!
What do you think?
loom knitted beanie…
I am really pleased with it!
I used Stylecraft Special Chunky in Midnight and King Cole Tonal Chunky in Misty Teal this time and this seems to have made all the difference in terms of size and stretch. It still needs to stretch a bit…it is an only just fit, but I am hoping it will stretch a little more as it gets worn. The hats I have made previously have always stretched a bit when worn.
If you are interested in the pattern details the links to such can be found in this post. I modified the brim slightly by adding a row of double crochet to the bottom of the brim once I had taken it off the loom. I found the edge curled outwards otherwise and didn’t lie flat. I think this may have something to do with my cast on technique and being a novice loom knitter!
So there it is… just in time for Christmas!
I would recommend this pattern if you are still outstanding a hand made gift for Christmas…4 hours and I had this knocked out, so there is still time!
Talking of which if you do celebrate this festive season then I wish you a peaceful and very happy Christmas. If you are not celebrating then I wish you a happy and crafty weekend. I will try and pop by before the new year, I’m sure I will feel the need to escape the madness at some point.
I have had some lovely comments and thought putting the pattern for the flower on a separate post might be useful….even though it is so simple, you could hardly call it a pattern!
Maybe inspiration may be a better phrase.
Any how this is what I did.
To make a dotty little flower, ch4, slst to 1st chain to make a ring.
Ch 2 (counts as a hdc) x9 hdc into ring, slst into top of starting ch and fasten off to finish.
To create a real field of flowers cross stitch some centres, add beads to others and save some for a french knot centre. When using beads, just make sure they have large enough centres for the yarn to pass through!
I used a cheat method to create the french knot centre by pulling a piece of yarn from the back of the flower to the front and then tying a knot x10 in the yarn in exactly the same place to make a large knot.
To finish thread the other tail of the yarn from the front to the back, so both tails are now at the back of the flower, tie to secure and trim tails short.
et voila!
A dotty little flower ready to be sewn or glued or attached to whatever your heart desires.
This is the third tea cosy in theGrandma collection,designed with simplicity and sweetness. The top down design means this pattern makes for a quick hook up. Ideal for beginners and sure to guarantee a perfectly sweet cosy for your teapot.Dedicated to the inspiration that was‘Nanna Dot’
The pattern makes a tea cosy that fits a standard 4 cup teapot.
I used less than 50g of Stylecraft special dk yarn in colourways cream and raspberry which I used as my base colours. Please note that I have used a different colour yarn in the photo tutorial below.
I also used scraps of stylecraft special dk yarn in: lipstick, saffron, meadow, fondant, gold, shrimp, lime, khaki and grape.
You will also need a darning needle, a selection of beads with a centre hole wide enough for the dk yarn to be threaded through, a pair of scissors and x4 stitch markers (or small safety pins or scraps of different colour yarn). The use of a hot glue gun is optional, flowers can either be glued into position or stitched.
Stitches used in this pattern refer to English terminology, however a conversion to US terminology is provided in brackets.
Ch – chain stitch
slst – slip stitch
hdc– half double crochet (half single crochet)
You will also need:
a 4mm crochet hook
Ok, here we go…
Using the raspberry yarn Ch 4
Join with a slst to form a ring.
Row 1: Ch1 (does not count as a st), 6hdc into ring,
finish with a slst in 1st hdc. (6hdc).
Row 2: Ch1, (does not count as a st) 2hdc in same space, 2hdc in each st around, finish with a slst in 1st hdc. (12hdc).
Row 3: Ch1 (does not count as a st), 2hdc in same space, 1hdc in next st, *2hdc in next st, 1hdc in next st* . Repeat * – * to end, finish with a slst in 1st hdc. (18hdc).
Rows 4: Ch 1 (does not count as a st), 2hdc in same space, 1hdc in next 2 sts, *2hdc in next st, 1hdc in next 2 sts*. Repeat *-* to end,finish with a slst in 1st hdc. (24hdc).
Row 5: Ch1 (does not count as st), 2hdc in same space, 1hdc in next 3 sts, *2hdc in next st, 1hdc in next 3 sts*. Repeat *-* to end, finish with a slst in 1st hdc. (30hdc).
Row 6: Ch 1 (does not count as a st), 2hdc in same space, 1hdc in next 4 sts, *2hdcin next st, 1hdc in next 4 sts*. Repeat *-* to end, finish with a slst in 1st hdc. (36hdc).
Row 7: ch1 ( does not count as a st), 1hdc in same space and in each st around, finish with a slst in 1st hdc. (36hdc).
Row 8: ch1 (does not count as a st), 2hdc in same space andin each st around, finish with a slst in 1st hdc. (72hdc).
Row 9 and 10: Repeat row 7, finish with a slst in 1st hdc. (72hdc).
You should have something that is starting to look a bit like a flying saucer! This is a good point to check your measurements with your intended teapot. Place your hooked disc on top of your teapot. You want the edges of the circle to be approx. 1cm from the handle of the teapot.
To mark out handle and spout holes, simply take x4 st markers (or cut short pieces of yarn in a different colour as I did) and place/ tie first marker in the st behind where you joined last row.
Counting backwards (or to the right)miss x3 sts and place/tie second marker in next st. This marks out your handle.
From this second marker count backwards (or to the right) 30sts and place 3rd marker in the next st (31st st). Return to the first marker and count forwards 30 sts (or to the left) and place 4th marker in the next st.
You have now marked out the handle and spout positions for your cosy. Marker 1 and 2 indicate the handle space and markers 3 and 4 indicate the spout space.
The next stage of the cosy is to construct the sides. So, for the purposes of the pattern these will be referred to as side A (between marker 1 and 4) and side B between marker 2 and 3).
Side A row 1: In Cream yarn Ch 1(does not count as a st)* 1hdc in same st and in each st along to marker/tie 4, ch1, turn*
Side A row 2: repeat Side A row 1 returning to marker/tie 1.
Repeat (side A row 1 and side A row 2), to fit the height of your teapot. I completed 15 rows in total. Fasten off.
To complete side B, join cream yarn in stitch to the left of stitch marker number 2
repeat Side A instructions between markers 2 and 3. Fasten off and sew in all loose ends.
Remove stitch markers.
Place on your teapot to check the fit.
Next, using a darning needle sew sides A and B together from the bottom of the cosy to below the spout (approx. 2 rows) and on the handle side from the bottom of the cosy to below the handle.
Now for the creative part… making ‘dotty little crochet flowers’. I made x4 flowers in each of the following colours:
lipstick, fondant, grape, gold, raspberry, saffron and shrimp
A dotty little flower
To make a ‘dotty little flower’ ch4, slst to 1st chain to make a ring. Ch 2 (counts as a hdc) x9 hdc into ring, slst into top of starting ch and fasten off to finish.
To create flower centres you can cross stitch the centre, add beads and create a french knot centre.
I used a cheat method to create the french knot centre by pulling a piece of yarn from the back of the flower to the front and then tying a knot x10 in the yarn in exactly the same place to make a large knot.
To finish thread the other tail of the yarn from the front to the back, so both tails are now at the back of the flower, tie to secure and trim tails short.
Secure your dotty little flowers to both sides of the cosy. You can sew them into place or secure them with hot glue! Then using green yarns sew simple stems and leaves using a back stitch to finish. I used stylecraft special DK yarn in meadow, khaki andlime.
And there you have it…a sweet dotty flower tea cosy to keep your brew warm.
xxxxx
I REALLY HOPE YOU HAVE ENJOYED MAKING THIS PATTERN AS MUCH AS I HAVE ENJOYED CREATING IT FOR YOU. IF YOU ARE NOT SURE ABOUT SOMETHING OR NOTICE ANY ERRORS PLEASE SHOUT UP. EQUALLY PLEASE FEEL FREE TO SHARE YOUR DOTTY FLOWER CREATIONS IN THE COMMENTS BELOW oron social media using the hashtags #ayarnyrobin or @yarnyrobin…I WOULD LOVE TO SEE THEM!


 This is the fifth tea cosy in the


 In addition to these colours I will also be using Graphite (charcoal grey) and Gold and possibly candyfloss pink…I am still undecided about the candyfloss…mmm…we’ll see…What do you think?