
Tag: pattern

Handmade home…
Day 20 of
#yarnlovechallenge
and it’s still not too late join in.
The theme for today is ‘handmade home’.
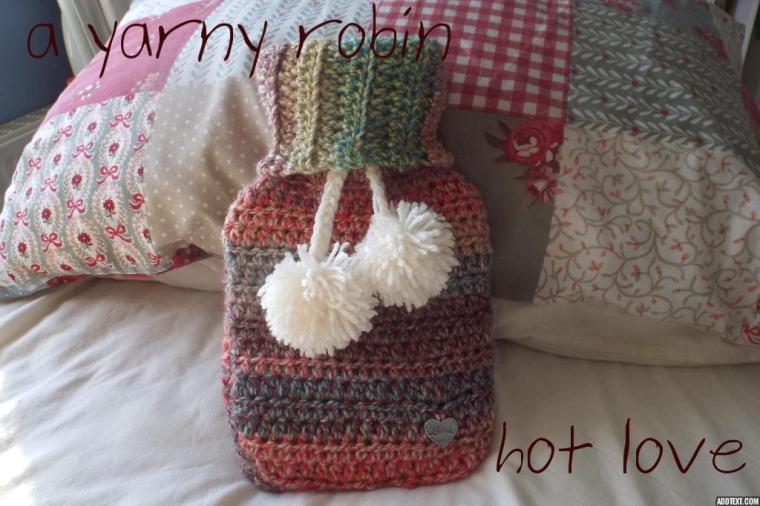
I love this hot water bottle cover and it’s an easy hook too…
a warm yarny cuddle guaranteed!
xxxxx
Share this:

Stripes
Day 7 of
#yarnlovechallenge
it’s not too late join in.
Theme for today is….
Stripes.

This is my Granny Mabel Tea Cosy, click the link for the free pattern.
I’ve chosen this tea cosy for stripes day, as these slim, pretty stripes sit amongst delicate lace, topped by an array of buttons.
This tea cosy makes me happy everyday.
xxxxx
Share this:


Serendipity…
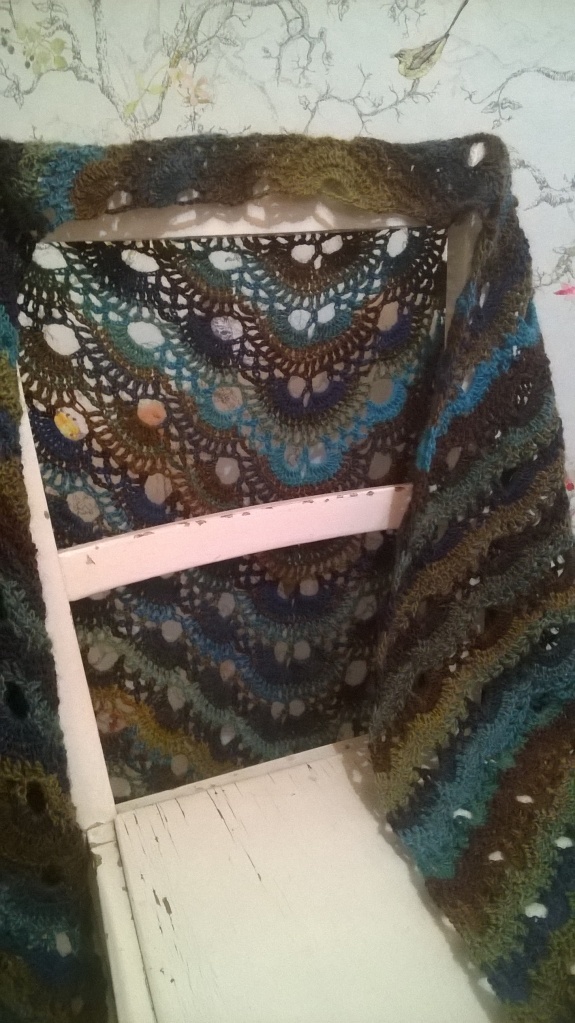
I am addicted to shawls…It’s official!

As soon as the chocolate peacock virus shawl was off my hook, I was chaining this little beauty…
 The pattern is called ‘pink shawl’ by Cecile Balladino, available in Simply Crochet issue 31.

The pattern is a sumptuous mix of shells and popcorns and I absolutely loved hooking this shawl . It was not mindless hooking however, even though it is only a six row repeat, I had to keep count and keep note of where exactly I was in the pattern. Having said that, if you keep track the pattern is easy enough to follow and makes up quickly. Each time it came to hooking those scrumptious popcorn stitches my heart swelled with delirious satisfaction.

The yarn I have chosen is clearly not pink, and it is for this reason that I am slightly disappointed with the shawls name… ‘pink shawl’. I am often drawn to patterns by their names alone and this shawls name does not do it justice. At the very least it deserves a name that is pretty or elaborate.

That tiny twinge of disappointment however, is consumed with pure delight in this yarn. The yarn is the most beautifully soft cotton mix I have ever had the pleasure of running through my fingers and I happened upon it by happy accident.

I found it at the bottom of a bargain bin in my local yarn store, buried underneath some very unattractive yarn. It was marked at just 50 pence a ball. So I scrambled through the bin and found seven 50g balls. I paid £3.50 at the till in haste and left before the very lovely lady realised what she had just sold for so little.
Further serendipity ensured it was just enough yarn for this shawl too. I have used 325g of yarn for this shawl, although the pattern states 150g. This yarn was a dream to hook with, it slid with ease over my hook and did not split at all. It also has a very pretty lustre.
I think my shawl is a lot larger than the pattern, despite using the same weight yarn and hook size. The yarn suggested in the pattern is silk based whereas I have hooked with a Patons 45% cotton mix yarn.

But, I am extremely pleased with my shawls size, it is a real beauty to snuggle in and the cotton mix ensures the textured popcorns drape wonderfully.
I will most certainly be hooking with this yarn again, even if I have to pay full price and I will most certainly be checking out the bottom of more bargain bins!
My Serendipity shawl…well I couldn’t call it ‘The Pink Shawl’
could I!
xxxxx
Share this:


I’ve Caught the Virus
The Virus Shawl bug, that is.
The yarn is Scheepjes Invicta Colour – 972, a 4 ply fingering weight yarn that is 75% wool and 25% polyamide. The colour way is just gorgeous and the yarn was easy to hook with. Occasionally the length of yarn withered thin, but remained usable nonetheless.
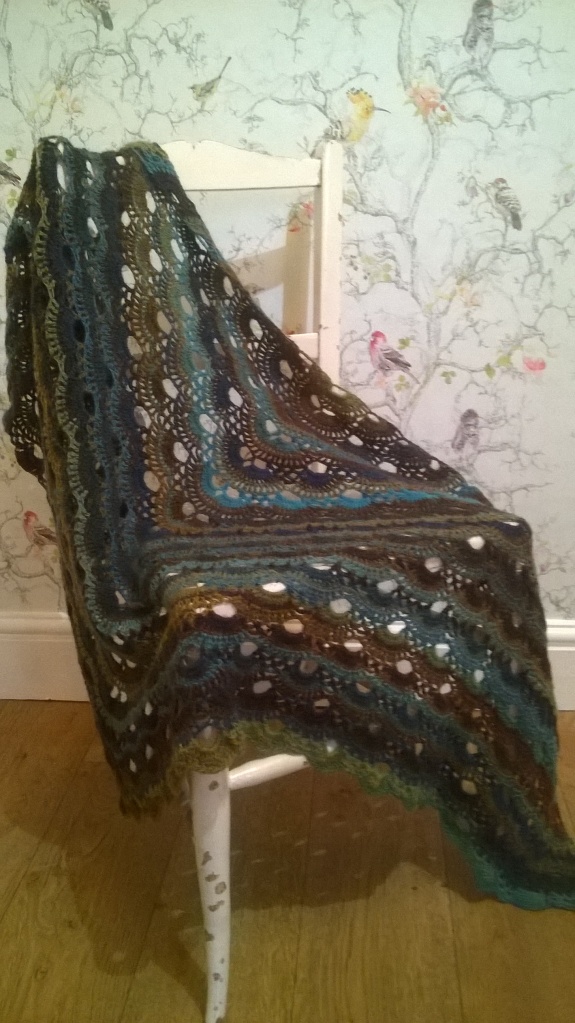
I adored the long colour repeats from turquoise blue into chocolate brown and sage green and couldn’t help get excited each time the colour change slipped over my hook…I don’t think I will ever get bored with the delight a colour changing yarn gives.

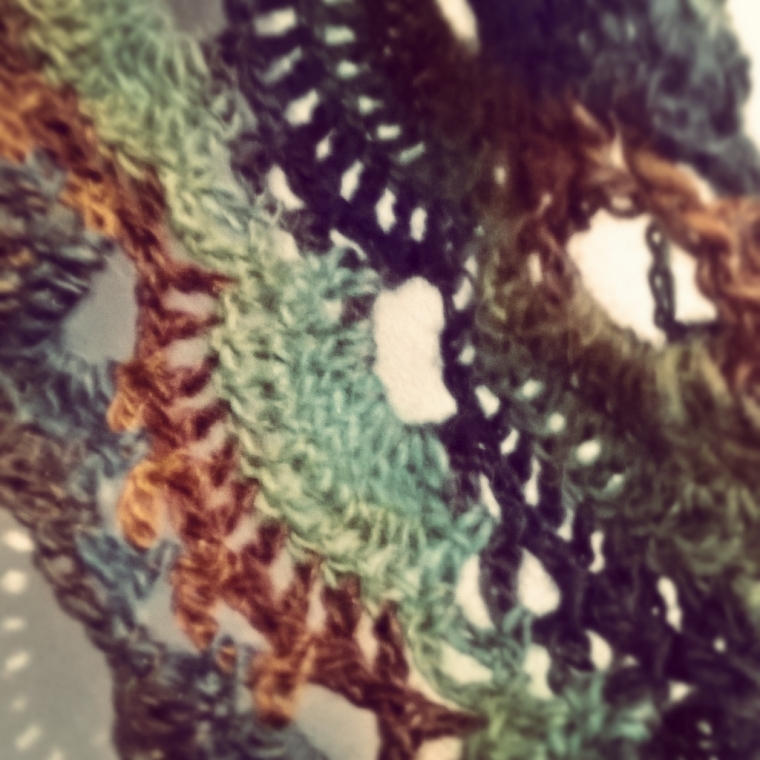
The eyelets that form in sequenced linear fashion amazed me. I couldn’t quite believe that a few trebles could create such a beautiful drape and fabric. They reminded me so much of a peacocks tail feather that I had to name this virus shawl The Chocolate Peacock!
 All in all a beautiful hook up made all the more simple by following a youtube tutorial of which there are several, I really liked this one though
This pattern is all over the internet, I used this one on Ravelry as a free download.
As for the yarn would I use it again…

yes, to make another virus shawl of course, but this time in beautiful sunset shades (colourway 959).
I may possibly have developed a shawl addiction.
xxxxx
Share this:


Grandma Mabel Tea Cosy…Free Pattern.
 This is the second tea cosy in the Grandma collection, designed with a slight twist on an original theme to keep your teapot well dressed and looking fine. It is fun and frilly and a little OTT… but that’s what I love…
Dedicated to the inspiration that was ‘Mabel‘

The pattern makes a tea cosy that fits a standard 4 cup teapot.
I used just under 50g of Stylecraft special dk yarn in colourway duck egg, lipstick, saffron, meadow, candyfloss and cloud.
You will also need approximately 40 buttons in similar colours and of all different sizes which were languishing in my button jar.
Stitches used in this pattern refer to English terminology, however a conversion to US terminology is provided in brackets.
Ch – chain stitch
slst – slip stitch
dc – double crochet ( single crochet)
dc tog – double crochet together (single crochet together)
You will also need:
a 4mm hook
a darning needle
scraps of yarn to use as temporary tie markers
a stitch marker
approximately 120cms of lace about 3cms wide
Top Tip: safety pins make excellent stitch markers!
Ok, here we go…
Using meadow Ch 80 and join with a slst to form a circle (before completing the slst make sure chain is not twisted).

It is a good idea to check at this point that the circle of chains fits around your teapot. (see end of pattern for instructions about adjusting pattern).
Row 1: Ch1 (mark with a stitch marker, does not count as a dc), dc in each ch around,
finish with a slst in ch marked with a stitch marker taking care that work is not twisted when completing the slst. (80dc).

Row 2: Ch1 (remove stitch marker from previous row and place in this ch, does not count as a dc)
Dc in each st around, finishing with a slst in ch marked with a stitch marker. (80 dc).
Rows 3: repeat row 2, before joining with a slst in ch marked with st marker (ie/ when you have the last 2 loops on your hook of the last st of the round – see photo)

join the lipstick (red) yarn and finish with a slst as shown below

Rows 4 – 6: repeat row 2
 We are now going to place a tie marker (a temporary mark) to indicate the space for the handle hole. Before you start the next row, take a small scrap of yarn in a contrasting colour and thread through st marked with the stitch marker. Tie a bow.
Row 7: Ch1 (remove st marker from previous row and place in this ch, does not count as dc), slst in the same st as the tie marker and in next 4 sts, mark this last slst with a second tie marker. This indicates the space for hole for the handle.

1dc in next 75sts around to stitch marker. On 75th dc (last st)change to candyfloss (pink yarn) ie/ when last 2 loops on hook of the last dc as before. Finish st with pink yarn, slstinto ch marked with st marker (75dc, 5 slst).


Row 8: Ch 1 (counts as a dc), turn work, 1dc in next 74sts (this row should finish in the st above the st marked with the tie marker in the previous round.

Row 9: ch1 (counts as a dc) turn work, dc in next 74sts (75sts in total). Change to sky blue yarn in last dc.
Row 10: ch1 (counts as a dc) turn work, dc in next 74 sts (75sts in total).

Row 11: Repeat row 9, changing to saffron (yellow yarn) in last dc. Row 12: (saffron) Repeat row 9.
Row 13: Repeat row 9, changing to duck egg yarn in last dc.
Row 14: ch1 (counts as dc), turn work, dc in next 19sts, slst in next 35sts, dcin next 20sts (40dc, 35slst, 75sts in total).
Row 15: Repeat row 14.
 Row 16: ch1 (counts as a dc), turn work, dc in next 19sts, dctogin next st (sts 21 and 22), slst in next 31sts, dctog in next st, dcin next 20sts (42dc, 31slst = 73sts in total).
Row 17: ch1 (counts as a dc) turn work, dc in next 20sts, slst in next 31sts, dc in next 21sts (73sts in total).
Row 18: ch1 (counts as a dc), turn work, dc in next 19sts, dctog in next st (sts 21 and 22), slst in next 29sts, dctog in next st, dc in next 20sts (42dc, 29slst = 71sts in total).
Row 19: ch1 (counts as a dc), turn work, dc in next 20sts, slst in next 29sts, dc in next 21sts (71sts in total). It should be starting to look a little something like this…

Row 20: Ch1 (counts as a dc) turn work, dc in next 19sts dctog in next st (sts 21 & 22), slst in next 27sts, dctog in next st, dc in next 20sts (42dc, 27slst = 69sts).
Row 21: Ch1 (counts as a dc), turn work, dcin next 20sts, slst in next 27sts, dc in next 21sts (42dc, 27 slst = 69sts).
Row 22: Ch1 (counts as a dc), turn work, dc in next 19sts, dctog in next st (sts 21 & 22), dctog in next st (sts 23 & 24), dc in next 21sts, dctog in next st, dctog in next st, dc in next 20sts (65sts).

Your cosy should be starting to take shape now!
Row 23: Ch1 (counts as a dc), turn, dc in next 19 sts,dctog in next st (sts 21 & 22), dc tog in next st (sts 23 & 24),dc in next 17sts, dctog in next st, dctog in next st, dc in next 20sts (61sts).
We return to working in the round in the next row.
Row 24: Ch1 (counts as a dc) – mark with a st marker, turn, dc in next 2sts, dctog in next st, *dc in next 3sts,dctog in next st*, repeat * -* around, finishing with 1dc in last st, ch3 and slst into st marked with stitch marker.

Row 25: Ch1 (remove st marker from previous row and place in this ch, counts as a dc), dc in each st around, finishing with a slst in ch marked with stitch marker (52dc).
Row 26: Ch1 (remove st marker from previous row and place in this ch, counts as a dc), dc in next st, dctog in next st, *dc in next 2 sts, dctog in next st* repeat *-* around, finishing with dctog, slst in ch marked with stitch marker (39dc).
Row 27: Ch1 (remove st marker from previous row and place in this ch, counts as a dc), dc in each st around, finishing with a slst in ch marked with a stitch marker (39dc).
Row 28: Ch1 (remove st marker from previous row and place in this ch, counts as a dc), dctoginnext st, *dc in next st, dctog in next st* repeat *-* around, finishing with a dctog, slst in ch marked with a stitch marker (26dc).
Row 29: Ch1 (remove st marker from previous row and place in this ch, counts as a dc), dc in each st around, finishing with a slst in ch marked with a stitch marker (26dc).
Row 30: Ch1 (remove st marker from previous row and place in this ch, DOES NOT COUNT AS A DC), *dctog in next st*, repeat *-* around, finishing with a dctog, slst in ch marked with a stitch marker (12dc).
Row 31: Repeat row 30 (6dc)
 Leaving a small hole, fasten off and weave in ends. The little hole allows for the knob of the teapot lid to poke through and helps to keep the cosy positioned on teapot.

Now hand sew on buttons of all different sizes.

Next hand sew on the lace with a simple running stitch.


I used meadow yarn for the lace at the bottom of the cosy and duck egg yarn for the lace around the buttons.


Just one last thing left to do now. Boil the kettle and make a brew…enjoy and admire.
xxxxx
Grandma Mabel Tea Cosy part of the Grandma Collection ©2016 designed by Nicola Florence @ayarnyrobin
Share this:

Introducing the Grandma Mabel Tea Cosy…
I am thrilled to be finally introducing the ‘Grandma Mabel’ tea cosy to you. The second cosy in the Grandma Collection

Dedicated to my Granny Mabel, whom I knew as Granny Jason. Granny Jason was named so by myself when I was still in terry towel nappies. Named after her dog Jason, it was my way of distinguishing between my two Grannies.
Granny Jason was born in August 1914 in Southern Ireland and in her younger days enjoyed driving tractors. Moving to England in 1960 when my Mom was a little girl, she worked in factories and finally as an Auxillary Nurse before she became too unwell to work. I was privileged to have had her in my life for just 10 years before she left this world at the age of 73.
I have precious memories of my Granny Jason, who although unwell always found a way of making me feel loved. She was a humble and unassuming woman, who was always busy in the kitchen and always had her hair done and was house proud. She would always give you the best of what she had and keep the worn out and old things for herself.
She loved shoes and made daisy chains and made the dog (Jason) a cup of tea with a sugar in, poured into his bowl, each time she made my Grandad a cup of tea…which was often!

Granny Jason was often unwell, seriously now I realise as I am older, but she tried hard not to let it show. I remember as a small child counting her tablets into a big medicine jar. There were all sorts of pills; round ones, oblong ones and all sorts of colours…
I loved this job…
maybe it was the beginning of my fascination with public health and my nursing career.
But I think family was the most important thing to her, because she cared so much about her family and cared so well.

This cosy has been inspired by my memories of her. The buttons representing those many colourful pills that I used to count, not understanding the gravity of how poorly she really was. The pretty colours of the cosy reflecting her beauty and the lace representing the finest dress a tea cosy could have.

I know Granny Jason would have been proud to put this cosy on her teapot, to put that teapot on her hostess trolley and wheel it from the kitchen to serve her guests.

So that is the Grandma Mabel tea cosy in all of its glory, I will post the pattern in the week.
xxxxx
Share this:


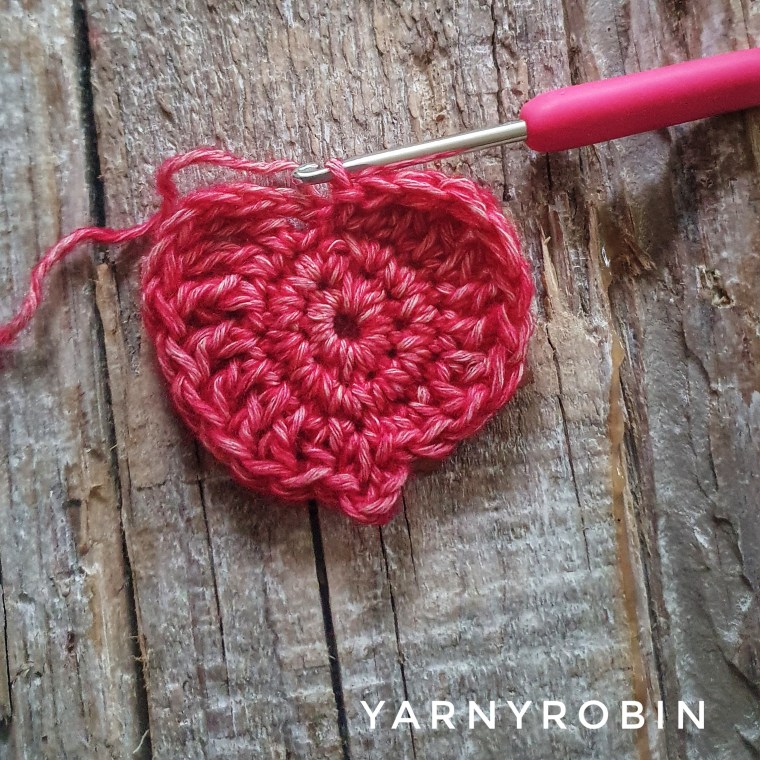
A yarny little heart…free pattern.
My hands have been yearning to hook in the evenings lately; but the projects I have on the go at the moment (which have to remain secret at least until after Christmas) are rather more intricate than I dare attempt at such an hour where I am prone to the odd gin and tonic or two as well as a little snooze.
So whilst creating numerous chains the other evening…see here . I found myself hooking up a yarny little heart with not a care of the process noted down at all.

Fast forward a couple of evenings later when the nest was still and quiet, I found myself unable to sleep, thinking of creative yarny possibilities and my yarny little heart began to trouble me.
So, I found myself unpicking my heart and writing down the pattern and my world was well again.
So here is my pattern for a ‘yarny little heart’.
This little heart is a great stash busting hook up as it only requires scraps.
You will need:
scraps of yarn, I used baby / sport weight…but you can use what you have. The thicker the yarn the bigger the hearts.
3.5mm hook, (or hook size to suit your yarn choice)
darning needle to weave in the ends.
Abbreviations used UK terminology (American terminology in brackets)
Ch – chain,
slst – slip stitch,
dc – double crochet (single crochet)
htr – half treble (half double crochet)
tr – treble (double crochet)
dtr – double treble crochet ( treble )
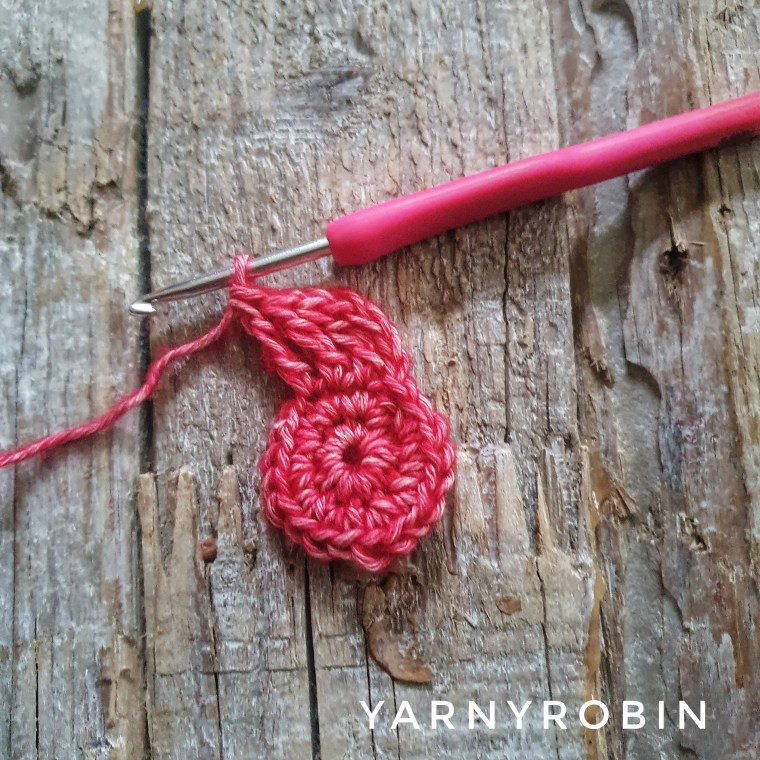
Begin with ch2
Round 1: 10dc into 2nd ch from hook (10dc).
Turn circle over and give the tail end a firm tug…this should pull the centre of the circle into a more closed position.
Turn back over.
Round 2:
Ch 1, 2dc in each st around (20dc)

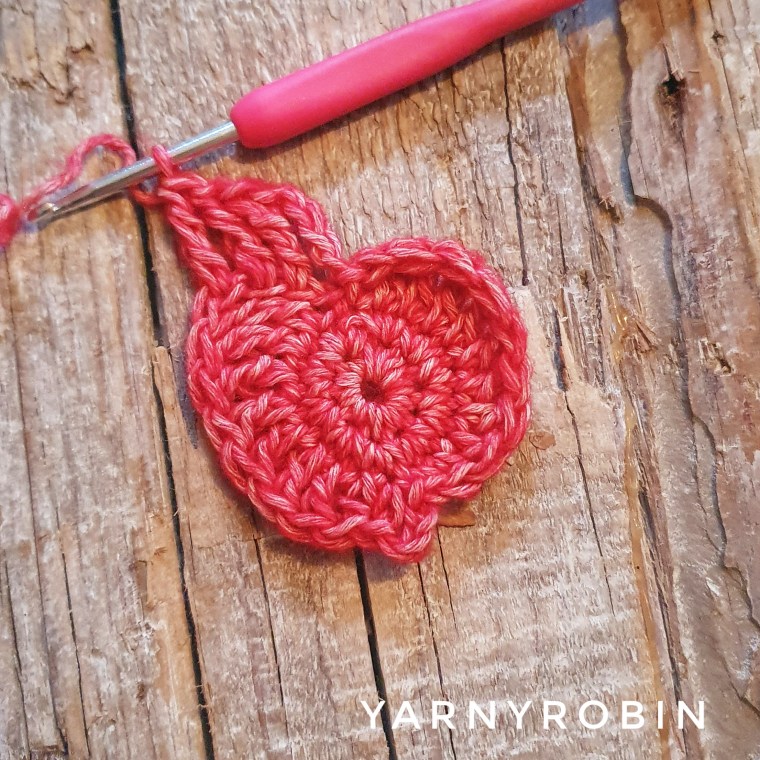
Round 3:
Ch4 (counts as a dtr), 1dtr in the next 3 sts,
1tr in next 4sts,

1htr in next st, dc in next st,
ch3, slst into same space (this creates a picot),

dc in next st, 1htr in next st,
1tr in next 4 sts,
1dtr in next 4 sts, slst in to ch1 of beginning ch4.
Round 4: ch4 (counts as a dtr),
3dtr into next 3sts (these are actually the chains from previous round)
1tr in next 3 sts, 1htr into the next st, 1dc in next 4sts,
Slst in picot space
ch3, slst in to same space (picot made)
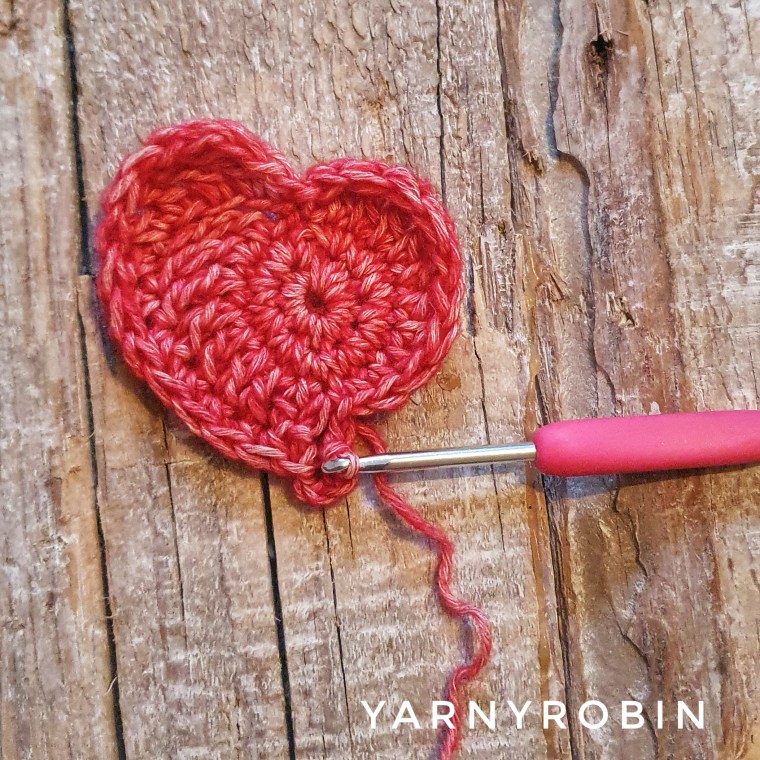
1dc in next 4 sts,1htr in next st, 1tr in next 3 sts, 1dtr in next 4sts,
slst in to the cleft of the heart
Fasten off and leave a long tail if you are going to sew it onto another project as a decoration, or weave in the ends.
Repeat until your hearts content.
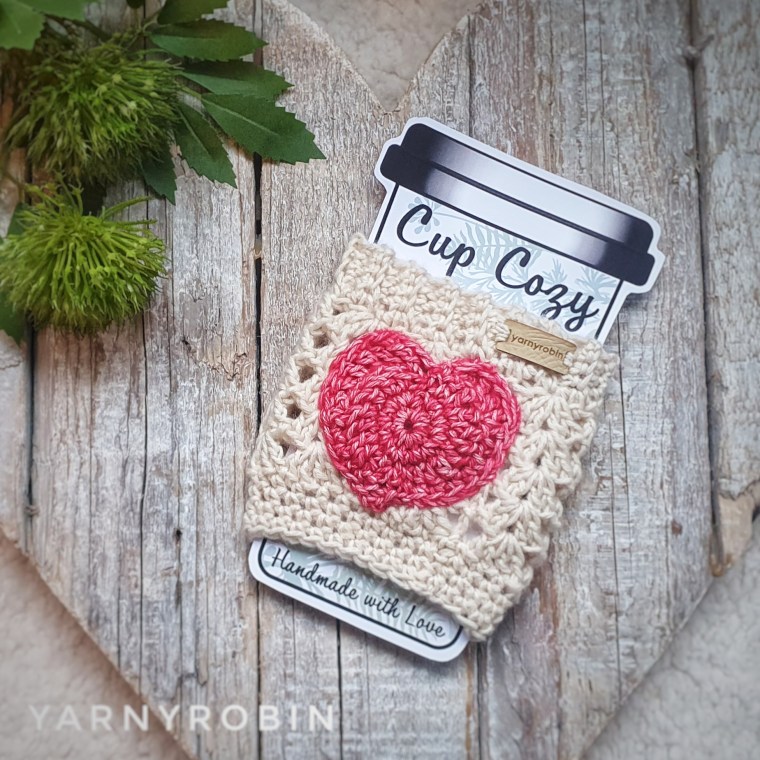
My Galentines cup cosy pattern uses this heart and the cosy pattern can be found for free just here.
xxxxx
A yarny little heart ©2016 designed by Nicola Florence @ayarnyrobin
Share this:


Grandma Mary Tea Cosy Pattern
This is a very pretty tea cosy, perfect for keeping your teapot dressed in style and your tea hot. It is the first of a series of tea cosies which make up the Grandma collection.

Dedicated to the inspiration that was ‘Mary’ the pattern has flowers made on a small flower loom, which are inexpensive to buy and relatively easy to use. I purchased mine for about £3.

The pattern makes a tea cosy that fits a standard 4 cup teapot
I used just under 50g of Rico baby classic dk yarn in colourway (026)

and scraps of yarn.
I used scraps of stylecraft special dk in the following colourway (nb/the mint is Stylecraft life dk)

Stitches used in this pattern refer to English terminology, however a conversion to US terminology is provided in brackets.
Ch – chain stitch
slst – slip stitch
dc – double crochet ( single crochet)
dc tog – double crochet together (single crochet together)
You will also need:
a small flower loom
a 4mm hook
a darning needle
scraps of yarn to use as temporary tie markers
scraps of yarn to make flowers
a string of beads 50cms long
50cms of lace 0.5cms broad
a stitch marker
Top Tip: safety pins make excellent stitch markers!
Ok, here we go…
Ch 80 and join with a slst to form a circle (before completing the slst make sure chain is not twisted).
 It is a good idea to check at this point that the circle of chains fits around your teapot. (see end of pattern for instructions about adjusting pattern).
Row 1: Ch1 (mark with a stitch marker, does not count as a dc), dc in each ch around

finish with a slst in ch marked with a stitch marker taking care that work is not twisted when completing the slst. (80dc).
Row 2: Ch1 (remove stitch marker from previous row and place in this ch, does not count as a dc)
 Dc in each st around, finishing with a slst in ch marked with a stitch marker. (80 dc).
Rows 3 – 5: repeat row 2
 Row 6: Ch 1 (remove st marker from previous row and place in this ch, does not count as a dc), 1dc in next 14sts, mark next st with a tie marker (different colour yarn which will be removed later – I just tied a bow in red yarn!) see picture below.
 slst in same st as tie marker and in next 6 sts and mark last slst with a second tie marker as shown in the picture above. This is where the spout hole starts!
1dc in next 33sts, mark next st with a third tie marker, slst in same st as tie marker and in next 4 sts, mark the last slst with a fourth tie marker. This is where the hole for the handle starts!
1dc in next 21 sts, slst in ch marked with a stitch marker. (35dc, 7slst, 33dc, 5slst). Fasten off.

This next part of the pattern is worked in rows as side (a) and side (b) and forms the sides of the cosy.
So let’s do side (a) first…
Row 7a: Join yarn in st next to the 4th tie marker and to the right hand side of the stitch marker
ch1 (does not count as a dc), 1dc in next 35 sts to next tie marker, turn.
Row 8a: ch1 (does not count as a dc), 1dc in next 35sts to tie marker, turn.
Rows 9a – 25a: repeat row 8a, fasten off.
 OK, now let’s do side (b). Turn over work and join yarn in st next to second tie marker on the right as shown.
 Row 7b: ch1 (does not count as a dc), 1dc in next 33 sts to next tie marker, turn.
Row 8b: ch1 (does not count as a dc), 1dc in next 33 sts to next tie marker, turn. Rows 9b – 24b: repeat row 8b.

Row 25b: ch1 (does not count as a dc), 1dc in next 33sts to next tie marker, ch5,
slst into 1st st on row 25a as shown.

 Again, this is a good point to check the cosies fit on your tea pot. We return to working in the round again now.
So Row 26: Ch1 (mark with a stitch marker…NB/ this ch does count as a dc), dc in next 34sts, ch7,
 dc in next 33sts,
 dc in next ch5, slst into ch marked by stitch marker. (80dc).

Row 27: ch1 (remove stitch marker from previous row and place stitch marker in this ch, counts as a dc), dc in next 34sts, dc in next 7chs
 dc in next 38sts, slst in ch marked with the stitch marker. (80dc)

 It is now time to start decreasing the number of stitches to form the top of the cosy. To do this a dc tog stitch is introduced. Top Tip: each row that uses dc tog stitches finishes on a dc tog before slst in to ch marked with st marker! Here we go…
Row 29: ch1 (remove stitch marker from previous row and place in this ch, counts as a dc), dc in next 5sts, dc tog in next st, *dc in next 6sts, dc tog in next st*
repeat * -* around,
finish with a slst in ch marked with stitch marker. (72dc).
 Row 30: ch1 (remove stitch marker from previous row and place in this ch, counts as a dc), dc in each st around, finishing with a slst in ch marked with stitch marker. (72dc).
Row 31: ch1 (remove stitch marker from previous row and place in this ch, counts as a dc), dc in next 3 sts, dc tog in next st,
* dc in next 4 sts, dc tog in next st *, repeat *-* around,
finishing with a slst in ch marked with stitch marker. (60dc).
Row 32: ch1 (remove stitch marker from previous row and place in this ch, counts as a dc), dc in each st around,
finishing with a slst in ch marked with stitch marker. (60dc).
Row 33: ch1 (remove stitch marker from previous row and place in this ch, counts as a dc), dc in next 2sts, dc tog in next st, * dc in next 3sts, dc tog in next st *, repeat *-* around,
finishing with a slst in ch marked with stitch marker. (48dc).

Row 34: ch1 (remove stitch marker from previous row and place in this ch, counts as dc),
dc in each st around, finishing with a slst in ch marked with stitch marker. (48dc).
Row 35: ch1 (remove stitch marker from previous row and place in this ch, counts as dc), dc in next st, dc tog in next st,
* dc in next 2 sts, dc tog in next st *, repeat *-* around, finishing with a slst in ch marked with stitch marker. (36dc).
Row 36: ch1 (remove stitch marker from previous row and place in this ch, counts as dc), dc in each stitch around, finishing with a slst in ch marked with stitch marker. (36dc).
Row 37: ch1 (remove stitch marker from previous row and place in this ch, counts as dc), dc tog in next st,
* dc in next st, dc tog in next st *
repeat *-* around, finishing with slst in ch marked with stitch marker. (24dc).
 Row 38: ch1 (remove stitch marker from previous row and place in this ch, counts as dc), dc in each st around, finish by slst into ch marked with stitch marker. (24dc).
Row 39:ch1 (remove stitch marker from previous row and place in this ch, counts as dc), dc tog in next st,
* dc tog in next st * repeat *-* around, finish with a slst in ch marked by stitch marker. (12dc).
Row 40:repeat row 39 (6dc).
Row 41: repeat row 39 (3dc). Fasten off.
 You should have something that resembles the above …now its time to make the flowers!!!
If you don’t know how to make loom flowers they are simple to make. I highly recommend you watch a tutorial…I found this one excellent…
loom bloom video tutorial

Make
x8 white / violet flowers
x10 raspberry flowers
x9 pale rose / plum flowers
all flowers to have the same colour centre…I used mint. Leave long tails on each flower to make attaching them easier.
Keep back x1 raspberry, x1 white, x1 pale rose and x1 plum flower.
Begin to attach the rest of the flowers to the top of the tea cosy using the long tails and darning needle.
 Continue around

Evenly attaching the flowers…
 Once attached turn tea cosy inside out and tie of all loose ends

Snipping to make tidy.

Next, take the lace. Turning the tea cosy inside out tack the lace around the edge of the opening for the spout and the handle.


Turn, the cosy back to the right side; you should now have a cosy that is beginning to look very pretty indeed…

Taking the string of beads, thread a darning needle with some raspberry coloured yarn and tie a large knot.

Starting at the bottom side of the handle hole pull the needle through from the inside of the cosy to the outside so that the knot cannot be seen.

Begin to tack between each bead, fixing them in a line around the cosy towards the spout hole.
 Once at the spout hole, snip the beads, turn cosy over and repeat on side b.
 Finally, attach raspberry coloured flower at the bottom of the handle hole in the space between the beads.

 Attach remaining white, pale rose and plum flower in space between the beads at the bottom of the spout hole. Weave in any remaining loose ends.
Just one last thing left to do now. Boil the kettle and make a brew…enjoy and admire.
NB/ TIPS FOR ALTERING THE SIZE OF THE cosy…regularly check the size of the cosy on your teapot. The body of the cosy has the same amount of stitches as row 1, if yours is more or less than 80sts then keep the number of sts you have up to row 28 in order to create the handle and spout holes, place around your teapot and mark with tie markers as described then count your sts between each marker and substitute your numbers into the pattern.
xxxxx
Grandma Mary Tea Cosy part of the Grandma Collection ©2016 designed by Nicola Florence @ayarnyrobin
Share this:


The Grandma Mary Tea Cosy
Introducing the ‘Grandma Mary’ tea cosy…the first in the Grandma Collection
Dedicated to my Grandma Mary who was a truly inspirational woman. Born in October 1916 and christened Vera Mary, she grew up in England in the West Midlands and trained as a primary school teacher. I was privileged to have had her in my life for 34 years before she left this world at the grand old age of 94. Granny Mary played a huge part in nurturing my creativity as a little girl, teaching me how to make pompoms and to French knit using a wooden cotton reel and some nails that my Grandad would have made. She was a gentle and patient woman, who always had a smile and a piece of chocolate. I once asked her what the best invention of her life time had been and without hesitation she quipped…’washing up liquid!’

Granny Mary worked hard, but always took time to make things pretty… whether that was pansies in the garden, geraniums in the porch, sugar on a peeled apple, a pretty apron whilst doing the housework or a tea cosy for the teapot.
Prettiness was important because it was the way she cared for people and her care was a true blessing.

So this cosy had to be pretty, in colours that evoke memories of her and of course had to be covered in flowers.

The beads at the bottom of the cosy actually belonged to her. I have a bag of broken plastic beads that she gave me – she never threw anything away!
I am honoured to put them to good use…I think she would be really very pleased with their new use.


