Tag: colour


#HOBCAL
Following on from my epic fail I sought solace in my ironing pile and some of my favourite crochet podcasts.
It was whilst watching one of these podcasts that I stumbled upon the perfect remedy for my misery…a CAL (crochet-a-long)!
So, with much excitement I ordered my yarn and made a start. 
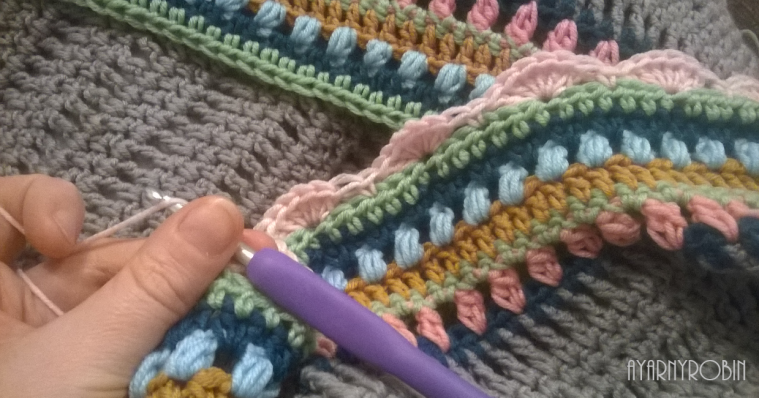
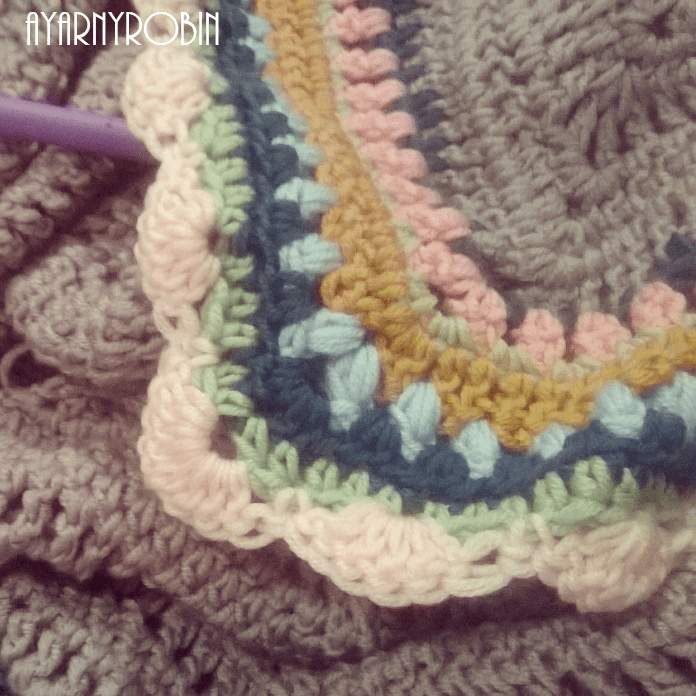
The pattern is written so well but is challenging my skills also. The design is amazing; I love how the different elements of this shawl work with one another.

I think this CAL runs until the end of May, so if you are looking for a challenge and want to join in it is not too late.
Here are all the details you need:
Hotel of Bees pattern
CAL hosted by Cherry Heart and Betsymakes
Ravelry group
search #HOBCAL
xxxxx
Share this:


daffodils

seedlings

pretty colour
 () ()")
Jess just chilling

Flaming peris

bleeding hearts

Easter Tree

pretty whites

helebres

lemon daffodils

climbing clematis
")
Mr Alf

heuchera

bridal spray spirea
Hello Spring…
Share this:


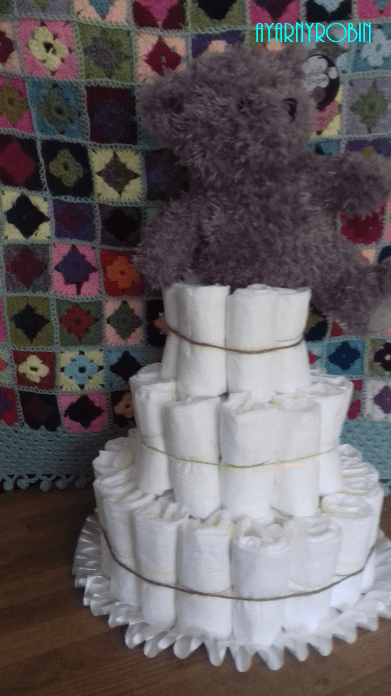
Baby Shower Diaper Cake…
Take a look at this little creation I just made…

Sweet Dreams Diaper Cake

add your decorations.

aqua and grey elegance
I would have adored one of these when I was expecting! So, I got to work constructing my diaper cake as soon as I received my friends baby shower invitation.
There are lots of tutorials on the web about how to make your own diaper cake, but I did take photo’s of each step and have included them below.
I found the hardest part of creating a diaper cake was deciding on the colours and of course a theme!
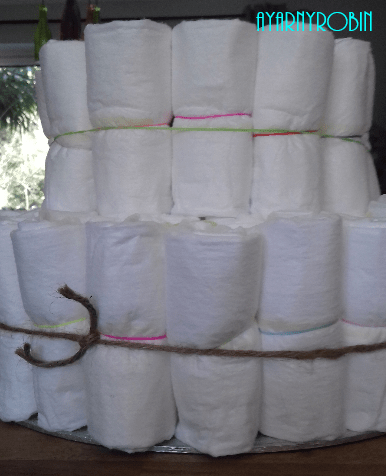
I used an old cake board, a kitchen roll tube, card, scissors, sticky tape, hot glue gun, elastic bands, string, ribbons, a teddy, ‘sweet dreams’ bunting and some artificial daisies and about 64 size 2 diapers (nappies).
So this is how I made mine…
Step 1:

I used the kids loom bands to secure, but elastic bands would work too.
Step 2:
 Using the scissors snip approx. 1cm around one end of the kitchen roll.
Step 3:

Step 4:

Begin placing rolled up diapers around the base of the tube, in x3 rounds. Secure each round with an elastic band or tie with string. If tying with string keep loose ends short and tuck any remaining ends in between the diapers as you go to keep your cake looking neat.
Step 5:

Step 6:
Now, at this point, the kitchen tube, disappeared as you can see in the photo above, as the height of the tube was equal to the height of the second tier.
You don’t really need to worry if your cake topper is rigid or small. But, as my topper was a cute little bear, that was quite floppy and soft, I added an extension to my tube in the form of a bit of plastic pipe, Mr R had spare.
If you need to extend your tube, card would suffice at this point, but as I did not have any I went with the plastic pipe.
To secure Mr Bear, I tied his leg with a bit of string and threaded the string through the pipe, securing the string at the bottom of the pipe with sticky tape. I then placed the pipe inside the kitchen tube, before proceeding with step 7.
You may find you can go straight to tier 3 and decorate with your topper once tier three is insitu, it will just depend upon what you have chosen for your decoration.
Step 7:
Step 8:


Just like so.
Step 9:


And there you have it.
I just love this sweet dreams theme in aqua and grey. The little yellow centres in the daisies and Mr. Bears matching bow tie add a little extra zing!
It looks so elegant and I have had so many gushing comments about it and requests to make more I may just have to!
If this inspires you to make a diaper cake I would love to see your pictures, your colours and your themes and just how your imagination runs away with this quick and simple project.
xxxxx
Share this:


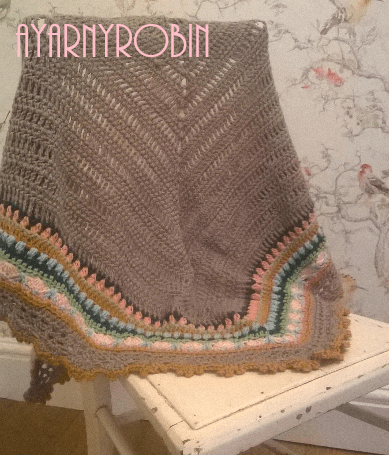
Sunday Shawl Love…
This is my Mellow Sunday Shawl by Alia Bland.

I want to start by telling you how amazing this is to hook, how simple, yet stunningly beautiful.
I want to tell you how deliciously soft scheepjes merino is and how it creates such a gorgeous stitch definition.
I want to shout with joy at just how happy I am with these amazing mellow colours; but that will all become obvious when you see the pictures!
I started with this serene grey

This was a therapeutic hook, the subtle tone of the yarn, and the ease of the pattern made for a quick hook up of the main body. I really enjoyed that each stitch was made in between the stitches of the previous row and not in the top of the stitches as is usual.
My heart was skipping towards the next colour though. A teal; and one of my favourite colours of all time.

Next a perfect pink…

This yarn is a dream, it is a dk weight, but it has a satisfying plumpness to it, making it pleasantly squashy! This pale pink was followed by an equally gorgeous spring green.

The quick colour changes make this pattern good for the soul…you know how I love colour.

This mustard colour makes me very, very happy, but then so does this sky blue…

And so this enjoyable colour changing border continued…


 Until my heart near burst as the pattern instructed me to hook scallops and I politely introduced this even paler pink.
Just as I was getting a little too giddy with these colours, the pattern rescued me with a tad more grey; sobering me and gently grounding me.

I had a dilemma deciding on which colour to finish this charming shawl with…

in the end it had to be the mellow mustard (Van Gough 641).
I have a lot of love for this shawl and this yarn, so excuse my indulgence in a few more photo’s.
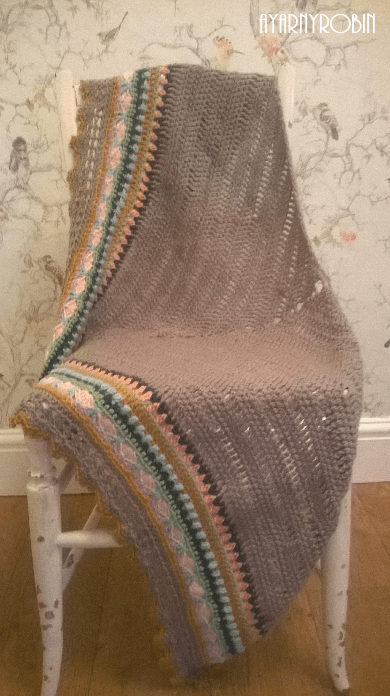
Details of the pattern and yarn, which I highly recommend can be found by clicking on the links at the top of this post, but just in case you can’t be bothered they are just here to.
xxxxx
Just as a footnote: this review contains my genuine opinions on this pattern and this yarn, for which I am not being paid.
Scheepjes merino soft yarn in
Kandinsky 625 50g
Degas 632 50g
Van Gough 641 50g
Titian 647 50g
MagrittE 614 50G
Ansingh 643 50G
Lowry 604 250G
purchased from Woolwarehouse
Pattern: The Sunday Shawl by Alia Bland.
Share this:


Chain Reaction Necklace Scarf…
Here is a quick pattern for a necklace scarf.
A simple but stunning item that you can make if you are new to crochet, or have an odd 50g ball of chunky yarn that your not sure what to do with, or if you need to hand make a present emergency style!
Yep, this beauty takes about an hour to make at most and the pattern (if you can call it that!) is just below.

You will need 50g of chunky yarn and a large hook. I used

 and a 6mm hook.
So you have probably guessed it….begin making chains and don’t stop until you have about 50cms of yarn left.
Randomly tie the first part of a bow to form a loose knot in your chains at random sections down its length.

Now join with a slip stitch into the very first chain to make an enormous loop.
It may be a good idea to secure the stitch with a stitch marker or safety pin so that your chains do not unravel during the next part.
Now find something to put your enormous loop of chains around… I used the stair post at the bottom of the stairs.
Start to make the loop smaller by crossing over the chains and hooking back over the post…or whatever you are using. Repeat the process until you have a handful of loops; that when placed around your neck fall just at the top of your tummy.
Next, you need to secure your loops together. To do this
remove the stitch marker / safety pin and reinsert your hook.

Pull the loop onto your hook to make the yarn looser. Now complete a giant double crochet (single crochet – American terms)… to do this take your hook under the handful of looped chains, yarn round hook and pull through, yarn round hook and pull through 2 loops on hook. Repeat x 9 more times. Fasten off and weave in any loose ends.

Told you it hooked up quick!
xxxxx
Share this:

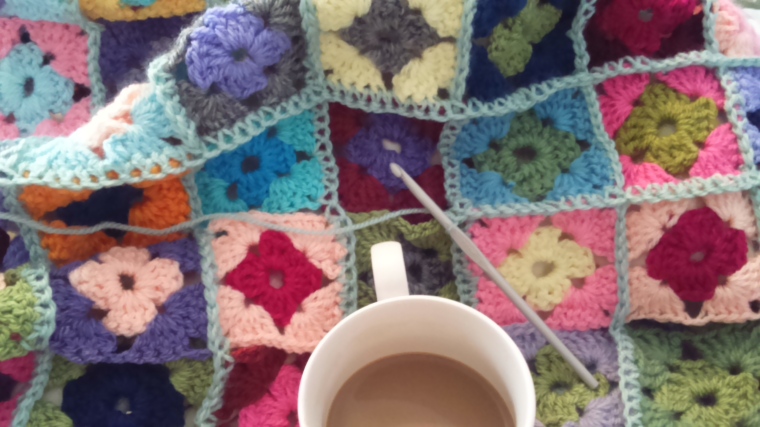
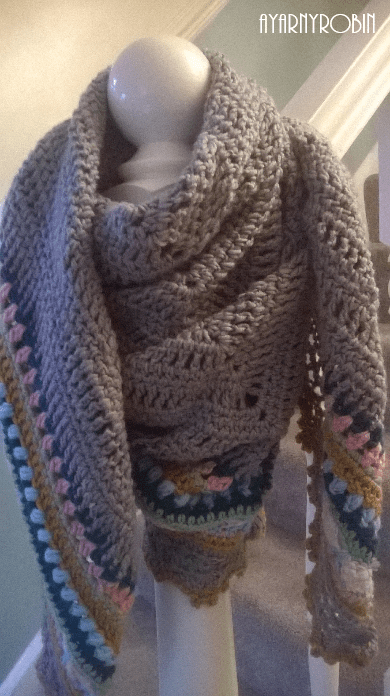
Favourite thing I’ve made…
Day 28 of
#yarnlovechallenge
and this is the final day!!
The theme for today is ‘favourite thing I’ve made’.
Now really…do I have to choose?
Ok…well just for today this is my favourite hook up,

because I adore the colours and that bobble edge border is just sooo super cute, and possibly the most addictive thing ever to hook. Seriously, it should come with a warning!
xxxxx
Share this:

Blocking…
Day 27 of
#yarnlovechallenge
and we are almost at the end now.
The theme for today is ‘blocking’.
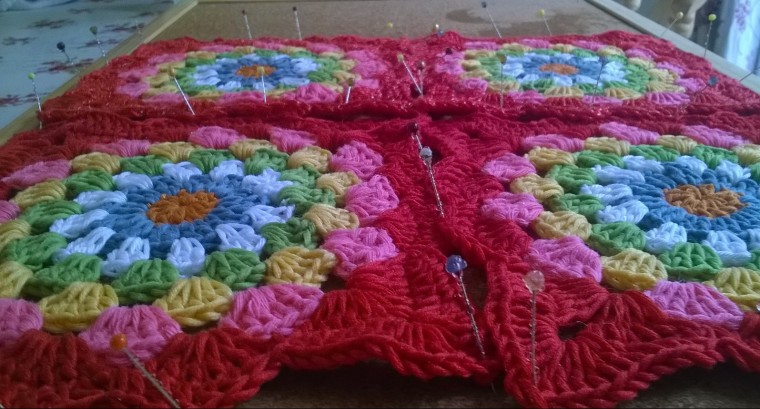
Not my favourite part of the process, but certainly worthwhile. These are my robin nest squares in the blocking phase.
xxxxx
Share this:

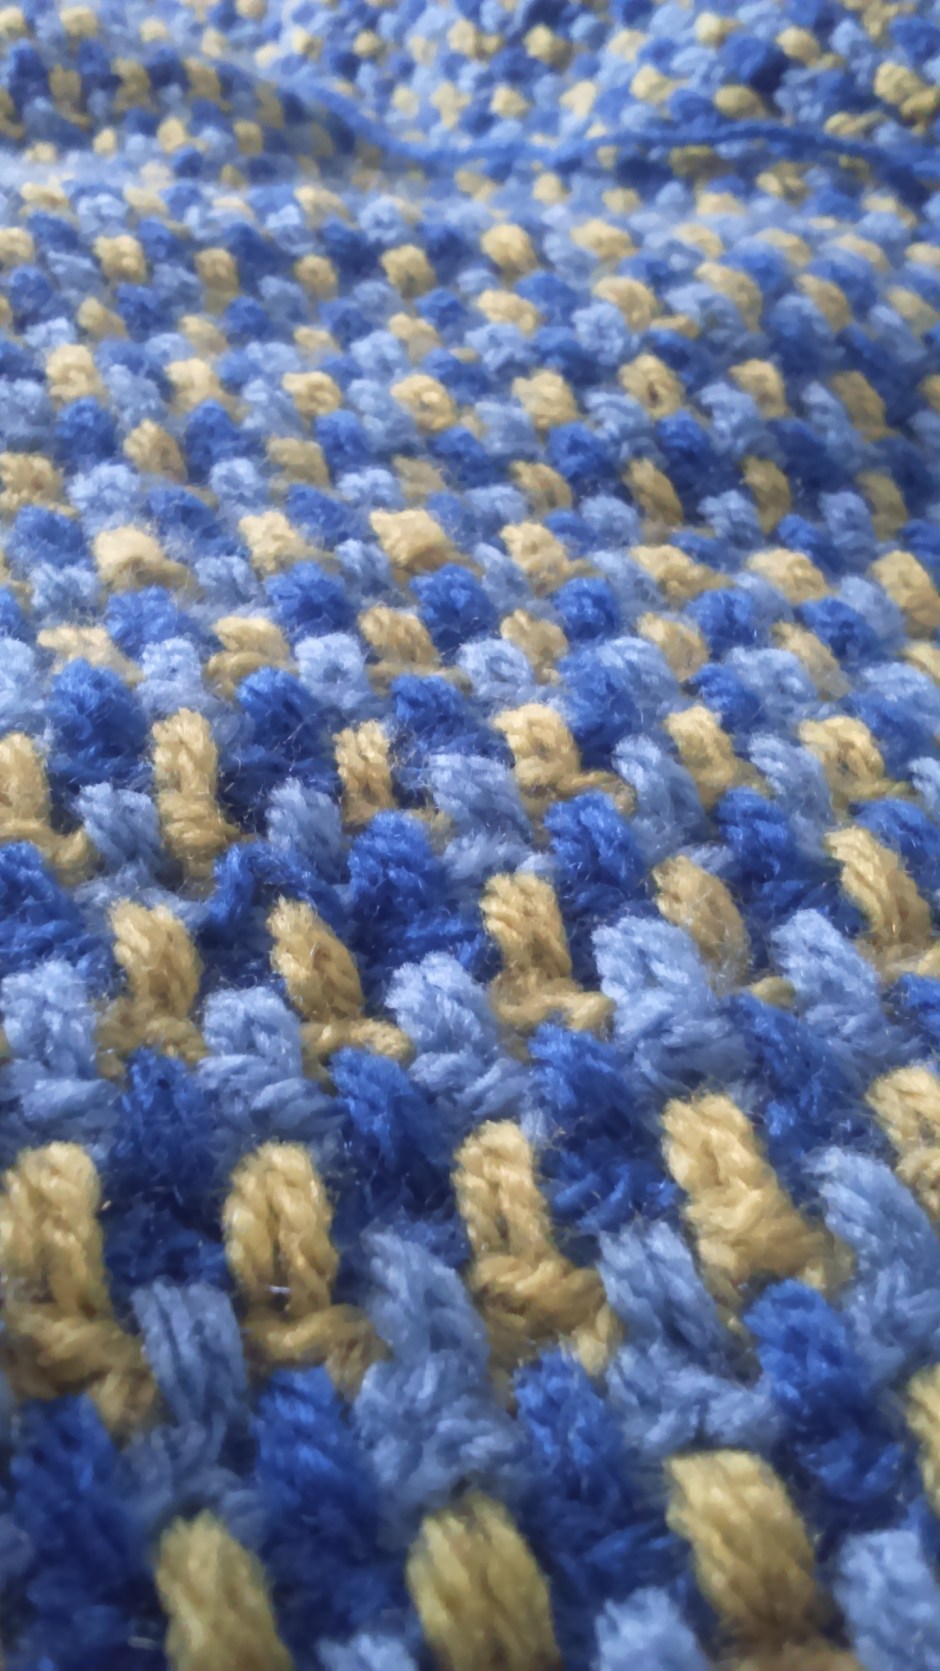
Newest stash…
Day 26 of
#yarnlovechallenge
and we are almost at the end now.
The theme for today is ‘newest stash’.

This is luscious Scheepjes Merino Soft that was delivered just the other day by the fabulous folk over at Woolwarehouse. They have always given a prompt and excellent service and have a fabulous range of yarns.
This lovely collection of yarn is soon to be hooked up into the even lovlier Sunday Shawl.
Share this:

Routine…
Day 25 of
#yarnlovechallenge
and it’s still not too late join in.
The theme for today is ‘routine’.